Download

1 / 29
290 likes | 465 Views
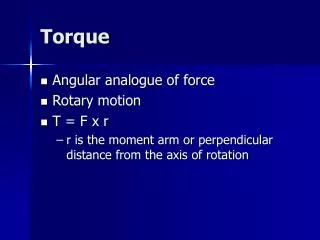
Torque Basics. CIS 487/587 Bruce R. Maxim UM-Dearborn. Goals. Based on the tutorial example shipped with the Torque (TGE) game engine Build a simple 3D game Show basic use of the world, terrain, and GUI editors Demonstrate use of Torque Script in client/server programming. Where to begin?.

E N D
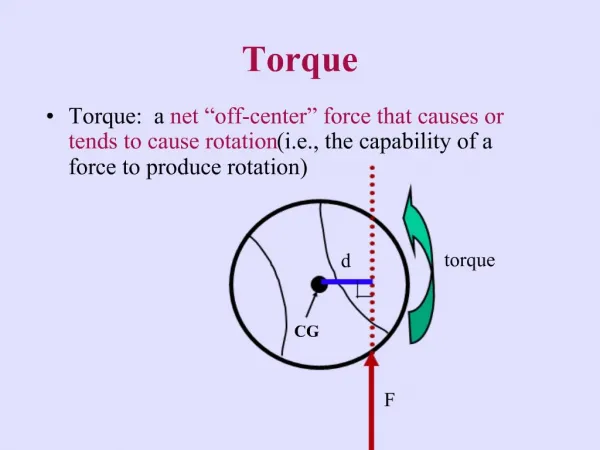
Torque Basics CIS 487/587 Bruce R. Maxim UM-Dearborn
Goals • Based on the tutorial example shipped with the Torque (TGE) game engine • Build a simple 3D game • Show basic use of the world, terrain, and GUI editors • Demonstrate use of Torque Script in client/server programming
Where to begin? • Start in the directory C:Torque/SDK/Example • Clicking on the torqueDemo icon starts a windows executable that will process the script stored in the file main.cs found in the same directory (by default) • This brings up a splash screen with several links
Using the Links • You need Internet connectivity to use several of the links • There are also links to the Torque editors, console, and exit • Typing quit(); in the console command line also allows you to exit the tutorial
Building a Game • Start by making a copy of the folder tutorial.base called GameOne • Use NotePad to edit the main.cs script file in the GameOne folder • Change line that describes the game to read $defaultGame = “GameOne”; • Save your changes
GameOne Folder • client • contains several client scripts and ui folder (graphics and widget scripts) • data • contains resources (models, textures, sounds, scripts associated with resources) • server • several server scripts Note: xxx.cs.dso files contain compiled xxx.cs code
World Editor • The World editor link on the demo splash screen loads a mission that can be edited • F2 - turns off the inspector windows • F11 - toggles World Editor on or off • F10 - toggles GUI Editor on or off
Movement • Camera view • Alt-C - camera/player toggle • R-Click-drag - look around • W, A, S, D - walk around • R-Click-Tab - toggle 3rd person player view • Alt-Q - drop camera at player • Alt-W - drop player at camera • Camera menu is in the World editor
Terrain Shaping • Move camera so you look down on the player off to the side and select the Terrain Editor • Adjust Brush size (Ctrl-Z or Menu) • Use Mouse to adjust height (determined by Action menu setting) • Relight the scene from Edit menu • The Player may end up underground if you are not careful toggle camera mode (Alt-C) and drop camera at Player (Alt-W) to check
Terrain Painting - 1 • Return to Camera view (Alt-C) and select Terrain Texture Painter from Window menu • Select change under the checkerboard box • Find the file sand.jpg in the folder GameOne/data/terrains and press load • This changes everything to sand
Terrain Painting - 2 • Select change under one of the empty boxes • Locate patchy.jpg file in the folder GameOne/data/terrains and press load • The Action menu item has changed to Paint Material • Select a Brush and paint some of the hills (relighting not necessary)
Terrain Painting - 3 • Terrain looks great from a far but not up close • To add a detail texture, go to the World Editor Inspector and select the Terrain TerrainBlock from the MissionGroup • In the Media section find the detailTexture browse button and load Game/One/terrains/detail1.png • Save your mission using the file menu as GameOneMission.mis in the folder GameOne/data/missions
Placing Objects - 1 • Change to Camera view and select the World Editor Creator item in the Window menu • Default action is to drop item at screen center so rotate screen so center is on the ground • Expand Shapes in lower window, drill down to TorqueLogo, mouse click on this item will place it in the center of the screen • Be careful it is easy to put things underground or in the air where they are nor visible to the Player
Placing Objects - 2 • The number under an object is its number (null is its default name) • The axis lines can be used to drag object to a new point • The object can also be moved by going to the World Editor Inspector and selecting it from the Tree • Object attributes can be modified in the Inspector window as well (remember to use the Apply button before you Save)
Interiors • Shapes are based on .dts files interiors are based on .dif files • Interiors are placed using the World Editor Creator • Go to Interiors/GameOne/data/interiors and drill down to place a box on the screen • Relight the terrain when prompted • Move the box so it is not on a hill and its floor is level with the ground (so the Player can enter the box and explore it) and save it
Organizing Objects • You can create folders called SimGroups to hold related objects • Expand the MissionObjects/System/ in the World Editor Creator • Click on the SimGroups item and use the dialog box to create a logos SimGroup and drag each of the logo items to the logos SimGroup (name is important for scripting) • Create a buildings SimGroup for the box and then save your work
Graphical User Interface - 1 • Return to the TGE main page by quitting the World Editor (File – Quit) or Restart Torque • To Select the GUI editor or use F10 • You will see 3 buttons on the left side of the screen • New Control • MainMenuGui • 640 x 480
Graphical User Interface - 2 • Select MainMenuGui in the Tree view • Scroll down in the inspector window and find the bitmap field • Change background to gameonebg and hit Apply • You can remove the buttons from the top, but if you do you should add a Start and Quit button
Graphical User Interface - 3 • To add a button use the New Control drop down menu and select GuiButtonCtrl • Drag the button to its desired location • Change the text field from ‘Button’ to ‘Start’ and type “loadMyMission();” in the command field then hit Apply
Graphical User Interface - 4 • You might also want to go back and change the horizSizing and vertSizing to relative and hit Apply and Save again • To create a Quit button, repeat process and label the control with ‘Quit’ and enter “quit();” in the command field of the new button
Graphical User Interface - 5 • To add a score counter use the Start button to enter the game • Use F10 to open the GUI editor and select PlayGui from the pull down menu • Add the new control by selecting the GuiTextCtrl from the pull down menu • Enter ScoreCounter in the name field
Graphical User Interface - 6 • In the General section enter Score: 0 in the text field • In Parent section change the profile to GuiBig TextProfile from the menu (…) • Use the Apply button and Save
Scripting - 1 • Find the script logoitem.cs in the Windows folder GameOne/server • Enter the following function at the end function TorqueLogoItem::onCollision(%this, %obj, %col) { // collision function for all Torque logo shapes // %this – data block // %obj - object itself // %col - object that collided with %obj
Scripting - 2 // check for logo collision with player object if(%col.getClassName() $= "Player") { // %client becomes client whose player hit logo %client = %col.client; // increment score and message with score to client %client.score++; commandToClient(%client, 'SetScoreCounter', %client.score); // remove object from logos %obj.delete();
Scripting - 3 // find out how many logo items remain in logos %logoCount = logos.getCount(); // if more logos remain continue game if(%logoCount > 0) return; // otherwise have client display victory screen commandToClient(%client, 'ShowVictory', %client.score); } }
Scripting - 4 • Open the folder GameOne/client and create a new text file containing the following functions in a file called clientGame.cs function clientCmdSetScoreCounter(%score) // This function processes the onCollision server call // commandToClient // (%client, 'SetScoreCounter', %client.score); // // replaces text in GuiTextCtrl in play screen { ScoreCounter.setText("Score:" SPC %score); }
Scripting - 5 function clientCmdShowVictory(%score) // this function processes the server call // commandToClient // (%client, 'ShowVictory', %client.score); // // displays a message box to get user choice { MessageBoxYesNo("You Win!", "Would you like to restart the game?", "loadMyMission();", "quit();"); }
Scripting - 6 • Last we need to add a line to file main.cs in the folder GameOne/main.cs • This line goes at the end of the Client scripts section to link our new script into the game exec("./client/clientGame.cs"); • Now all that’s left to do is play test the final game and fix any problems
Scripting - 7 • One of those problems is getting the Score to display as 0 when the mission reloads • Add these lines to function onMissionLoaded( ) in the file game.cs found in the folder GameOne/server/game.cs %score=0; ScoreCounter.setText("Score:" SPC %score);