Download

1 / 13
130 likes | 315 Views
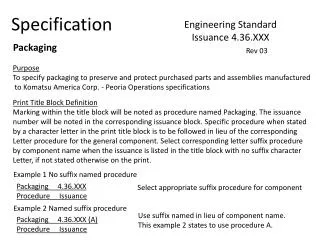
IP-700 Specification. Video input Supporting NTSC/PAL system Video compression H.264 baseline profile@ Level 2.2 Video resolution PAL: 320*240 (QVGA), 640*480 (VGA)NTSC: 320*240 (QVGA), 640*480 (VGA) Video parameter adjustment

E N D
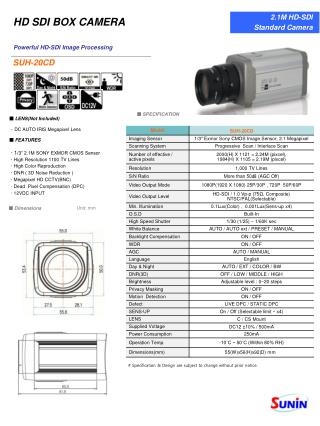
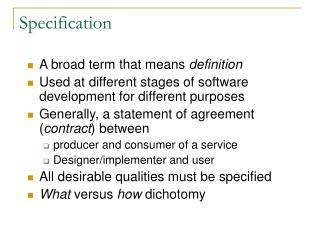
IP-700 Specification Video input Supporting NTSC/PAL system Video compression H.264 baseline profile@ Level 2.2 Video resolution PAL: 320*240 (QVGA), 640*480 (VGA)NTSC: 320*240 (QVGA), 640*480 (VGA) Video parameter adjustment Brightness, chrominance, contrast, saturation, and image quality CMOS parameter adjustment Automatic White Balance (AWB), Automatic Gain Control (AGC), Backlight Compensation (BLC), Automatic Light Control /Electronic Light Control (ALC/ELC) Stream format Pure video stream or composite video & audio stream Video frame rate PAL: 1 – 25 frame/second; NTSC: 1 – 30 frame/second; Video compression code rate 16Kbit/S ~ 8Mbit/S Audio input One linear input, impedance: 2.2KΩ Audio compression G.726 Audio output One linear output Call input One microphone input, built-in/external optional, red for built-in and white for external Communication interface One 10M/100M adaptive Ethernet interface Input power DC 12V 1A Maximum power Less than 5W Operating temperature -10 ~ +55ºC Operating humidity 10 ~ 85% Storage temperature -20~+70 ºC System requirement Operating system: Microsoft Windows 98/2000/ME/NT 5.0/XP/VistaBrower: Microsoft Internet Explorer 6.0 or later version Wi-Fi module Infrastructure mode Dimensions (W´D´H) 104 ´ 125 ´ 106mm Weight (approx.) 252g
Step 1 • Plug one end of the Ethernet cable into the Ethernet port on the back of your camera, and the other end into your router. • Then plug the power adaptor into a power socket, and the cable to the power slot on the back of your camera. • Once you insert the power cable, the Power indicator light should turn green, and after a few seconds, the camera will also automatically start to pan and tilt; this is normal.
Step 2 • Please check the Network Indicator on the front of the camera to make sure that the light is green; this indicates that the camera is connected to the Internet. If there is no green light, then recheck your router to make sure that it is working and also check that the Ethernet cable is securely plugged into the camera and router.
Step 3 • Next, go to http://astak.yoics.com
Step 4 • Click on the “Signup” button. A form will appear - please fill it out and then click on the “Register” button.
Step 5 • Then you will find the following page: • Click on the “Complete Registration” link.
Step 6 • Then on the “register new devices” page, type in a name for your camera in the “Yoics Device Name” box. (For example, “Amy’s camera” is shown in the picture below.) Then click the “Register Now” button.
Step 7 • In a few minutes, you should receive a registration confirmation email from Yoics at the email address you entered in the form. You will also be redirected to this webpage, shown below. Under the My Stuff , click on the name you gave your camera.
Step 8 • You will see a pop-up window • Type in “admin” as the default Username, and “admin” as the default Password. You are free to change the username and password later if you wish. Then click on OK.
Step 9 • Congrats! Now you have finished the registration process. You are now on the camera’s browsing interface, and you should be able to see input from the camera on your computer screen. Note: if you want to login to this browsing interface from another computer, just go to http://astak.yoics.com and enter your username and password.