Download

1 / 11
110 likes | 391 Views
6/2 Serve = BASE DEFENSE – Perimeter Rotations 1 - 6. OH. MH. RS. OH2. S. MH2 L1. BASE = Player main position after serve / receive first ball or after serve. 6/2 Serve = BASE DEFENSE – Perimeter Block Opponent OH Hit – Go Gap / Our Right Side Block. OH. MH. RS. OH. OH2. S. MH2

E N D
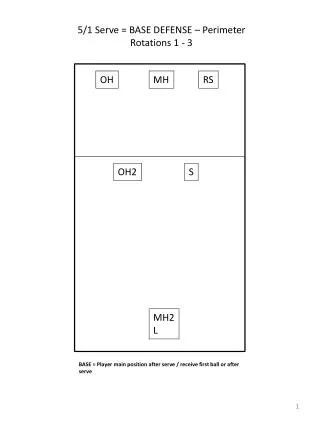
6/2 Serve = BASE DEFENSE – Perimeter Rotations 1 - 6 OH MH RS OH2 S MH2 L1 BASE = Player main position after serve / receive first ball or after serve
6/2 Serve = BASE DEFENSE – Perimeter Block Opponent OH Hit – Go Gap / Our Right Side Block OH MH RS OH OH2 S MH2 L1 RS = Moves out to Opponent OH places LEFT HAND on the ball and wrap RIGHT Hand around the ball. MH = Moves out to our OH and blocks with RS OH1 = Moves to 5’ and covers tips & balls off block OH2 = Off the MH inside shoulder and sees the hitter off that shoulder L1 = Sees Hitter in Split and moves off the what they see hitter shoulders & block. S= Moves to RIGHT sideline with RIGHT foot on side line & Hands Up.
6/2 Serve = BASE DEFENSE – Perimeter Block Opponent OH Hit – 3 Gap / Our Right Side Block OH MH RS OH OH2 S MH2 L1 RS = Sits in 3 Gap – Yells 3 - places LEFT HAND on the ball and wrap RIGHT Hand around the ball on block. MH = Moves out to our OH and blocks with RS OH1 = Moves to 5’ and covers tips & balls off block but out closer to side line OH2 = Off the MH inside shoulder and sees the hitter off that shoulder L1 = Sees Hitter in Split and moves off the what they see hitter shoulders & block. S= Moves to RIGHT sideline with RIGHT foot on side line & Hands Up.
6/2 Serve = BASE DEFENSE – Perimeter Block Opponent MH Hit – A Gap Attack MH MH RS OH S OH2 MH2 L1 MH = Moves to Opponent MH places RIGHT hand on ball LEFT hand wraps. RS = Moves over to MH and double blocks OH1 = Moves to 10’ corner off MH inside shoulder and covers tips & balls off block OH2 = Off the MH inside shoulder and sees the hitter off that shoulder L1 = Sees Hitter in Split and moves off the what they see hitter shoulders & block. S= Moves to RIGHT sideline off the RS outside shoulder ready for dig & tips
6/2 Serve = BASE DEFENSE – Perimeter Block Opponent MH Hit – B Gap Attack MH MH RS OH S OH2 MH2 L1 RS = Sits in 3 Gap – Yells B - places LEFT HAND on the ball and wrap RIGHT Hand around the ball on block. MH = Moves out to our RS and blocks with RS OH1 = Moves to 5’ and covers tips & balls off block but out closer to side line OH2 = Off the MH inside shoulder and sees the hitter off that shoulder L1 = Sees Hitter in Split and moves off the what they see hitter shoulders & block. S= Moves to RIGHT sideline with RIGHT foot on side line & Hands Up.
6/2 Serve = BASE DEFENSE – Perimeter Block Opponent MH Hit – Slide Attack MH OH MH RS S OH2 MH2 L1 OH = Sits in Go Gap– Yells SLIDE - places RIGHT HAND on the ball and wrap LEFT Hand around the ball on block. DO NOT FLOAT OUT TO ANTENNA! MH = Moves out to our OH and blocks with OH RS = Moves to 5’ and covers tips & balls off block but out closer to side line OH2 = LEFT foot on LEFT side line ready to dig hard hit ball L1 = Sees Hitter in Split and moves off the what they see hitter shoulders & block. S= Moves to RIGHT off MH inside shoulder and prepares for a dig & SETTER OUT Call.
6/2 Serve = BASE DEFENSE – Perimeter Block Opponent RS Hit – D Gap Attack RS OH MH RS S OH2 MH2 L1 OH = Sits in Go Gap– Sets Block - places RIGHT HAND on the ball and wrap LEFT Hand around the ball on block. DO NOT FLOAT OUT TO ANTENNA! MH = Moves out to our OH and blocks with OH RS = Moves to 5’ and covers tips & balls off block but out closer to side line OH2 = LEFT foot on LEFT side line ready to dig hard hit ball L1 = Sees Hitter in Split and moves off the what they see hitter shoulders & block. S= Moves to RIGHT off MH inside shoulder and prepares for a dig & SETTER OUT Call.
6/2 Serve = BASE DEFENSE – Perimeter Block Opponent RS Hit – C Gap Attack RS OH MH RS OH2 S MH2 L1 OH = Steps Into C Gap– Yells C- places RIGHT HAND on the ball and wrap LEFT Hand around the ball on block. MH = Moves out to our OH and blocks with OH RS = Moves to 5’ and covers tips & balls off block but out closer to side line OH2 = LEFT foot on LEFT side line ready to dig hard hit ball L1 = Sees Hitter in Split and moves off the what they see hitter shoulders & block. S= Moves to RIGHT off MH inside shoulder and prepares for a dig & SETTER OUT Call.
6/2 Serve = BASE DEFENSE – Perimeter Block Free Ball Coverage – Base to Release OH MH RS OH2 S MH2 L1 BASE – To Release – All yell FREE!
6/2 Serve = BASE DEFENSE – Perimeter Block Free Ball Coverage – Base to Release S OH MH RS OH2 MH2 L1 OH – Releases to 10’ and then transitions out to ATTACK MH – Releases to 10’ and then transitions to ATTACK RS – Switches with SETTER and gets 15’ on RIGHT side line and then ATTACKS S – Switches with RS and releases to SETTER base and runs play OH2 – Release back into lane between OH1 & MH then covers. L1 – Release over to lane between MH & RS then covers ***Pass must be a TEMPO 1 pass to SETTER and then run quick sets with motion on front row**
6/2 Serve = BASE DEFENSE – Perimeter Block Down Ball Coverage – Base to Release MH S OH RS OH2 MH2 L1 OH – Releases to 120’ and then transitions out to ATTACK MH – BLOCKS and then transitions to ATTACK RS – Switches with SETTER and gets 18’ on RIGHT side line and then ATTACKS S – Switches with RS and releases to SETTER base and runs play OH2 – Release back into lane between OH1 & MH then covers. L1 – Release over to lane between MH & RS then covers