Download
1 / 17
170 likes | 261 Views
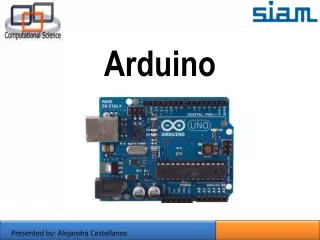
Arduino Part 2. Topics: Serial Communication Programming Constructs: functions, loops and conditionals Digital Input. Serial Communication. todbot.com/blog/bionicarduino. todbot.com/blog/bionicarduino. Serial Communication. Compiling turns your program into binary data (ones and zeros)

E N D
Arduino Part 2 Topics: Serial Communication Programming Constructs: functions, loops and conditionals Digital Input
Serial Communication todbot.com/blog/bionicarduino
Serial Communication • Compiling turns your program into binary data (ones and zeros) • Uploading sends the bits through USB cable to the Arduino • The two LEDs near the USB connector blink when data is transmitted • RX blinks when the Arduino is receiving data • TX blinks when the Arduino is transmitting data todbot.com/blog/bionicarduino
First Program /* * Hello World! * From www.ladyada.net * It shows how to send data to the computer */ void setup() // run once, when the sketch starts { Serial.begin(9600); // set up Serial library at 9600 bps Serial.println("Hello world!"); // prints hello with a line break } void loop() // run over and over again { // do nothing! }
Modify the Program (each bullet is a different mod) • Move Serial.println("Hello world!"); to loop() • Add the following to setup(): int a = 5; int b = 10; Serial.print("a + b = "); Serial.println(a + b); • Replace the code above with the following:
Conditional Statement if (someCondition) { // do stuff if the condition is true} else { // do stuff if the condition is false} modelect.wordpress.com
int printMessage = 1; void setup() { Serial.begin(9600); } void loop() { if (printMessage == 1) { Serial.println("Message"); printMessage= 0; } else { Serial.println("NO Message"); printMessage= 1; } } Conditional Statement int printMessage = 1; void setup() { Serial.begin(9600); } void loop() { if (printMessage == 1) { Serial.println("Message"); printMessage= 0; } }
while Loop while(expression){ statement(s); } www.toves.org Example int var = 0;while (var < 200) { // do something repetitive 200 times var = var + 1;}
while Loop void setup() { Serial.begin(9600); int count = 0; while (count < 5) { Serial.println("Hello world!"); count = count +1; } } void loop() { }
for loop www.visualcplusdotnet.com martin-thoma.com
for Loop void setup() { Serial.begin(9600); for (int count = 0; count < 5; count++) { Serial.println("Hello world!"); } } void loop() { }
Functions • loop() and setup() are procedures • You can create you own functions void setup() { } void loop() { } Both setup() and loop() have no parameters and return no values arduino.cc
Functions: Example 1 learn.parallax.com
Functions: Example 2 learn.parallax.com
Digital Input (introducing the switch) Create the circuit above and then run File -> Examples -> Digital -> Button push-button switch www.ladyada.net/