Download
1 / 41
410 likes | 629 Views
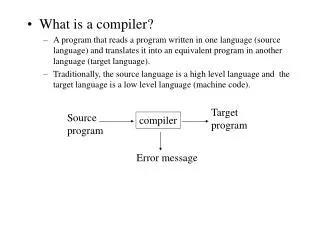
Using a PC Compiler. This term you can create programs on UNIX or you can create programs using any C++ compiler (on your own computer). There is open source software available for free, so you don’t have to buy a compiler…. This is for fun and it not required!. Some of the Choices.

E N D
Using a PC Compiler This term you can create programs on UNIX or you can create programs using any C++ compiler (on your own computer). There is open source software available for free, so you don’t have to buy a compiler…. This is for fun and it not required!
Some of the Choices • In CS161 our focus is on problem solving and learning how to apply these solutions to a high level programming language, like C++ • We will also compare this to C and Java frequently, other high level languages • You can work with graphics, if you want to challenge yourself (and have fun), but there is no requirement that you do this.
Some of the Choices • If you want to work on your own PC with a C++ compiler, rather than being logged in remotely to the PSU systems • You have many choices – there are many compilers available for free download • Many provide Integrated Development Environments (IDE’s) • Which just means they have a graphical front end and aren’t just text based when you enter in your program.
Some of the Choices • Some of your choices are (for free) • Dev-C++ • Visual Student C++ Express 2008 • NetBeans • Eclipse for C++ • These all support the basic language features • But, they are not equal in terms of computer graphics
Some of the Choices • Here is how they rank… • Dev-C++ provides a single graphics.h library that we use for in-class demos. It is easy to use. • It is limited in support and functionality • But it is easy to use! • Visual Student C++ Express 2008 • NetBeans is an environment a lot of Computer Science students use, but it doesn’t support graphics.h by default • Eclipse for C++ requires more advanced OpenGL programming, which is beyond the scope of CS161 • By the time you take CS202 you’ll want to be fluent with Eclipse
What is Dev-Cpp? • Dev-C++, developed by Bloodshed Software, is a fully featured graphical IDE (Integrated Development Environment), which is able to create Windows or console-based C/C++ programs. • It is recommended because it is easy to use, doesn’t require knowing a lot to get started, and is a great way to create some fun programs quickly. • It is based on MinGW (Minimalist GNU* for Windows) which uses the same family of compilers that we use on PSU’s unix environment ( a GNU g++ compiler collection). • Although there are some differences, we don’t need to be too concerned with that in CS161. Differences between Cygwin and MinGW for more information. • Links of interest: http://www.bloodshed.net/devcpp.html
What does it allow me to do? • With an IDE, we can do all of our work on our home computer without logging in and without being on the internet. • You can also use some cool features that allow you to turn your screen into a graphical paradise. • In class some programs were demonstrated using Dev-C++ -- such as painting programs, tic-tac-toe, and more.
Where you can get Dev-Cpp… • You can get Dev-C++ as free software (under GPL) but also offers a CD for purchase. • Go to the author’s site to get a list of sites where you can get it: Dev-C++ download sites. (http://www.bloodshed.net/dev/devcpp.html) • You should let the installer put Dev-C++ in the default directory of C:\Dev-Cpp, as it will make it easier to later install add-ons or upgrades. • I downloaded: Dev-C++ 5.0 beta 9.2 (4.9.9.2) (9.0 MB) with Mingw/GCC 3.4.2
How to Install Dev-Cpp… • You can get Dev-C++ as free software (under GPL) but also offers a CD for purchase. • Go to the author’s site to get a list of sites where you can get it: Dev-C++ download sites. (http://www.bloodshed.net/dev/devcpp.html) • You should let the installer put Dev-C++ in the default directory of C:\Dev-Cpp, as it will make it easier to later install add-ons or upgrades. • I downloaded: Dev-C++ 5.0 beta 9.2 (4.9.9.2) (9.0 MB) with Mingw/GCC 3.4.2
Adding in Graphics Capabilities • The graphics functions that we use in examples in this course are not automatically part of Dev-C++, so you would need to download them at: (http://www.uniqueness-template.com/devcpp/graphics.h) • graphics.h (download to C:\Dev-Cpp\include) and • libbgi.a (download to C:\Dev-Cpp\lib) • Then, you must tell Dev-C++ where to find the graphics library! • To do this, go to the Project menu and select Project Options • See the next slide…………..
YOU MUST DO THIS! • After you go to the Project menu and select Project Options • Go to the Parameters tab • In the Linker field, enter the following text -lbgi-lgdi32-lcomdlg32-luuid-loleaut32-lole32 • Click OK
To Configure Dev-C++… • All programming done for CS161 will require separate compilation projects. This process is pretty easy as long as you know what goes where, which we will show in class and demonstrate here in these slides. • The first time you use Dev-C++ you will need to configure it so that it will allow you to more easily get your work done and allow you to perform computer graphics, if you so desire. • Go to the Tools menu and select Compiler Options • In the Settings tab, click on Linker in the left panel and change Generate debugging information to Yes • Click OK
To Create a new Project • Think of a project as a container used to store all of the pieces needed to compile a program • Go to the File menu and select New and then Project • Choose Empty Project unless you use one of the projects I have posted on my website, make sure C++ project is selected • This is also where you will give your project a name. If you reuse a project, you essentially we write over whatever was there, so you will probably want to start with a fresh project name. The name of your project will also be the name of your executable. • Once you have entered a name of your project, click OK • Dev-C++ will then ask you where you want to save your file
Make it a C++ Empty Project • Select Empty Project • Select C++ Project • I checked “Make Default Language • Click OK
Add Source Files • Here are some ways to add source files • Go to the File menu and select New Source File • Or, go to the Project menu and select New File • I like to go to the green + symbol which allows me to add files to this project; you can use it to add one of the examples that has been posted on our website
Opening a Demonstration Program • To open one a file, go to the Project menu and select Add to Project • Or, right click on the project name in the left-hand panel and select Add to Project • Make sure when you are adding a project, that it has a .cppextension. • You can see the contents of the file in the large window by clicking on the name in the left-hand panel
To Compile a Program • Once you have either entered in a program or opened one of the demonstration files, • It is time to compile and run the program • Go to the Execute menu and select Compile • Instead, I use: control key F9 • Errors will display at the bottom window
Running the program! • If there were no errors, you will get in this case both a graphics window and a console window:
Placing graphics.h in the package • I like to put the graphics.h library in the project, so that see a summary of the functions available to be used • So, go back to the green + symbol and select graphics.h from the include directory • From the include directory, select graphics.h:
Select open….you’ll see this…. • Notice the graphics.h in the left-hand window under the name of the project: By Clicking on the graphics.h file name in the left-hand window, that file is displayed now in the large window. Don’t modify this file!
Compile again… • Every time you fix errors or change your program, you will need to compile again • Go to the Execute menu and select Compile • Or use: control key F9 • Errors will display at the bottom window • I made a couple of typos … so you could see what it would look like…..
When we get error messages • Many times, in C and C++ when we get errors, the errors actually occur on the line above • When a compiler encounters something unexpected, it tries to correct the situation, but typically by the next line it can’t resolve it and gives an error • Sometimes the error messages are relevant…but sometimes they are not. • Notice the error occurs in this case on the line above the highlighted line • I mis-typed end (forgot the lower case L after) • I forgot a semicolon!
Disappearing Windows • If you run your program, you may notice the console window flashes (or maybe you don’t even see it), or the graphics window flashes up and goes away • You will need to add at the end code to ask the user to hit enter … to pause the system until the user is ready, for both the graphics window and console window
Console Window • The console window is where all input and output occurs that is normal in C++ • If you say cout << “blablabla”; it will go to the console window • Any use of cout or cin works with the console window…in the same way as we will learn in unix
Graphics Window • The graphics window is where all drawing will occur • cin/cout do not work in the graphics window • We can easily do some basic input, • Single character input from the keyboard • Mouse input
At the end of All Programs • At the end of all programs you will want the following: • For managing the console window: cout <<“Press ENTER to continue…” <<endl; cin.get(); • For managing the graphics window: (you don’t have to do this if you also do the above) outtext(“Hit any Key when Done”); getch();
Some of the Graphics Features • Initialize the graphics window (the maximum width is usually 1024x768 or 1280x1024) initwindow(width,height); • Clearing the graphics window… cleardevice(); • Delay the program, so that users can see what is happening…sending in the number of msec delay(milliseconds); • Wait for a keyboard hit: getch(); or, kbhit();
Setting Graphics Attributes…. • Set Drawing Color (for lines and edges) (colors typically range from 0-15; 0 is usually black and 15 is white) setcolor(color); • Set Background Color (usually for text) setbkcolor(color); • Set Fill Style and Color (for interiors) • Pattern 0-12, 0 = empty, 1 = solid setfillstyle(pattern, color) • Set Line Style and Thickness • Style: 0 = solid, 1 = dotted, 3 = dashed • Thickness is the width in terms of pixels setlinestyle(style, pattern, thickness)
The Current Position…for graphics • Origin on graphics system is Upper Left • So, positive y values move DOWN • X,Y coordinate data are always whole numbers • Setting the Current Position • Move to a current position (x,y are whole numbers) moveto(x,y); • Move relative to the current position moverel(x,y);
Drawing…Lines • Drawing a line • Drawing from Current Position (from current position to the specified coordinate) lineto(x,y); • Drawing relative (a delta amount from the current position) • The delta amounts would be whole numbers linerel(deltax,deltay); • Drawing absolute (from one coordinate to another) linerel(from_x, from_y, to_x, to_y);
Drawing…Areas • Drawing a Circle • Given center and radius as whole numbers circle (center_x, center_y, radius); • Drawing a filled Rectangle (given upper left and lower right corners) bar(ul_x, ul_y, lr_x,lr_y); • Drawing an unfilled Rectangle (given upper left and lower right corners) rectangle(ul_x, ul_y, lr_x, lr_y);
How Text Look…. • Text Formatting • Set the justification • Horizontal: (0 = left, 1 = center, 2= right) • Vertical: (0 = bottom, 1 = center, 2 = top) settextjustify(horizontal, vertical) • Set the text style • Font: (0-11) • Direction: 0 = left to right direction • Character Size: 0 = normal, 6 is really big! settextstyle(font,direction, character size)
Messages in the Graphics WIndow • Text Output • Set Text color (index ranges 0-15) setcolor(index); • Output a message on the graphics window at the current position outtext(“messages on graphics window”); • Output a message on the graphics window at the given x,y coordinate outtextxy(x,y,”message”);
Mouse Input! • Has there been a mouse click? • Right Click is 513 • Left Click is 516 answer = ismouseclick(kind) • Clear the mouse click (if you don’t do this you can’t get the next mouse click!) clearmouseclick(kind); • What was the coordinate when the mouse click happens… x = mousex(); y = mousey();