Download
1 / 23
290 likes | 1.16k Views
android Android -UI. (DMI) Kang GiHoon. Android UI. Android UI 구성요소. TextView , EditText , Button, CheckBox , RadioButton. 다른 View 들을 포함하는 상위 클래스. AlertDialoge , ProgressDialogue. ListView , GridView , Gallery , Sppener,ScrollView 등. LinearLayout,FrameLayout ,

E N D
android Android-UI (DMI) Kang GiHoon
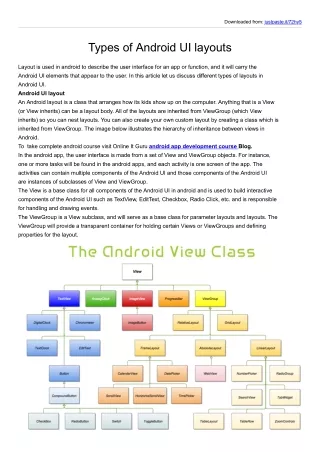
Android UI 구성요소 TextView, EditText, Button, CheckBox, RadioButton 다른 View들을 포함하는 상위 클래스 AlertDialoge, ProgressDialogue ListView, GridView, Gallery ,Sppener,ScrollView등 LinearLayout,FrameLayout, RelativeLayout,TableLayout OptionMenu ContextMenu View 를 기준으로 파생되어 각 Widget과 ViewGroup을 구성한다. Widget 은 button등과 같이 단독 view이다. ViewGroup의 ListView등은 하나이상의 view로 구성된 view들의 집합이다. ViewGroup의 Layout은 포함하고 있는 View에 대한 배치에 대한 정책들을 가지고 있다.
Android UI – View 생성 • android 에서 UI 디자인은 주로 xml 형태로 구성된다. • xml 로 구성된 각 내용은 차후 객체화 되어android 내부의 구별된 id 정보를 바탕으로 application 내에서 참조된다. • R.layout.main : res의 layout 디렉토리의xml 파일의 파일 참조 • R.id.button1 : res의 layout 디렉토리의xml 파일내의 widget id 참조 • Button button= (Button)findViewById(R.id.Button01); • 물론 Application 내에서 동적으로 각 view 의 객체를 생성 할 수도 있다. • Inflator 를 통해 xml 로 구성된 view 파일을 동적으로 생성 할 수 있다. • Button button = new Button(context);
Android UI - Widget ViewGroup제외한 각 class의 subclass • TextView • Button • EditText • CheckBox • RadioButton • .... View class 에서 상속된 Class중에 ViewGroup을 상속하지 않는 클래스를 지칭
Android UI - TextView Text를 표현해주는 View 텍스트를 편집 할 수 없음.
Android UI - Button 기본적인 Text Button View에서 상속받은 onClick이벤트 발생을 통해 어떤 일을 수행.
Android UI – Button의 종류 기본Button외 ImageButton / CheckBox/ RadioButton등
Android UI – Layout • View 의 배치에 대한 정책들을 담고 있다. • ViewGroup으로 부터 파생된 5가지 Layout을 사용 • Layout 하위에 Layout을 만들수 있는 계층구조 가능 • 보통 XML 형식으로 layout을 디자인 하여 layout 다자이너와 개발자를 분리 한다.
Android UI – LinearLayout vertical <?xml version="1.0" encoding="utf-8"?> <LinearLayoutxmlns:android="http://schemas.android.com/apk/res/android" android:orientation="vertical" android:layout_width="fill_parent" android:layout_height="fill_parent" > <TextView android:id="@+id/label" android:layout_width="wrap_content" android:layout_height="wrap_content" android:text="URL" android:paddingTop="15px" android:paddingRight="10px" /> <EditText android:id="@+id/edittext" android:layout_width="wrap_content" android:layout_height="wrap_content" android:text="http://www.chol.com" /> <Button android:id="@+id/ok" android:layout_width="wrap_content" android:layout_height="wrap_content" android:text="OK" /> <Button android:id="@+id/cancel" android:layout_width="wrap_content" android:layout_height="wrap_content" android:text="Cancel" /> horizontal • 담고 있는 view들을 수평 또는 수직으로 일괄 배열 • orientation = “vertical” : 수직으로 배열 • orientation = “horizontal” : 수평으로 배열
Android UI – RelativeLayout [false/true 값을 가지는 값 : 부모 컨테이너 내부에서 위치 결정] [기준 컨테이너를 참조하여 배열] • 각 view 에 대한 상대 위치 정보로 view 들을 배치 • xml의 상위 View들은 하위 View들의 객체를 참조 할수 없음. • View들간의 overlay 가능.
Android UI – RelativeLayout <?xml version="1.0" encoding="utf-8"?> <RelativeLayoutxmlns:android="http://schemas.android.com/apk/res/android" android:layout_width="fill_parent" android:layout_height="fill_parent" android:padding="5px" > <!-- EditText나 Button들의 id(@id/edittext, @id/ok, @id/cancel)를 사용할 수 없음 --> <TextView android:id="@+id/label" android:layout_width="wrap_content" android:layout_height="wrap_content" android:text="URL" android:paddingTop="15px" android:paddingRight="10px" /> <EditText android:id="@+id/edittext" android:layout_width="fill_parent" android:layout_height="wrap_content" android:layout_toRightOf="@id/label" android:layout_alignBaseline="@id/label" android:text="http://www.chol.com" /> <Button android:id="@+id/ok" android:layout_width="wrap_content" android:layout_height="wrap_content" android:layout_alignRight="@id/edittext" android:layout_below="@id/edittext" android:text="OK" /> <Button android:id="@+id/cancel" android:layout_width="80px" android:layout_height="wrap_content" android:layout_toLeftOf="@id/ok" android:layout_below="@id/edittext" android:text="Cancel" /> </RelativeLayout>
Android UI – TableLayout stretchColumns = * layout_span = 2 layout_column = 2 • TableRow가 행분리 기준 • TableRow안의 View의 항목의수가 cloumn의 수 • 각 row는 가장 많은 column을 기준으로 정렬된다. • 첫번째row , 첫번째column은 index는 0부터 시작한다.
Android UI – FrameLayout <?xml version="1.0" encoding="utf-8"?> <FrameLayout xmlns:android="http://schemas.android.com/apk/res/android" android:orientation="vertical" android:layout_width="fill_parent" android:layout_height="fill_parent"> <EditText android:text = "뭐시여" android:id="@+id/name" android:layout_width="fill_parent" android:layout_height="wrap_content" android:hint="ex) name" /> <Button android:id="@+id/ok" android:layout_width="wrap_content" android:layout_height="wrap_content" android:text="~~~~~~~~~또겹친다요." /> <Button android:id="@+id/cancel" android:layout_width="wrap_content" android:layout_height="wrap_content" android:text="나도 겹치자." /> </FrameLayout> • 왼쪽상단을 기준의 모든 view 들이 overlay • 일반적으로 View들을 동적으로 보였다 안보였다 할 경우 사용. • ex) Progress 진행 상태 View 보여주고 없어짐.
Android UI – Menu [OptionMenu] [ContextMenu] <?xml version="1.0" encoding="utf-8"?> <menu xmlns:android="http://schemas.android.com/apk/res/android"> <item android:id="@+id/MnuHi" android:title="안녕하세요.?" android:checkable="true" android:checked="false"/> <item android:id="@+id/MnuBye" android:title="아따 안녕하신가?" android:checkable="true" android:checked="false"/> </menu> Menuxml 정의 Activity 상에서 Menu 버튼을 클릭했을때 나타내는 메뉴 메뉴는 크게 Option 메뉴 와 Context 메뉴로 구성됨. xml 로메뉴파일 정의 가능 : res > menu 폴더 생성 후 menu관련 xml 파일 생성
Android UI – Dialog AlertDialog ProgressDialog [Time/Data]Dialog
Android UI – Dialoge *showDialoge의 id에 따라 onCreateDialoge에서 생성 • *실제 dialoge생성시 onPrepareDialog() 를 호출 • 여기서 다이얼로그 상태 변경시 처리 가능 [Activity] [Dialoge보이기] showDialog(int id) [Dialoge생성] onCreateDialog (int id) onPrepareDialog() [Dialoge안보이기/삭제] dismissDialog(int id) removeDialog(int id) • Dialoge의 종류
Android UI – ListView (AdapterView) • ViewGroup의 하위 클래스의 비어 있는 컨테이너 • ListAdapter를 통해 데이터와 데이터를 표현한 View 를 셋팅한다. • ListAdapter의 하위 클래스등를 사용하여 Adapter 세팅. • ArrayAdapter : 단순한 텍스트 view 리스트 표현 • SimpleAdapter : xml 형태로 정의된 view들을 ArrayList의 내부 map 형태를 가진 data와 매핑. • SimpleCursorAdapter : xml 형태로 정의된 view 들을 데이터베이스 cursor 형태의 data와 매핑.
Android UI – Custom ListView <?xml version="1.0" encoding="utf-8"?> <LinearLayout xmlns:android ="http://schemas.android.com/apk/res/android" android:orientation="horizontal" android:layout_width="wrap_content" android:layout_height="wrap_content" > <ImageView android:id="@+id/rowImageView01" android:layout_width="wrap_content" android:layout_height="wrap_content" android:src="@drawable/icon" ></ImageView> <TextView android:text="@+id/TextView01" android:id="@+id/rowTextView01" android:layout_width="wrap_content" android:layout_height="wrap_content"> </TextView> </LinearLayout> [View] Adapter getView() [Datas] String[] datas = {"SM3","SM5","SM7","SONATA","AVANTE","listView"}; Integer[] images = {R.drawable.car1 ,R.drawable.car2 ,R.drawable.car3 ,R.drawable.car4 ,R.drawable.car5 ,R.drawable.car6}; • 기존 Adapter를 상속하여 CustomAdapter 구현 • 기존 ArrayAdapter등을 상속하여 실제 row를 보여줄때 호출하는 getView() 함수 재정의. • 추상class인 BaseAdapter를 상속하여 CustomAdapter구현 • getCount() / getItem() / getItemId() / getView() 함수 재정의 • CustomAdapter는 사용자 정의의 view를 담당할 xml파일과 view에 해당하는 Data를매핑
Android UI – Gallery (AdapterView) ImageView의 List를 표현하는 컨테이너 BaseAdapter를 상속을 통해 ImageAdapter표현 Gallery 내의 액자 표현을 위해 각imageView마다android:galleryItemBackground배경 설정.
Android UI – WebView 클릭시 전화걸기 화면으로 이동 • WebPage를 표현하는 View • local 페이지 및 원격 URL 페이지 호출. • 페이지내의 javascript및 link 제어 가능 • *AndroidManifest.xml파일에 인터넷 연결 permission 설정 • <uses-permission android:name="android.permission.INTERNET"></uses-permission>
Android UI – Thread View [Message Queue] UI Thread 사용자 정의 Thread Handler android 에서 main thread 가 5초정도응답없을 경우 ANR (Application Not Response) 오류메시지 발생 네트웍자원등 오래 걸리는 작업을 위해 Thread 사용 필수 안드로이드 UI 컨트롤은 안드로이드 내부 UI 쓰레드 메커니즘에 의해 관리 (큐잉방식) 사용자 정의 Thread에서 안드로이드 view 직접 컨트롤시 에러발생 사용자 정의 Thread는 Handler 또는 View 의 post() 를 통해 view 컨트롤 해야함.
Android UI – Thread • Handler 객체의 생성은 사용자 thread 외부 에서 생성 해야함. • 사용자 Thread는 handler.sendMessage(msg) 를 통해 Handler에게 Message 전송 • Handler는 handleMessage(Message msg) 를 통해 Message 전달 받음. • handler.obtainMessage() 는 Handler에서 세팅된 메시지 값을 전달 받은 Message Handler 사용자 정의 Thread Thread worker = new Thread(newRunnable() { publicvoid run() { Message msg = null; for(nProgress = 0; nProgress<=100; nProgress+=10) { msg = handler.obtainMessage(); //Handler에게 메시지 전달 handler.sendMessage(msg); } } }); handle = new Handler() { @Override //사용자 정의 Thread에서 받은 데이처 처리 public void handleMessage(Message msg) { textView.setText(“OK”); } };