Download
1 / 6
70 likes | 218 Views
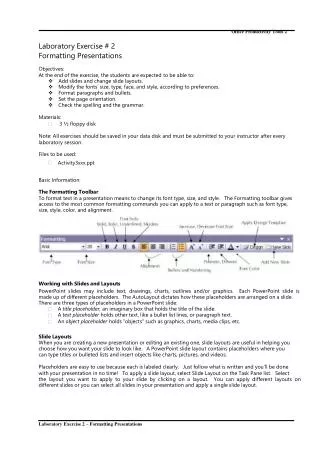
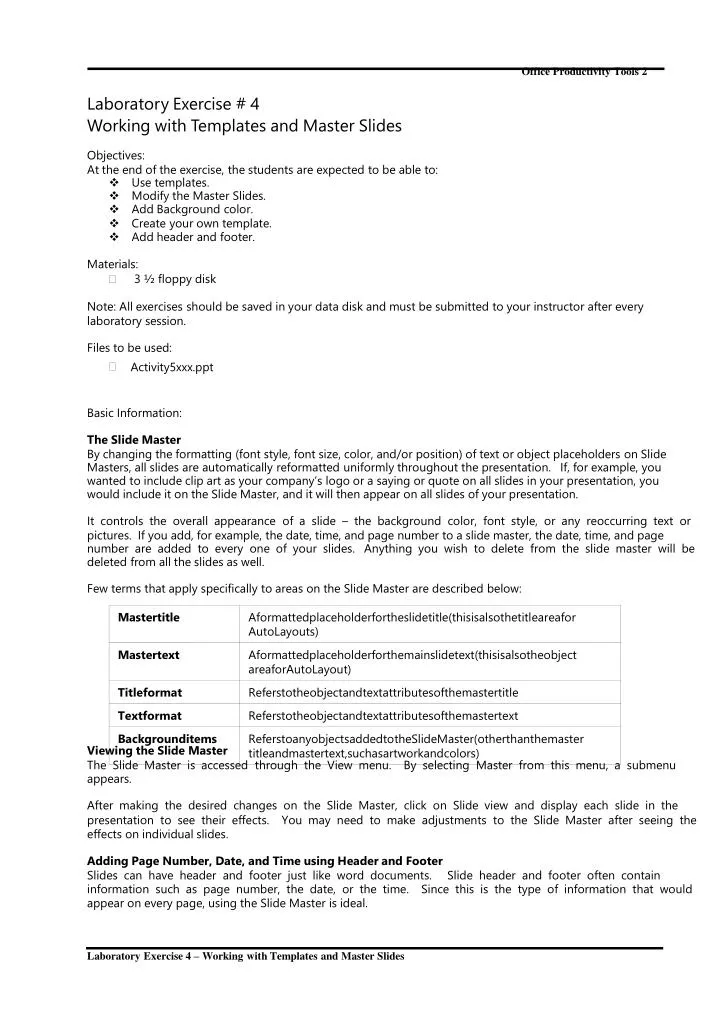
Office Productivity Tools 2 Laboratory Exercise # 4 Working with Templates and Master Slides Objectives: At the end of the exercise, the students are expected to be able to: v Use templates. v Modify the Master Slides. v Add Background color. v Create your own template.

E N D
OfficeProductivityTools2 LaboratoryExercise#4 WorkingwithTemplatesandMasterSlides Objectives: Attheendoftheexercise,thestudentsareexpectedtobeableto: vUsetemplates. vModifytheMasterSlides. vAddBackgroundcolor. vCreateyourowntemplate. vAddheaderandfooter. Materials: •3½floppydisk Note:Allexercisesshouldbesavedinyourdatadiskandmustbesubmittedtoyourinstructorafterevery laboratorysession. Filestobeused: • Activity5xxx.ppt BasicInformation: TheSlideMaster Bychangingtheformatting(fontstyle,fontsize,color,and/orposition)oftextorobjectplaceholdersonSlide Masters,allslidesareautomaticallyreformatteduniformlythroughoutthepresentation.If,forexample,you wantedtoincludeclipartasyourcompany’slogoorasayingorquoteonallslidesinyourpresentation,you wouldincludeitontheSlideMaster,anditwillthenappearonallslidesofyourpresentation. Itcontrolstheoverallappearanceofaslide–thebackgroundcolor,fontstyle,oranyreoccurringtextor pictures.Ifyouadd,forexample,thedate,time,andpagenumbertoaslidemaster,thedate,time,andpage numberareaddedtoeveryoneofyourslides.Anythingyouwishtodeletefromtheslidemasterwillbe deletedfromalltheslidesaswell. FewtermsthatapplyspecificallytoareasontheSlideMasteraredescribedbelow: ViewingtheSlideMaster TheSlideMasterisaccessedthroughtheViewmenu.ByselectingMasterfromthismenu,asubmenu appears. AftermakingthedesiredchangesontheSlideMaster,clickonSlideviewanddisplayeachslideinthe presentationtoseetheireffects.YoumayneedtomakeadjustmentstotheSlideMasterafterseeingthe effectsonindividualslides. AddingPageNumber,Date,andTimeusingHeaderandFooter Slidescanhaveheaderandfooterjustlikeworddocuments.Slideheaderandfooteroftencontain informationsuchaspagenumber,thedate,orthetime.Sincethisisthetypeofinformationthatwould appearoneverypage,usingtheSlideMasterisideal. LaboratoryExercise4–WorkingwithTemplatesandMasterSlides
OfficeProductivityTools2 ApplyingaColorScheme ColorSchemesaresetcoordinatedcolorsyoucanuseinyourpresentation.Youcanalsousethemforcharts andtablesandtorecolorpicturesyouaddtoslides.Eachdesigntemplatecomeswithasetofcolorschemes. Itdeterminesthebackgroundcolor,text,lines,shadows,andfillcolors.However,anexistingcolorscheme canalsobemodifiedtosuityourtastesincolors. ApplyingaDifferentBackground Youcanchangetheappearanceofyourslidebackgroundbychangingitscolor,shade,pattern,ortextureto produceamoredramaticeffect.Youcanalsouseapictureasaslidebackground,butyoucanuseonlyone typeofbackgroundonaslidemaster.Forexample—youcanhaveashadedbackground,atextured background,orapictureasthebackground,butyoucanuseonlyoneoftheseonasingleslide.Whenyou changethebackground,youcanapplythechangetoonlythecurrentslideortoalltheslidesandtheslide master. ApplyingDesignTemplates Designtemplatesarefilesthatcontainthestylesinapresentation,includingthetypeandsizeofbulletsand fonts;placeholdersizesandpositions;backgrounddesignandfillcolorschemes;andaslidemasterand optionaltitlemaster.Thiscanhelpyourpresentationtobemorestylishandsomehowaddsbeautywhen presenting. Activity#7WorkwithTemplatesandMasterSlides 1.OpenthefileActivity5xxx.ppt. 2.AccesstheViewmenu>Master>SlideMaster.PowerPointgivesyouaccesstoyourpresentation’s slidemaster. Alongwiththeviewofslidemaster,theSlideMasterViewtoolbaralsobecomesavailable.Thistoolbar givesyoueasyaccessoneditingyourelementsintheslidemaster.Tosavemorespaceinyourslide master,youcandockthistoolbar.Clickthetitlebarofthetoolbar,yourmouseshouldbecomeafour- headerarrow.Holddownandmoveitalongwiththeothertoolbar. Also,youcannoticetwoslideswhenintheslidemasterview.ThefirstslideistheLayersslidemaster andthesecondistheLayerstitlemaster.Thelatterbecomesvisibleinthenormalviewwhenthelayout oftheslideistitlelayout.Incontrary,thelayersslidemasterisbeingusedbytheotherlayouts.Letus firstusethelayerstitlemaster. 3.ChangeyourfirstslidelayouttoTitleSlideLayoutsoanymodificationswillbechangeonthelayers titlemasterwillbeappliedinyourtitleslide. Youwouldnoticethatthereareplaceholdersonyourslide;youcanjustignorethisbecausewehave alreadyprovidedourowntitle.Tocontinuetoourslidemaster,dothefollowing: 4.ClickthetitleareaforAutoLayoutstomodifythefonttypeandsize.Thehandlesmustbecome visible. 5.ChangethefonttypetoBroadwayandretainthedefaultsizeto45. 6.Changeallthelevelofbulletedlisttoyourdesiredbulletsymbol. 7.Also,changethefonttypeoftheObjectareaforAutoLayoutstoAvantgardeMdBt. However,thefonttypesandsizesofthethreeareasbelowcanalsobemodified. 8.Changethethreearea’sfonttypetoOptimaandthesizeto12. 9.Tomaketheseareasvisibletoyourslide,clicktheViewmenuandchooseHeaderandFooter.The HeaderandFooterdialogboxappears. LaboratoryExercise4–WorkingwithTemplatesandMasterSlides
OfficeProductivityTools2 10.FromtheSlidetab,clickontheUpdateAutomaticallyradiobutton. 11.ChecktheSlideNumbercheckboxandkeyin:PowerPoint2003FeaturesontheFootertextbox. 12.Also,clickontheDon’tshowontitleslidecheckbox.Obviously,thisistohidetheelementsyou chosefromtheslidetabinyourtitleslide. 13.ClickApplytoAllbutton.However,theseareascanbeplacedanywhereintheslide,placethe date/timeplaceholderbesidetheslidenumberplaceholderandmakeitalignedtoright. 14.ClickontheCloseMasterViewbuttonfromtheSlideMasterViewtoolbarorsimplyaccesstheView menu>Normal. 15.Switchtoyoursecondslide,sincethelayoutappliedonitisblank. 16.AccesstheSlideLayoutpaneandclickthearrowoftheTitleandTextlayoutandchooseReapply Layouttoupdatetheslide.Youwillseenowthatyoursecondslideinheritstheslidemaster. 17.ReapplytheTitleandTextlayoutuptoyourfifthslide. 18.SavethispresentationasActivity7xxx. Sinceourslideonehasacoloredgraphics,letustrytheCitrustemplatethathasthecolorslikethe graphicsinserted. 19.Accessyourfirstslide;switchyourSlideLayoutpanetoSlideDesignpane. 20.BrowsefortheCitrus.pot,clickthearrowbesideitandchooseApplytoSelectedSlidesoption. Clickingthetemplatewillmeanthatitwillbeappliedtoalltheslides. Bytheway,theslidedesigntemplatehasthreesectionswherethefirsttwosectionscollectthedesign templateyouareusingandyoucurrentlyused.Thelastsectionwouldbeallthedesigntemplates availableforuse. 21.AdjustthegraphicsandtheWordArtjustliketheimageshownbelow. LaboratoryExercise4–WorkingwithTemplatesandMasterSlides
OfficeProductivityTools2 22.Accessyoursecondslideandapplyadifferentdesigntemplate.ApplytheBalloons.pottoyour secondslide.Sinceyouappliedatemplate,meaning,fromthebackground,fonttypeandsize,upto bullets,willbemodified.Adjusttheimage.Youmustsomehowhavethesameslideasshown below. 23.ApplytheBalloons.pottotheremainingslidesexceptthesixthslide. Yousee,therecanbedifferenttemplatesthatcanbeappliedtoslidesthoughinonlyonepresentation.Tryto experimentapplyingasingletemplateonapresentation. 24.Say,applytheLayers.pottoalltheslides.Switchtoyourfirstslideandapplythesaiddesign templatetoalltheslides.Adjusttheimage. Didyouknowthattheobjectsinsidethetemplatecanalsobemodified?Todothis,accessyourslidemaster. Chooseinthelayerstitlemaster.Selectalltheobjectsinitandungroupit.Nowclickonthevertical rectangleontheupperleftcorneroftheslide.Changethecolorofthistoyourdesiredcolor.Remember, modifyingyourslideobjectscanaddbeautytoyourpresentation.Youmayundothispracticeifyouwould wantto. 25.Accessyoursecondslide;letuschangethebackgroundbutstillacquiringthedesigntemplatewe used. 26.ClickontheFormatmenuandchooseBackgroundorright-clicktheslidepaneandchoose Background.TheBackgrounddialogboxappears. 27.Fromthedialogbox,clickthebackgroundfilldrop-downboxandchooseMoreColors.Letusfind thecolorofthebackgroundofourimage. 28.Setthered,green,andblueto242fromtheCustomtab.ClickOK. LaboratoryExercise4–WorkingwithTemplatesandMasterSlides
OfficeProductivityTools2 29.Goingbacktobackgrounddialogbox,clicktheApplybuttonsothatthiscolorofthebackground willonlybeappliedtothecurrentslide. 30.Noticealsothatyourimageonyourthirdandfourthslidehasadifferentcoloraswiththe background.Changethebackgroundofyourtemplatetowhiteacquiringthebackgroundcolorof yourimage. 31.Inyourfifthslide,simplyadjusttheimagesoitwon’toverlapwiththetexts. 32.Onyoursixthslide,deletetherectanglethatservesasyourbackgroundtoapplytheproper background. Ifyouhavegroupedalltheshapesfromthisslide,youmustfirstungrouptheshapestodeletethe rectangle.Selectthegroup,clickDrawbuttonfromtheDrawingtoolbarandclickungroupcommand. Selectnowtherectangleandpressthe<DEL>key.Groupagaintheshapes. 33.AccesstheBackgroundofyoursixthslideandapplyafilleffect.YourFillEffectsdialogboxmust looklikethedialogboxbelow.Notethatyoumustchoosethesecondvariant. 34.Saveyourworkandclosethepresentation. PracticalExercise:CreatingyourOwnTemplate 1. 2. 3. 4. 5. 6. 7. 8. Createanotherpresentation. SwitchtoSlideMaster. ChangetheTitleplaceholderfonttoAleandWenchesBBandthesizeto38. Also,changethefonttypeofthetextplaceholdertoTechnical. Thefirstlevelfontsizewillbe28,thesecondis24andlastly,thethirdis20. Makethefontofthethreeareasbelow,date,footer,andnumberarea,toVerdanaandthesizeto12. AccessyourBackgrounddialogboxthenaccesstheFillEffectsdialogbox. KeyinthefollowingfiguresintheCustomtabofColor1. a. Red–205 b.Green–50 c. Blue–0 9. KeyinthefollowingfiguresintheCustomtabofColor2. d.Red–255 e. f. Green–215 Blue–160 10. 11. 12. UsetheShadingStyleDiagonalUpandchoosethefirstvariant. Createarectanglewithaheightof0.83andawidthof8.34.AccessitsFillEffectsdialogbox. OntheCustomtaboftheColorsdialogbox,acquirethefollowingfigures: LaboratoryExercise4–WorkingwithTemplatesandMasterSlides
OfficeProductivityTools2 g. Red–205 h.Green–50 i. Blue–0 13. 14. 15. 16. 17. 18. 19. 20. UsetheShadingStyleHorizontalthenchoosethefirstvariant. Placethisontheleftside,lowercorneroftheslidepane. Duplicatethisshapeacquiringtheheightof0.58andthewidthof7.84.Repeatstep13. Duplicateagainthisshapeacquiringtheheightof0.33andthewidthof7.42.Repeatstep13. Createacirclewithaheightandwidthof0.83. AccessitsFillEffectsdialogbox.Repeatsteps6and7. UsetheShadingStyleFromCenterandchoosethesecondvariant. Duplicateitwithtwocopiesandplacethemjustliketheshownoutputbelow. 21.Saveyourwork.Rememberthatthisisnotapresentation,butyourowntemplate.OntheFile menu,chooseSaveAs. 22.Locateonwheretheprovidedtemplatesare.Usually,ProgramFiles>MicrosoftOffice>Templates >PresentationDesign.Youmayalsosaveyourtemplateinyourdiskette. 23.OntheSaveAsTypedrop-downlist,choosetheDesignTemplate(*.pot).ChangetheFileNameto MyTemplatexxx.pot.ClickonSave.ClosetheApplication. 24.Toviewthetemplateyoucreated,openthePowerPointapplication. 25.GotoSlideMasterView,accessSlideDesignpane,andchooseMyTemplatexxx.pot. 26.Closethewholeapplication. *MicrosoftPowerPoint2003Help LaboratoryExercise4–WorkingwithTemplatesandMasterSlides