Download
1 / 70
720 likes | 893 Views
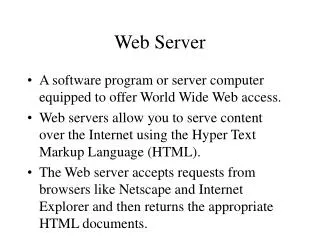
Chapter 5: Server Installation. Learning Objectives. Make installation, hardware, and site-specific preparations to install Windows 2000 Server

E N D
Learning Objectives • Make installation, hardware, and site-specific preparations to install Windows 2000 Server • Install Windows 2000 Server using different methods, including from a CD-ROM, from the installation disks, over a network, unattended, and from another operating system
Learning Objectives (continued) • Go through a Windows 2000 Server installation step by step, and test the installation • Upgrade a Windows NT server and domain • Create an emergency repair disk
Learning Objectives (continued) • Install a service pack • Troubleshoot installation problems and uninstall Windows 2000 Server
Installation Preparations • Preliminary steps: • Information about what hardware components are installed • Determination of which file system to use • Creation of an Administrator account • Name of the server • An installed NIC • Determine which protocols to install
Troubleshooting Tip • Record the BIOS setup information and save it for later troubleshooting in the event that the computer’s battery is defective or in case you need it to restore one or more BIOS settings
Sample BIOS Setup Screen Figure 5-1 BIOS setup screen
Troubleshooting Tip • Obtain the latest device drivers before you start the installation, such as those for the NIC, HAL.dll (for SMP computers), SCSI adapters, CD-ROM drives, RAID arrays
Make Important Decisions in Advance • How to partition the disk or disks • What file system(s) to use • What to name the server • What password to use for the Administrator account • What protocols to use • What licensing method to use • Whether to make the server a DC
Decide Whether to Set Upa Dual Boot System • Other systems that can reside on the same server as Windows 2000 Server include MS-DOS, Windows 3.x, Windows 95, and Windows 98
Partitioning • If you create FAT and NTFS partitions, create the FAT partition before you start (or leave an existing FAT partition if you create a dual boot system)
Boot.ini File • The Boot.ini file on the system partition contains information about the location of both operating systems in a dual boot configuration
Sample Boot.ini File Figure 5-2 Boot.ini file
FAT Partitions • Windows 2000 will format a 2 GB or smaller partition as FAT16 and a partition larger than 2 GB as FAT32
Server Naming • Use a name that is easy to type • Make the name descriptive of the server’s function or of the organization • Select a name that is easy to remember and use • Make sure the name is not already used on the network
Administrator Password • Use a “strong” or difficult-to-guess password for the critical Administrator account • Characteristics of a strong password: • Over seven characters long • Has a combination of letters, numbers, and symbols • Includes at least one symbol in characters two through six
Protocol Selection • Consider using the default TCP/IP setup as a starting point and add other protocols later as needed
Licensing Methods • Per server licensing: A server software license based on the maximum number of clients that log on to the server at one time • Per seat licensing: A server software license that requires that there be enough licenses for all network client workstations
Initial Server Installation • Standalone server: A server that is not a member of a domain, but that is a member of an existing workgroup or that establishes its own workgroup, such as in peer-to-peer networking • Member server: A server that is a member of an existing Windows 2000 domain, but that does not function as a domain controller • (Either type of server can be later set up as a domain controller)
Installation Options • CD-ROM only • Floppy disk and CD-ROM • Network installation • Installation from an existing operating system • Unattended installation
Installation Programs • Use Winnt.exe from scratch (installation disks or CD-ROM) and from computers already booted from MS-DOS or Windows 3.x • Use Winnt32.exe from computers already booted from Windows 95/98, Windows NT, or Windows 2000 (for an upgrade)
CD-ROM Installation • Set the computer’s BIOS to boot first from CD-ROM • Insert the Windows 2000 Server CD-ROM • Turn the computer off and then back on (you may need to press Enter to boot from CD-ROM) • After Winnt.exe starts, follow the instructions on the screen
Floppy Disk and CD-ROM Installation • Set the BIOS to boot first from drive A: • Power off the computer • Insert Setup Disk #1 and the CD-ROM • Turn on the computer, booting from the Setup Disk #1 • After Winnt.exe starts, insert Setup Disk #2 and follow the on-screen instructions
Making Copies of the Setup Disk • Format 4 floppy disks • Insert the Windows 2000 Server CD-ROM • Click Start and then click Run • Enter the drive letter of the CD-ROM and the path \bootdisk\makebt32.exe • Click OK • Follow the on-screen instructions
Network Installation • Copy the installation files from the Windows 2000 Server CD-ROM which are in the folder \I386 • Share the host’s folder and set appropriate permissions • Map the host’s shared folder from the target server computer • Run Winnt.exe or Winnt32.exe from the shared folder • Follow the on-screen instructions
Installation from an Existing Operating System • Boot the computer to use its existing operating system • Insert the Windows 2000 Server CD-ROM • Click Start, click Run, enter the drive letter of the CD-ROM and the path to the Winnt.exe or Winnt32.exe file, such as \I386\winnt32 plus any switches • Follow the on-screen instructions
Installation Tip • If you install Windows 2000 from MS-DOS, you can reduce the installation time from several hours to under an hour if you start the SMARTDRIVE utility before running Winnt.exe
Unattended InstallationOver the Network • Create an answer file using Setup Manager or Notepad • Use the /s and /u (or /unattend) switches to specify the location of the installation files and of the answer file such as: • Winnt32 /s:\\mainserver\I386 /unattend:unattend.txt • Use a uniqueness database and the /UDF switch to further customize the unattended installation
Unattended Installation via CD-ROM • An alternative to a unattended network installation is to create an answer file to use along with booting via the CD-ROM, but name the file, Winnt.sif
Creating Duplicate Unattended Installations • Use Sysprep.exe to clone computers that have the same hardware configuration • Use Syspart.exe to clone computers that have different hardware configurations
Installation Troubleshooting Tip • If Setup starts, but does not find mass storage, restart the installation, press F6 as soon as possible and load the manufacturer’s driver (such as for a SCSI adapter) • If Setup does not start because you are using an SMP computer, restart the installation, press F5, and provide the computer manufacturer’s Hal.dll
Installation Part 1 • When the Windows Setup starts, it inspects the computer hardware and loads drivers and then presents a screen on which to press Enter to start the installation
Installation Part 1(continued) Figure 5-3 Beginning setup options
Installation Part 1(continued) • Read the licensing agreement and press F8 • Select the partitioned or unpartitioned disk space on which to install Windows 2000
Installation Part 1(continued) Figure 5-4 Detecting partitions
Installation Part 1(continued) • Select the file system to use, FAT or NTFS • Setup automatically checks the disks, copies files, and reboots into the graphical mode
Installation Part 2 • Setup gathers and verifies information about the computer, such as the keyboard and pointing device • Setup next enables you to configure regional and keyboard settings, such as the language that you use
Installation Part 2(continued) • Enter your name and the name of your organization • Enter the product key which is obtained from the back of the Windows 2000 Server CD-ROM jewel case
Installation Part 2(continued) Figure 5-5 Name and organization information
Installation Part 2(continued) • Select the licensing mode • Enter the name of the server and the Administrator account’s password • Select the Windows 2000 components to install
Installation Part 2(continued) Figure 5-6 Windows 2000 components
Installation Part 2(continued) • If there is an installed modem, provide the Modem Dialing information • Verify the date and time • Select the network configuration option, such as Typical settings in order to install TCP/IP • Specify whether the computer will start off in a workgroup or domain (if in a domain, provide the account and password)