Download
1 / 6
60 likes | 215 Views
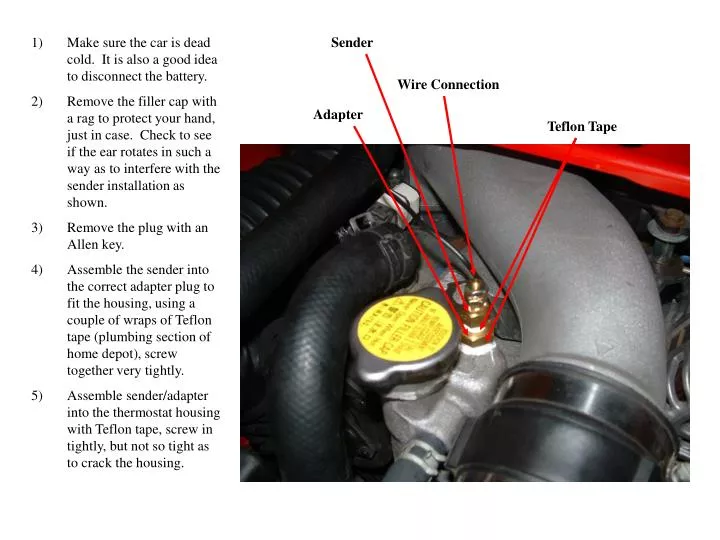
Make sure the car is dead cold. It is also a good idea to disconnect the battery. Remove the filler cap with a rag to protect your hand, just in case. Check to see if the ear rotates in such a way as to interfere with the sender installation as shown. Remove the plug with an Allen key.

E N D
Make sure the car is dead cold. It is also a good idea to disconnect the battery. • Remove the filler cap with a rag to protect your hand, just in case. Check to see if the ear rotates in such a way as to interfere with the sender installation as shown. • Remove the plug with an Allen key. • Assemble the sender into the correct adapter plug to fit the housing, using a couple of wraps of Teflon tape (plumbing section of home depot), screw together very tightly. • Assemble sender/adapter into the thermostat housing with Teflon tape, screw in tightly, but not so tight as to crack the housing. Sender Wire Connection Adapter Teflon Tape
Make a small U-bend in the bare wire and screw it down at the sender connection. Make certain the sender connection and bare portion of the wire touch nothing (e.g. filler cap) • Route the wire away from the alternator and into the firewall (under the cruise control unit). I wired mine along with my boost gauge sender line for simplicity, but with just enough slack make sure it doesn’t sag into any hot components (turbos). • Remove the cruise control unit from the car wall, and flip it out of the way. Firewall hole (underneath cruise unit) Sender wire path
Remove the Vent Panel by prying/pulling straight away from the car. • Remove the top of the column cover by carefully popping it loose from the bottom cover. • Loosen the screws on the bottom of the column cover and remove it. • Unscrew the screws holding the lower dash and remove it. • Unscrew the screws holding the instrument cluster (under the lower dash) and pull it straight back, holding the big ridge on top. Once it pops, reach around and disconnect the electrical connections before attempting to remove it. It will probably not be necessary to remove it. Instrument Cluster Vent Panel Column Cover Lower Dash
Prepare the gauge by unscrewing the light bulb and placing a red or green cover over the bulb as desired. Put the gauge in its location. In my car I’m using an A-pillar mounting. • Crimp connectors on the wires and screw them down onto the post. I bent the connectors so the wire pointed straight back from the gauge. • Wiring notes: I simply used full 12v power to both the light power instead of a dimmer source since the dimmer on my FD is generally weak and I always run it at full bright. I connected the bulb ground and the gauge ground and connected it to the left-hand screw connection of the lower dash cover. • I got my 12v power from the fuse box auxiliary power source. There are two slots to insert a flat terminal – use the one on the right which turns off/on with the ignition. 12v Power Line (Clutch Pedal)
You can’t thread the sender wire through the firewall hole, so find one of the wires already running through it and gently tug one out until you have about 10” of extra slack on the engine side. I used my boost gauge line. Tape the sender wire to the slack line and use the other line to pull the sender line through. • Wire the sender to the gauge using a terminal. Cruise Control Unit (you will have remove this) Wires entering firewall hole
Reassemble the dash, tuck/tape away wiring excess wiring being careful not to pinch or short out any connections. Make sure the sender wire does not contact any of the 12v source lines. • Re-connect the battery, turn on the ignition, and turn on the lights to check the backlight function. • Start the engine and inspect the filler cap / sender location for leaks. • Drive the car and check its function. Because this sender is located outside the thermostat, it will read 100F for a few minutes on a cold engine until the thermostat opens.