Download
1 / 19
190 likes | 373 Views
Working with Web Graphics About Web Graphics . File Formats . Image Resolution, Image Size Creating Web Graphics . Getting Started, Paint Shop Pro 5. File Formats . We must work with C O L O R s,

E N D
Working with Web Graphics • About Web Graphics • . File Formats • . Image Resolution, Image Size • Creating Web Graphics • . Getting Started, Paint Shop Pro 5
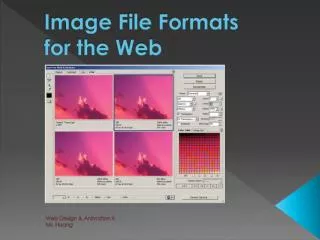
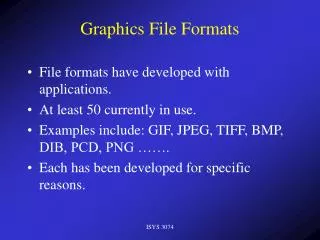
File Formats • . We must work with COLORs, • . There are millions of COLORs produced by the mixture of main colors (R,G,B) • . Web pages are LOADED over the telephone lines, • . Download bandwidth is very very important, things must be easy to load. • There are many ways to manageCOLORs. • How ??? • 1. Differentiate COLOR Balancing, • If you differentiate COLOR Balancing, different FileFormats will occur; • Gif • JPeg About Web Graphics,
Image Resolution, Image Size Web is a visual media; NOT PRINT MEDIA. SIZE properties (width, height) of an image DOES NOT fit according to the RULER Measuring. Image Resolution : is the number of PIXELs on 1 cm size. Pixel : Short for Picture Element, a pixel is a single point in a graphic image. Image Size : is the dimension of (width, height) an image. ! You should not use CENTIMETER as an unit for Web Graphics, always use PIXEL. With respect to WEB GRAPHICs, please use the standarts listed above: . Dimension Unit = PIXEL . Image Resolution = 28,346 pixel/cm . Width of the image should be smaller than 600 pixels. About Web Graphics,
Image Resolution, Image Size Resolution 1 cm Resolution = 28,346 pixel/cm Width = 450 pixel Height = 334 pixel width and height 28,346 pixel ---- 1 cm 450 pixel ---- ? cm ? = 450 x 1 / 28,346 = 15,87 cm # of PIXEL on 1 cm About Web Graphics, Difficult to LOAD
Getting Started PSP 5; is very simple, and able to do almost everything with respect to Professional Programs. . Create new images in .jpeg, .gif, .png and many other formats. . Create transparent images in .gif format. . Edit the all properties of an image. (size, resolution, color, etc.) . Built up many layers on one work. . Apply many effects on a layer. . Capture and save a screen shot view on your computer. . and many many other things with images .... Detailed information about PSP 5 at http://www.jasc.com Run the Program : START > PROGRAMS > Paint Shop Pro 5 > Paint Shop Pro 5 and, begin to enjoy yourself ... Paint Shop Pro 5
... Apply settings according to Web Graphics ... 1. Run the Program 2. File > Preferences > General Program Preferences . Undo . Rulers and Units 3. View > Toolbars First to DO ...
jıo ... Screens ...
1. File > New . Unit must be PIXEL . Resolution must be 28,346 pixel/cm . Background color or transparency ??? 2. File > Save .jpg .gif Give your decision .... ... Create a New Image ...
. View > Grid > Rulers . Image > Flip > Mirror > Rotate > Canvas Size > Resize > Deformations > Effects > Blur . Colors > Adjust > HSU > Negative Image > Set Palet Transparency . Layers . Capture > Setup > Start Capture ... Toolbars ...
Ruler and Grid • Paint Shop Pro includes a ruler and a grid to help you align your artwork and arrange image elements symmetrically. • The grid/ruler can be set at any size, and the grid can be configured to display inches, centimeters, and pixels. • Set the options in the Rulers > Units > General Preferences dialog box. • To display the grid/ruler, choose Grid/Ruler from the View menu.
Flip and Mirror • The Flip and Mirror commands reverse an image or selection's orientation along the vertical and horizontal axes: • The Flip command reverses the image or selection vertically, so that what was the top becomes the bottom, and vice-versa. (Image>Flip). • The Mirror command reverses the image or selection horizontally, so that what was the left side becomes the right side, and vice-versa. (Image> Mirror) Original Flip Mirror
Rotate • The Rotate command lets you spin an image by a specified number of degrees. (Image>Rotate) • Select the direction of rotation Right is clockwise, and left is counter-clockwise. Click the direction's option button or its text. • Select the degrees of rotation from the Degrees group box. Click the appropriate option button or its text. • On an image with multiple layers, select the All Layers check box to rotate all the layers. Leave it blank to rotate only the current layer Rotated 30 degrees
Canvas Size • It increases or decreases image dimensions by adding or removing pixels around the original image. You can add or remove pixels around the entire image or around selected edges. Blur • Blur level effects, the appearance of the images softens.
Resize • Resizing duplicates or deletes pixels as necessary to achieve the desired width and height. Image > Resize ***Aspect ratio is the relationship of the image’s width to height. If you want to retain the original proportions when resizing, select this check box.
Deformations • Deformations alter an image or selection to achieve a particular effect. They create an effect by moving image data from one area to another. As the name implies, the result is deformed version of the original image. ***Use deformation browser to see each of the effects ***Deformations and filters can be applied only to grey scale and 24-bit color images.
Effects • Add Drop Shadow command adds a shadow effect behind the current selection. • choose a shadow color from the Color box. • select the shadow’s opacity. As the opacity decreases, the drop shadow fades. • set the blur of the shadow. As the blur level increases, the appearance of the shadow softens. • Vertical and Horizontal Offset sliders to control the alignment of the drop shadow. • Buttonize command adds interest to your Web page by creating square or rectangular buttons from any image or selection. It applies a three dimensional border that makes the image or selection appear raised. • select the "Auto Proof” (update the original image) • Select the solid colored or transparent edges option. PSP uses the background color for solid edges. • Select a height and a width, set the opacity of the edges.
Chisel command adds a three-dimensional border around a selection or layer to make it appear as though it were cut out of stone. • Cutout command creates the illusion that part of the image has been removed, allowing you to see through the image to a lower level. You can apply this effect only to a layer that contains a selection or is not a background layer. • Select the "Auto Proof" check box. (updates the original image) • In the Attributes panel, select the "Fill the interior with color" check box • choose an interior color from the and a shadow color. Your color choices are the same as for the interior. • Set the opacity of the shadow by dragging the Opacity slider. • et the blur of the shadow by dragging the Blur slider. As you increase the Blur level, S shadow widens and its edges soften. • The Vertical and Horizontal Offset sliders control the alignment of the interior and outline
Colors Adjust > Hue Saturation Lightness • Hue refers to the color’s tint, saturation to the hue’s purity, and lightness to the color’s brightness. • Negative Image command replaces the color value of each color with its opposite on the 0-255 scale. The effect is similar to a photographic negative, and the function can be used to create a positive image from a scanned negative.
Set Palet Transparency • Determine the color you want to make transparent by doing one of the following: • Selecting the color as the background color. • Locating the color’s palette number from the image palette. • Choose Set Palette Transparency from the Colors menu. The Set Palette Transparency dialog box opens. • Set the transparency by selecting the appropriate option: • To undo the transparency of a color, select No transparency. • To assign the background color, select Set transparency value to the current background color. • To assign a color by palette number, select the number from the palette entry box. • To view the new selection in the image, click the Proof button. Paint Shop Pro removes the color from the image. A transparent color remains visible in the image until you choose the View Palette Transparency command.