Download
1 / 48
480 likes | 919 Views
EMnet General Operation: The Message Manager. Click to hear a PRIORITY 1 (low priority) Alarm. Click to hear a HIGHER PRIORITY Alarm. The Emergency Message Alert.

E N D
EMnet General Operation: The Message Manager
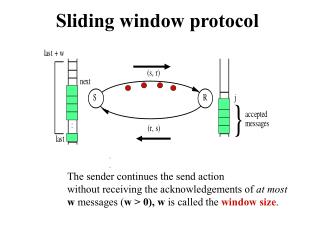
Click to hear a PRIORITY 1 (low priority) Alarm Click to hear a HIGHER PRIORITY Alarm The Emergency Message Alert When EMnet receives a message for your station, an alarm will sound repeatedly, and an Emergency Message Alert will appear on the desktop.
The Emergency Message Alert The From line tells you what site sent the message.
The Emergency Message Alert The Subject line tells you about the content of the message.
NOTE: When the countdown reaches zero, the alarm will resume, and the alert will reappear at the front of your desktop. The Emergency Message Alert • Clicking Silence: • Temporarily silences the audible alarm • Sends the alert to the back of your desktop • Starts a 60 second countdown • [If you click Silence repeatedly, it will add additional minutes to the countdown.]
The Emergency Message Alert • Clicking Acknowledge: • Silences the audible alarm • Opens the EMnet Message Manager • Opens the message for viewing NOTE: If you have more than one waiting message, the alarm will continue to sound until the last message is acknowledged or silenced
An Open EMnet Message The originating site and the subject line will be repeated at the top of the open message.
An Open EMnet Message You may read the text of the message in the Message Body.
An Open EMnet Message If the message comes with one or more attachments, they will appear here. To open an attachment, double- click on the file name. • Examples of attachments you might receive: • A message might include a report, a fact sheet, or other supporting information. • A weather alert might come with weather graphics • A missing person alert could come with an attached photograph • A message sent to a broadcast station may come with an audio version of the message for broadcast
An Open EMnet Message If there is a printer installed on your EMnet computer, you may print a hardcopy of the message by clicking the printer icon.
An Open EMnet Message You may send a reply message to the originator by pressing Reply, so long as you are authorized to reply to the originating site.
An Open EMnet Message When you are finished reading the message, press Done to close it. The message will be stored in your INBOX in the EMnet Message Manager.
The EMnet Message Manager The EMnet Message Manager will open automatically when an EMnet message arrives. You may also open the Message Manager by right-clicking on the satellite icon, and selecting Manage Messages.
Messages received by your EMnetsite will be stored in your INBOX The EMnet Message Manager
Messages received from the National Weather Service will be stored in your WEATHER folder The EMnet Message Manager
Messages sent by your EMnetsite will be stored in your OUTBOX The EMnet Message Manager To move any message to your ARCHIVED folder, select the message, and press Archive
Messages sent by your EMnetsite will be stored in your OUTBOX The EMnet Message Manager To move any message to your DELETED folder, select the message, and press Delete
Messages deleted from your EMnetsite will be stored in your DELETED folder. The EMnet Message Manager If you select a message from your DELETED folder and press Delete again, the message will be erased completely.
Messages you archive will be stored in your ARCHIVED folder. The EMnet Message Manager
Examples of message you send frequently may be stored in DRAFTS for easy retrieval. The EMnet Message Manager
The EMnet Message Manager To view a previously received message, select the message, and press View
The EMnet Message Manager NOTE: The COMPOSE EAS button is only available to authorized stations. See the Composing EAS Module for further information. To compose an EAS message, select Compose EAS
The EMnet Message Manager As with email, you may open the EMnet Send Program by selecting a message and choosing to Reply, Forward, or Reply to All.
The EMnet Message Manager Or, press New to begin composing a new message. This will also open the EMnetSend Program.
The EMnet Send Program To specify message recipients, click on the TO button. This will bring up your address book.
The EMnet Send Program The Specify Message Recipients dialog contains a complete list of stations that your site is authorized to send to. (If new sites are commissioned in your area, they will be automatically added to the list) NOTE: If you wish, you can organize your address book into groups for easy sending. You can also define email addresses to receive Emnet messages sent from this terminal. For more information, see the Address Manager tutorial module.
The EMnet Send Program To specify message recipients, select a name or names from the Available Address list, and press Add to put that name in the Destination box. You may have an address in your list with a 900 code (i.e., “CL.900” or “IL.931.” This is a server-defined group address. Sending a message to this group will send the message to every member of that group. (You can also use the Address Manager to create client-defined groups.)
The EMnet Send Program Press OK when you are done.
The EMnet Send Program The site names you selected are now listed.
The EMnet Send Program Type a subject heading into the Subject line. NOTE: EMnet will not send a message that does not have a subject!
The EMnet Send Program If you wish to attach a file to your EMnet message, click the paperclip button to browse your computer for files to attach. Attachments may be no larger than 1 mb after compression.
The EMnet Send Program Type your message into the Message Body
The EMnet Send Program NOTE: Your station will be configured with a highest authorized priority. Your station’s highest authorized priority may be 1(lowest priority) Specify your message’s Priority
The EMnet Send Program Priority 1 is the lowest priority, used for tests and non-emergencies. Priorities 2 and 3 are generally emergency-level messages from the State. Priorities 4 through 6 are reserved for federal use. Specify your message’s Priority
The EMnet Send Program Request Receipts is checked by default. This allows you to monitor message delivery in the Receipts dialog Box.
The EMnet Send Program To store a copy of this message in DRAFTS to send later, click Draft.
The EMnet Send Program To cancel this message, click Cancel.
The EMnet Send Program To send this message, click Send Now. This will bring up the Receipts dialog Box.
The Receipts Dialog Box When the Receipts dialog Box first appears, it will be empty while it transmits the message
The Receipts Dialog Box When the server sends the list of recipients, each site you sent your message to will be listed.
The Receipts Dialog Box The icons beside each listed destination tell you the status of your message.
The Receipts Dialog Box This red icon tells us that the message has been sent to these stations, but has not yet been received.
The Receipts Dialog Box Notice that the Received field now has a time stamp. This yellow icon tells us that CL.001 and CL.002 have received their messages, but no one has acknowledged the message yet.
The Receipts Dialog Box Notice that CL.006 still shows the red icon, indicating that the message has not been received at this station. This may mean CL.006 is currently turned off and unable to receive messages. The status bar below shows percentages of how many stations have received the message.
The Receipts Dialog Box The Acknowledged field now has a time stamp. This envelope icon tells us that a person at the CL.002 station has hit the Acknowledge button to open this message
The Receipts Dialog Box When all stations have received and acknowledged the message, the Receipts Dialog will show the dates and times.
To view receipts for a previously sent message: Select the message from the Outbox in the Message Manager Click Receipts to open the Receipts Dialog for that message The receipt list will be available only if Request Receipts was checked when the message was first sent.
You have completed the EMnet Message Manager Tutorial Thank you for your time!If you have further questions, please contact Comlabs Tech Support: support@comlabs.com 321.409.9898 x1