Download

1 / 26
330 likes | 904 Views
Rotator Cuff Injuries. By: Michael LaBella. Objectives:. You will understand the anatomy of the shoulder and rotator cuff. You will be able to identify the types of rotator cuff injuries. You will be able to identify the signs and symptoms of rotator cuff injuries.

E N D
Rotator Cuff Injuries By: Michael LaBella
Objectives: • You will understand the anatomy of the shoulder and rotator cuff. • You will be able to identify the types of rotator cuff injuries. • You will be able to identify the signs and symptoms of rotator cuff injuries. • You will be able to identify the causes of rotator cuff injuries. • You will be able to understand the rehabilitation process. • You will be able to aid in the prevention of rotator cuff injuries.
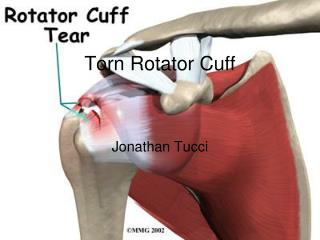
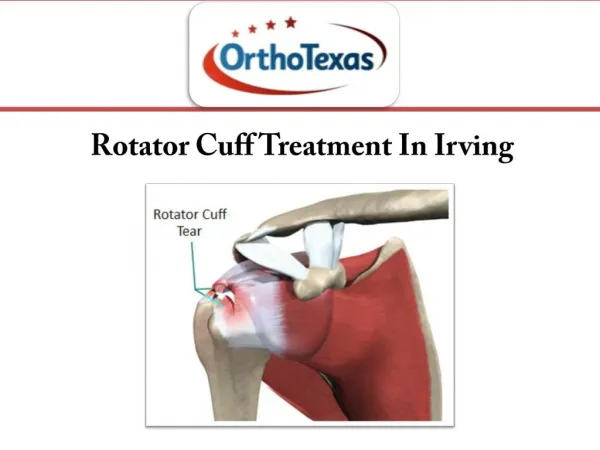
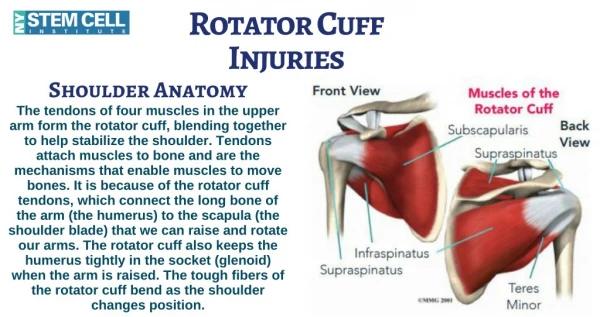
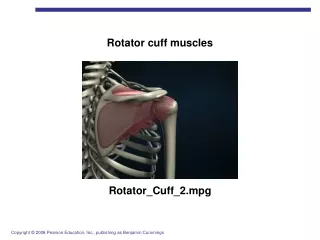
The rotatorcuff is made up of muscles and tendons. It holds the top of the upper arm into the shoulder joint (socket). The rotator cuff is made up of four muscles. The muscles include the supraspinatus, infraspinatus, teres minor, and subscapularis. The tendons attach the muscles to four shoulder bones: the shoulder blade (scapula), the upper arm bone (humerus), and the collarbone (clavicle.) The tendons are broad, measuring approximately 5 centimeters in width, and form a cuff encapsulating the articular surface of the top of the humerus.
Rotator Cuff Injuries Tendinitis:Tendons in your rotator cuff can become inflamed due to overuse or overload, especially in athletes who perform a lot of overhead activities. In some people, the space where the rotator cuff resides can be narrowed due to the shape of different shoulder bones, including the outside end of the collarbone or shoulder blade. Bursitis: The fluid-filled sac (bursa) between your shoulder joint and rotator cuff tendons can become irritated and inflamed. Strain or tear:Left untreated, tendinitis can weaken a tendon and lead to chronic tendon degeneration or to a tendon tear. Stress from overuse also can cause a shoulder tendon or muscle to tear.
Rotator Cuff Tear • A ripping of one or more of the tendons • Result when a sudden eccentric force applied to the rotator cuff resulting in failure of the tendon. • Uncommon under the age of 40 but strains do occur. • In the population over 40 years of age, supraspinatus tears occur and less commonly, infraspinatus tears. Tears in the subscapularis tendon are uncommon and are often the result of a shoulder dislocation.
Causes • Repetitive stress: Repetitive overhead movement of your arms can stress your rotator cuff muscles and tendons, causing inflammation and eventually tearing. This occurs often in athletes, especially baseball pitchers and tennis players. It's also common among people in the building trades, such as painters and carpenters • Impingement: Falls or incorrect throwing techniques or arm movements and weak shoulder muscles may cause the arm bone to move up and trap the tendon. This may also happen in persons who over-train or have a sudden change in arm or shoulder activity. Normal wear and tear:The rotator cuff tendons can degenerate due to ages (starting around the age of 40) . This can cause a breakdown of fibrous protein (collagen) in the cuff's tendons and muscles. • Calcium deposits: Calcium may deposit in the tendons due to decreased oxygen and poor blood supply. These deposits may cause irritation and inflammation
Causes • Poor posture: When you slouch your neck and shoulders forward, the space where the rotator cuff muscles reside can become smaller. This can allow a muscle or tendon to become pinched under your shoulder bones, including your collarbone, especially during overhead activities, such as throwing. • Falling: Using your arm to break a fall or falling on your arm can bruise or tear a rotator cuff tendon or muscle. • Lifting or Pulling: Lifting an object that's too heavy, or doing so improperly (especially overhead) can strain or tear your tendons or muscles. Pulling something, such as an archery bow of too heavy poundage, may cause an injury.
Common in sports such as: • Baseball • Tennis • Football • Weight Lifting • Skiing • Swimming • Racquetball
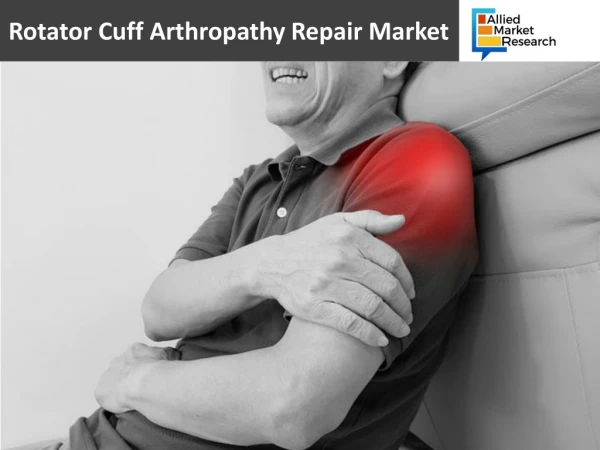
Symptoms • Pain in the shoulder or arm , especially with arm movement (reaching overhead, reaching behind your back, lifting, pulling or sleeping on the affected side. • Radiation of the pain to the upper, lateral arm • Pain at night • You may not be able to move your arm well, especially away from your body. • Your shoulder may feel weak, numb, or tingly. • Loss of shoulder range of motion • Inclination to keep your shoulder inactive • Lying or sleeping on the affected shoulder also can be painful
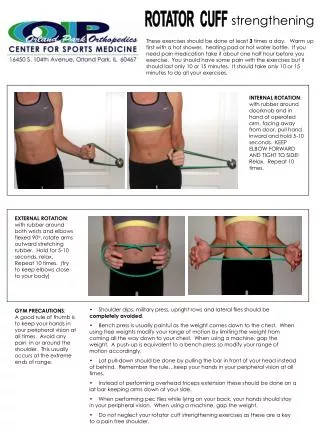
Physical Examination The physical examiner must detect the torn muscle by isolating the muscles through manual testing. Perform following with patient seated: • External rotation - with elbow at right angles and held into side, turn the arm outwards as far as possible. • Internal rotation - with elbow held into side, raise arm as far as possible up patient's back. • Internal rotation with 90° forward flexion - support elbow and shoulder with elbow at right angles pointing vertically downwards and palm facing backwards, turn the forearm as far backwards as possible. • Forward flexion - start with arm at patient's side and lift arm forwards and upwards as far as possible. • Extension-with arm by the patient's side, lift the arm back wards as far as possible. • Abduction-with arm at patient's side, lift arm away from the body as far as possible, continuing past the horizontal by allowing the shoulder to externally rotate, bringing the hand behind the head. • Adduction-draw the arm across the anterior chest wall as far as possible.
Additional Tests • Drop-arm test Abduct the patient's shoulder to 90° and ask the patient to lower the arm slowly to the side in the same arc of movement. Severe pain or inability of the patient to return the arm to the side slowly indicates a positive test result.A positive result indicates a rotator cuff tear. • Neer impingement test The shoulder is forcibly forward flexed and internally rotated, causing the greater tuberosity to jam against the anterior inferior surface of the acromion. Pain reflects a positive test result and indicates an overuse injury to the supraspinatus muscle and possibly to the biceps tendon • Hawkins-Kennedy impingement test With force internally rotate the shoulder. Pain indicates a positive test result and is due to supraspinatus tendon and greater tuberosity impingement under the coracoacromial ligament and coracoid process. • Apprehension test Abduct the arm 90° and fully externally rotate while placing anteriorly directed force on the posterior humeral head from behind. The patient becomes apprehensive and resists further motion if chronic anterior instability is present.
Diagnosis Diagnosis is usually made after a physical examination, often by a sports medicine physician. X rays are also sometimes used in diagnosis as well as an arthrogram. However, the arthrogram is an invasive procedure and may be painful afterwards. For this reason, magnetic resonance imaging (MRI) is preferred to determine tendon tears as it also shows greater detail than the arthrogram.
Diagnosis Continued • Arthrogram: A test done by injecting dye into the shoulder joint and then taking x-rays. Areas where the dye leaks out indicate a tear in the tendons. • Magnetic Resonance Imaging (MRI) Scan: A special radiological test that uses magnetic waves to create pictures of an area, including bines, muscles, and tendons. • Ultrasound: An ultrasound is a test that looks inside your body. Sound waves are used to show pictures of your muscles and tissues on a TV-like screen
Treatment Initial Care: Treatment will depend on your symptoms and the length of time you have them. Your caregiver may want you to limit activity on your affected shoulder to decrease stress on the tendon. This may help prevent further damage, decrease pain, and promote tendon heal. The primary treatment is resting the shoulder and, for minor tears and inflammation, applying ice packs. You may need to wear a sling to keep the shoulder from moving. Medicines: Anti-inflammatory medications may also be prescribed. As soon as pain decreases, physical therapy is usually started to help regain normal motion. If pain persists after several weeks, the physician may inject cortisone into the affected area.
Treatment Continued Surgery: If you have a large tear in your rotator cuff, you may need surgery to repair the tear. Sometimes during this kind of surgery, doctors may remove a bone spur or calcium deposits. The surgery may be performed as an open repair through a 6- to 10-centimeter incision, or as an arthroscopic repair with the aid of a small camera inserted through a smaller incision. An arthroscope is used to view the shoulder joint and confirm the presence of a tear. It can also remove any bone spurs that may be present in the shoulder area. The arthroscopic procedures usually involves 2in incision in the outer shoulder. During this time the torn rotator edge may be reattached to the humerus with stitches. Arthroplasty: Some long-standing shoulder muscle tears may contribute to the development of rotator cuff arthropathy, which can include severe arthritis. In such cases, your doctor may discuss with you more extensive surgical options, including partial shoulder replacement (hemiarthroplasty) or total shoulder replacement (prosthetic arthroplasty). A unique treatment option now available involves the use of a reverse ball-and-socket prosthesis. This reverse shoulder prosthesis is most appropriate for people who have very difficult shoulder problems. These include having arthritis in the joint, along with extensive tears of multiple muscles and tendons (rotator cuff) that support the shoulder, or having extensive rotator cuff tears and a failed previous shoulder joint replacement.
Post Shoulder Arthroscopy Instructions • Ice: Apply ice to the top and back part of the shoulder as much as possible (at least 30 minutes every hour) during the first 24 to 48 hours after surgery (if a cyrocuff was prescribed, it should be used continuously during this period. Make sure that the cuff remains cold). This will help limit swelling. After the first few days use the ice/cyrocuff as you feel necessary. The ice should be placed in a sealed plastic bag to keep the surgical dressing from getting wet. • Dressing: The shoulder may have been filled with sterile fluid with a pump during the operation. The shoulder, therefore, will be very swollen and drainage will occur from the wounds. Expect the shoulder and arm to become discolored a few days after surgery. If the dressing becomes loosened or soiled, apply new ones (you may use small bandaids on the scope incisions and larger ones to cover any larger incisions). You should not allow the wounds to get wet until the 4th post -operative day, thereafter you may shower as long as the wounds are dry, without any drainage on the bandages.
Post Shoulder Arthroscopy Instructions • Activity: Wear a sling to immobilize and unload the shoulder. You should remove it periodically to move the elbow. This will help avoid cramping pain and stiffness. Unless instructed otherwise the sling may be removed when sitting in a chair, eating, or lying in bed. • Exercise: Begin elbow range of motion immediately. Begin posture (shoulder shrugs) and cervical spine flexibility exercises the first post-op day as tolerated. Begin shoulder pendulum exercises and isometric strengthening exercises at 24 to 48 hours as tolerated. • Medication: The injured patient will have a prescription for a strong painkiller. Use it as prescribed during the post-operative period. After several days, Tylenol or Ibuprofen may provide the pain relief. • Potential Problems: Call the office if: -If drainage continues after 24 hours or you think the drainage is excessive. -If you have a temperature greater than 101 degrees on more than one reading 48 hours or more after surgery. -If swelling increases or you develop any persistent numbness in the hand. -If severe pain remains 48 hours after surgery.
Rehabilitation Rehabilitation is crucial to restore the rotator cuff strength. The length of recovery depends of the severity of the tear. Rehabilitation can be divided into three phases: Phase I: Pain control: Use of non-steriodal antiflammatory agents, cryotherapy, protection of the injured tissue through the use of a sling or shoulder immobilizer. Exercises such as the pendulum can be performed. This is important for preservation of strength, which will speed recovery time. Phase II: 5 to 7 days after injury: In an overuse problem, this phase begins when pain diminishes. Range of motion is fully restored. Progressive resistive exercises are initiated to establish normal strength. Some examples of exercises are rotator cuff strengthening and strengthening of the scapular stabilizers. Restoration of strength and mobility of the shoulder is vital to allow for a successful return to sports.
Rehabilitation Continued Phase III: Sports Specific Training: To return an athlete to a level of full recovery and maximal performance, the exercises need to be tailored to the specific sport. For example, an interval throwing program is used for the throwing athlete.
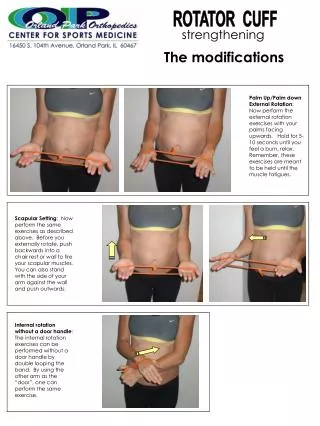
Shoulder Exercises Shoulder Pendulum: Let arm move in a circle clockwise, then counterclockwise by rocking body weight in a circular pattern. Repeat 5 times and complete 3 to 4 sessions per day. Lay on stomach on a table or bed. Put your arm out shoulder level with your elbow bent to 90 degrees and your hand down. Keep your elbow bent and slowly raise your hand. Stop when your hand is level with your shoulder. Lower the hand slowly.
Shoulder Exercises Continued Shoulder Shrugs: scapular stabilizing exercise of retraction and elevation. Lie on your right side with a rolled-up towel under your right armpit. Stretch your right arm above your head. Keep your left arm at your side with your elbow bent to 90 degrees and the forearm resting against your chest, palm down. Roll your left shoulder out, raising the left forearm until it is level with your shoulder.
Prevention • Warm-up stretching and strengthening of the shoulder muscles. • The shoulder exercises for treatment are great for a general conditioning program. • When shoulder injury symptoms begin, early evaluation and treatment can prevent mild inflammation from becoming full blown rotator cuff impingement, or worse, a tear of the rotator cuff. • A program of twenty minutes a day of shoulder stretches and muscle strengthening exercises is recommended to increase performance and decrease injuries.
Return to Play Return to play criteria should be individualized. The athlete should experience no pain with rest or activity, full strength in muscles across the affected joint, pain-free shoulder range of motion and negative provocative tests (Neer impingement test, Hawkins impingement test). An athlete who returns to his or her sport too soon tends to alter throwing mechanics and risks injuries not only to the same shoulder, but also to the elbow, hip, and spine. Resumption of activities should be gradual, and the intensity of the activity may need to be modified. Imaging findings alone should not be used to determine return to play.
References Geiger, Bill. “The cuff; If your shoulder hurts, don't shrug it off. shoulder pain can derail your chest and delt training. here's how to strengthen your rotator cuffs and prevent injury.(SPORTS MED).” Joe Weider’s Muscle & Fitness. Oct 2007 v68 i10 p241(3). Retrieved on March 15, 2008. < http://galenet.galegroup.com.libproxy.cc.stonybrook.edu/servlet/ Kessenich, C. “Shoulder assessment for rotator cuff tear. Diagnostic tips.” The Journal for Nurse Practitioners. 2008 Feb; 4(2): 142-3 retrieved on Macrh 15, 2008. < http://web.ebscohost.com.ezproxy.hsclib.sunysb.edu/ehost/detail?vid=4&hid=5&sid=a45885a2-b787-48bb-9bde-81d5b2e35ab1%40sessionmgr3 Puffer, James C. Sports Medicine, 20 common problems. New York: McGraw-Hill , 2002. Wells, Ken. R. "Rotator cuff injury." The Gale Encyclopedia of Medicine. Ed. Jacqueline L. Longe. 3rd ed. Detroit: Gale, 2006. 5 vols. http://www.stoneclinic.com/rotator_cuff.htm Http://ravenstd.com/wp-content/uploads/2007/12/rotator-cuff-diagram.jpg http://medicalimages.allrefer.com/large/rotator-cuff-muscles.jpg