Download
1 / 126
1.27k likes | 1.48k Views
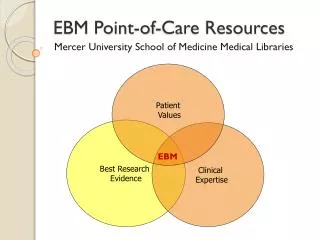
Point of Care. What is Point of Care??. Point-of-care is a general term defined as

E N D
What is Point of Care?? Point-of-care is a general term defined as “near the site of patient care”. The driving notion behind POC is to document immediately while you are with the patient. This increases the likelihood that the patient will acquire results in a timely manner and will prevent miscommunication and omitted information/documentation in the future.
What are some benefits to Point of Care? • Nursing & Multidisciplinary • data entry on the same patient • Bedside documentation • Real Time Data Entry • User defined documentation • content • System security-- unique id • access & password ensures • patient confidentiality
Logging in 1. Each employee will be assigned a unique USER ID and Password to access the system
4. Click on the “My Patients” tab to see your patients and start charting. 5. To start viewing the “Virtual Chart” click on the Name of the Patient
So what does a virtual chart look like and what are its functions?
Patient’s Photo Labs / Critical Labs Allergies and Immunization Information Memo or Reminder - See definitions on next page
Flowchart - used for daily charting / Nurses Notes E-forms – used for one time forms example: Present on Admission Pharmacy – used for Medication Administration / Med Verify / MAR Diabetic Record – Diabetic Flowsheet Order Entry – Orders example: Labs, Dietary, Radiology Reports – Printouts Discharge – Discharge Summary / Instruction Chart Type – used to select type of Patient (MedSurg / Telemetry / ICU/ CCU/CSU, etc.) ALWAYS MAKE SURE YOU HAVE THE CORRECT CHART TYPE!
What will change? In the name game… • Admission/Initial Assessment = Initial Interview • Nursing Flowsheet = Patient Care Daily Flowchart • Nursing Notes = Patient Progress Notes • Kardex = MedAct • Paper Medication Record/MAR = Electronic MAR • Daily Assessments, Activities & Vital Signs = Flow Chart • Plan of Care = Interdisciplinary Plan of Careeform
So which forms do we keep in a Flowchart, E-form and Paper? Click here!!!
REMINDERS—Common Mistakes • NEVER PRESS ON “COMPLETED“ icon–This means patient will be discharged and you are closing the flowchart or you have reached the limit of 500 columns. • If you wish to chart on the same time, always click on the same column of the flowchart to keep the same time. • POLICY : CHARTING BY EXCEPTION • For Nurses Notes: Chart only if there is a change in patient status. However, all questions need to be answered upon assessment every shift. • Address Interventions by System. Example: ( Respiratory Section to chart on “Lung Sounds”)
Flow Chart Functions • Vital Signs • Intake/Output • Initial Interview (Initial Assessment) • Physical Assessment • Nurse’s Notes
Select a new flowchart from the list or click Existing to search for previously created flowcharts
Answer the question and click on Next to continue. Click on Update to chart in real time.
Pharmacy • When selecting a tab from the Virtual Chart, the user can access an application directly. • Click on the Pharmacy tab to access the various applications associated with pharmacy such as 24hrEMAR or electronic MAR.
SELECT PHARMACY TO ACCESS THE PHARMACY APPLICATION
Verifying Orders From Pharmacy tab, click on Pharmacy and then click on Verify Orders; after you look at or review the medication to be verified: • click on the medication to turn it blue • then proceed to Verify • After medications have been ordered and verified, you can go to the 24hr EMAR to view the medications.
Medication Verification Administration • Medications are administered via the Point of Care Pharmacy application. Select the Pharmacy option and proceed to click on Medication Verification Administration. • This is a fully integrated and wireless point of care method for safer medication administration. • It is designed to take patient safety a step further by providing a final check at administration.
What is Med-Verify? Medication Verification checks medications scheduled to be administered against the patient’s Pharmacy Electronic MAR for accuracy. Process: Scan the barcode on the patient’s identification bracelet and then scan the barcode of each medication that is to be administered. The system then compares the medication to the patient’s medication profile of outstanding orders, ensuring that the specific medication and dosage was in fact ordered for that patient.
Accessing MedVerify via Point of Care Med Verifycan be accessed the following ways via Point of Care • Patient Whiteboard (from the Hospital Base Menu, click on POC access) • Pharmacy Options Menu from the virtual chart • 24hr. eMAR 17
Scan the IDBRACELET We will be using the bar scanners on each mobile workstation to scan patient’s ID armbands
Some medications will have preprinted barcodes from the manufacturer. Others will have barcode labels generated by pharmacy. Scan Bar Code Label
When documenting the medication administration the user will first scan the patient’s ID armband at which point the system will display the patient’s account number, name and date of birth. • The patient’s medication information will display upon scanning each medication barcode. • The scanned medication will be checked against the Pharmacy Profile • Once the user has completed scanning all the medications, Update must be selected to save the administrations. • There is no need to scan the patient’s armband between each medication.
Med Count keeps track of the total # of meds scanned Med List allows review of the current eMAR