Download
1 / 13
130 likes | 140 Views
Today, I want to tell you about the rare Clipping Path feature in Photoshop. I already mentioned this feature in my article Vector drawing tools in Photoshop. In it, while parsing all the tools and all the functions of the drop-down menus, I mentioned Clipping Path and described briefly its functions. But today I want to dwell on this topic in more detail. I searched the entire Internet and found almost no sensible information about this setting. To understand the meaning of the Clipping Path function in Photoshop will have to delve into the history. In this article I will show you beautiful pictures, we will create a Clipping Path, apply it to the picture and open it in the Illustrator. I must say at once, Clipping Path is not the same as Clipping Mask. It is not necessary to confuse these 2 terms. They are in different places and do different things, although the General meaning remains. Both in varying degrees obtain layout object. More Resource : https://www.cutoutexpert.com

E N D
What is Clipping Path in Photoshop Cutout Expert Sharing with you how to do Clipping Path at PHOTOSHOP
Today, I want to tell you about the rare Clipping Path feature in Photoshop. I already mentioned this feature in my article Vector drawing tools in Photoshop. In it, while parsing all the tools and all the functions of the drop-down menus, I mentioned Clipping Path and described briefly its functions. But today I want to dwell on this topic in more detail. I searched the entire Internet and found almost no sensible information about this setting
To understand the meaning of the Clipping Path function in Photoshop will have to delve into the history. In this article I will show you beautiful pictures, we will create a Clipping Path, apply it to the picture and open it in the Illustrator. I must say at once, Clipping Path is not the same as Clipping Mask. It is not necessary to confuse these 2 terms. They are in different places and do different things, although the General meaning remains. Both in varying degrees obtain layout object. • The history of Clipping Path in the paradigm of the universe
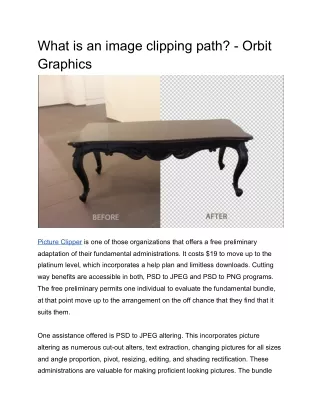
At the dawn of the era of computer graphics, in the very years when Photoshop was similar to Pixlr Editor, designers and coders of the early 90's asked a simple question: how to insert into your layout, carried out in some Page Maker or QuarkXPress, your favorite cat, without a bathroom in the background. Clearly, the cat needs to be cut out. In those difficult times, at the crossroads of millennia, designers seriously considered whether to create a new layer. And in the local literature constantly flash, funny today arguments about saving megabytes, minimizing layers, saving on the resolution of graphics. I always wanted to insert cut-out pictures into the newspaper, but there was no question of large-scale collages and files on 500 MB, which I create daily. Just saved the Clipping Path. On this theory ended, we pass to practice.
Create Clipping Path • I long hesitated, that same choose for example to this note: boy on backdrop of decline of or moon. The moon is round and simple, and the boy is not round and it is not simple to trace him for a long time. Alas, my choice fell on the moon. • * select the Ellipse Tool; • • On the tool settings panel, select the Path icon; • • If you don't have this panel, open it through Windows > Options; • * You can read more about the Path, Pixel Fill and Shape layers modes in my article; • * Move the mouse to the center of the moon and press SHIFT + ALT and draw a circle; • * SHIFT will create a proportional circle, that is, a circle rather than an ellipse, and ALT will create a circle from the center rather than from the corner.
* Most likely you are not exactly in the center of the moon and your contour will not capture it all; • • open Edit > Free Transform or press CTRL+T, adjust the size of the circuit. • * Go to the Path tab, if you do not know where it is, click Windows > Path; • * Path shows all the paths you've created, almost like layers; • • You will see the Work Path layer, this is the work path layer where all the paths appear. As you can see it is highlighted. Work Path does not save paths. If you deselect and draw a new path, the old path disappears and a new path appears on the Work Path. So we need to keep the outline; • * Double click on Work Path. A window will appear in which you need to write the name of the contour; • • All this I will tell you again when I describe the possibilities of the contour palette, but it does not matter. • • The contour is saved, great. Here we come to the point; • * Your outline should be highlighted; • * Click on the icon in the upper right corner of the Path palette and select Clipping Path; • * The font of the name of our contour is bold. Clipping Path is created, but visually no changes. What's the matter? Where is the magic of Photoshop?
What is Clipping Path? • Let's go back to the antediluvian times, when printing designers wanted to create complex collages and typesetting, but computers processed such work for hours. Clipping Path is an attribute that is assigned to one of the paths. This attribute means something like this: everything inside the contour should be shown, and everything outside the contour should be hidden. Of course you can adjust the settings of the curve options like Add or Subtract, the work of which I described in detail in the article Add, Subtract, Intersect and Exclude in Photoshop, but now not about that. Saving our file in vector format like EPS or printed format like TIFF, Photoshop takes into account the attributes of the contour and masks the remaining surface of the picture.
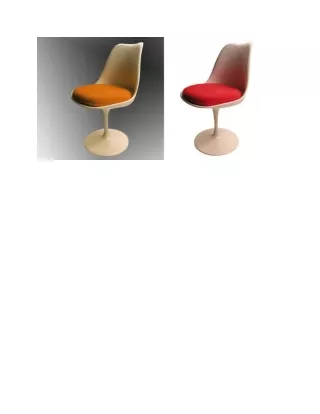
As a result, the cut-off line turns out to be sharp, vector, but in the 90s there could be no gradual fading or smooth overflows, blurred edges. Well, the cut-out contour pictures were just chic. Then came 2011, Photoshop has long learned to do full-scale collages with the most incredible smoothing and everything else. Clipping Path, which was the primary idea of creating contours in Photoshop sailed into the background, but has not lost relevance and that's why. • Saving file with Clipping Path in PDF, PDS, TIFF and JPG format • I'll do the work for you and show you a real-world example of how different formats react to the Clipping Path attribute. I will save our moon in PSD, EPS, TIFF and JPG formats and upload them via File > Place to Illustrator.
And here are our 4 images in the listed formats. With JPG everything is clear. This format is not created for drag-and-drop contours and did not know about them. TIFF until recently, a popular print format, and now quite common. He perfectly retains contours and understands their attributes. In this case, TIFF creates an image with a transparent background. Everything outside the contour became transparent. Photoshop PSD format reacts in the same way. In layers we see 2 ordinary pictures. At the moment it's just links to images, but we'll fix that now. • * Click on the TIFF picture • * In the menu above, click Embed • * In the menu that appears, select Flatten Layers to a Single Image As you can see, the Illustrator attached our moon to the working area and took out the contour hidden before, which is a vector mask of the image. The full picture is hidden under the vector mask. Similarly, the TIFF format behaves and, of course, EPS.
And all this would be good, but the clipping Path option could be annihilated. • * First, the Illustrator has long learned to open translucent images. • * Secondly, the need to layout raster graphics enclosed in vector contours has long disappeared. The entire collage whole piece is done in Photoshop. • * Thirdly, the baton of masking in Photoshop adopted vector mask, which does the same when saving to EPS format and is used much more often. • Well, on the other hand, the more different ways to perform, even one and the same, the better. Let's talk about practical application.
Practical application of Clipping Path • Despite the above points for what would not use Clipping Path, the use of it is necessary on a daily basis. At work, I face similar situations constantly, as translucent shimmers are not a panacea and are necessary constantly. I will describe one of the options for using Clipping Path in practice. This is not so much about Clipping Path as about vector masking of raster in Illustrator, because it does not matter how you achieved it. Whether you made Clipping Path in Photoshop, or created a vector mask in It, or just opened your picture in the Illustrator, drew the desired contour and applied Make Clipping Mask. The result of all these manipulations is the same-a vector mask for the raster. When printing, the vector is not rasterized as a raster image is rasterized. If a bitmap image has very specific resolution parameters, concluded in relation to the number of pixels per inch, then the resolution vector does not have at all. And you can rasterize it in any resolution necessary for printing, that's why it is a vector. Vector rasterization for printing occurs at a resolution of more than 2000 dpi which is slightly more than the usual 300 for raster graphics. It is for this reason that the text for business cards should not be written in Photoshop.
Very often, when making a cover or flyer, I have to place small objects, such as logos. The usual working situation — no one has these logos in the vector, not even in a good raster, but it is necessary to put. So that urgently are looking for where want and all. Most often, the logo is on the Internet in terrible quality. Swam, small size. In this case, the Clipping Path comes. I carefully circle the logo, as a result of which it comes out on the print with at least clear edges, but, alas, muddy inside. • And finally the main thing, what the hell is this incomprehensible flatness setting, which is in the clipping Path creation window?
Flatness when creating Flatness in Photoshop. Flatness is responsible for smoothing the vector contour when printing. If you leave this field blank, the printer uses its default settings. If errors occur, you must enter a value in the Flatness field to understand how the PostScript interpreter creates the curve. The smaller the Flatness value, the more straight lines PostScript uses to create the curve. Accordingly, the more flexible and smoother the contour is obtained. Value range 0.2 to 100 in General, 8 to 10 values are recommended for high resolution printing of 1200 dpi to 2400 dpi. A values of 1 to 3 for low resolution 300 dpi to 600 dpi.