Download
1 / 21
210 likes | 328 Views
Hyrax Installation and Customization. ESIP ‘08 Summer Meeting Best Practices in Services and Data Interoperability Dan Holloway James Gallagher. Outline . Hyrax Architecture Example Configuration of Hyrax Hyrax Customization. OLFS. BES. Data. Hyrax Architecture.

E N D
Hyrax Installation and Customization ESIP ‘08 Summer Meeting Best Practices in Services and Data Interoperability Dan Holloway James Gallagher
Outline • Hyrax Architecture • Example Configuration of Hyrax • Hyrax Customization
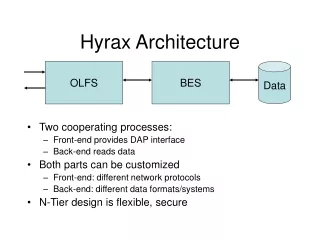
OLFS BES Data Hyrax Architecture • Two (or more) cooperating processes: • Front-end provides DAP interface • Back-end(s) read(s) data • Both parts can be customized • Front-end: different network protocols • Back-end: different data formats/systems • N-Tier design is flexible, secure
BES Commands DAP2 OLFS BES THREDDS HTML XML- encapsulated object Java Servlet Engine Unix Daemon Optional THREDDS catalogs File system with data files, SQL Database, … Hyrax Architecture
Hyrax Architecture Summary • Hyrax can be installed on one machine or several • Installation security merits serious consideration • Authentication & Authorization are handled by the web servers (Tomcat and Apache)
Hands on: Hyrax Configuration • Choices: • Single or Multiple machine • Single or Multiple back-end servers • Tomcat or Apache web server • Data formats • Catalog customization • Security • Testing • Command line tools for system administrators • Web browser
ESIP Workshop Configuration • Run a single BES and the OLFS on one host (the virtual machine running SLAX Linux) • Use Tomcat running on port 8080 • Data formats: NetCDF and FreeForm • No custom THREDDS catalog • No firewall
ESIP Hardware • SLAX Linux VMware Virtual Appliance • All the software needed has been built, installed and configured • Start the virtual machine now…
Starting the Virtual Machine • Insert the CD-ROM • Drag the opendap_vm and Wintools folders to the Windows desktop • Copy the ISO image from the CD ROM to the harddisk (in a command window, mkdir C:\SLAX and then use copy or dd to copy the iso to the new directory). • The dd command is in the Wintools folder • The C:\SLAX directory is coded into the virtual machine; use Vmware Workstation/Fusion to edit • Open the opendap_vm folder and double click on the opendap_vm.vmx virtual machine configuration file or start VMware Player/Workstation/Fusion and open opendap_vm.vmx from there. • The virtual host will boot and the SLAX (slackware Linux with KDE) desktop will appear.
Installing the Software • Already present on the virtual machine • But, if it wasn’t, you’d go to the OPeNDAP web site* and download: • Binaries or source for the BES and the data handlers needed. • Get the OLFS web archive file (which is a compiled java servlet). • You also need the Tomcat servlet engine * http://opendap.org/download/hyrax.html
Location of Server Files on the Virtual Machine • On your virtual machine: • The Tomcat servlet engine is in /usr/local/javadev/apache/tomcat-5.5.12 (this is the value of $CATALINA_HOME) • The BES, data handlers and related source files are in /usr/local/src. The BES has been built and installed in /usr/local/ ($prefix) • The OLFS web archive file is $CATALINA_HOME/webapps/opendap.war • BES: bes.conf, found at $prefix/etc/bes/bes.conf • OLFS: olfs.xml and catalog.xml, found at $CATALINA_HOME/content/opendap
Background: Starting the Server • Start the BES (back-end data processing component) • Use bescmdln to verify it’s working • Start Tomcat: This automatically starts all installed servlets • Servlets are installed by copying the .war file to the servlet’s webapps directory • Verify it’s working using a web browser
Start Tomcat & the OLFS • Typical steps: • Unpack the olfs jar-file • Copy the opendap.war file to Tomcat’s webapps directory • Start Tomcat • Since all but the last step has been done already, start Tomcat: • /usr/local/javadev/apache-tomcat-5.5.12/bin/startup.sh
Verify Tomcat is running http://localhost:8080
…and Hyrax http://localhost:8080/opendap
Complete the Configuration • Steps you would typically perform: • Security: Set up a firewall! Limit access to port 10002 to this host only • Custom catalogs: Edit the catalog.xml configuration file. By default automatic catalogs are generated • Logging: Edit the log4j.xml file. By default all accesses are logged
Stopping Hyrax First, stop Tomcat using ‘shutdown.sh’ …then stop the BES using ‘besctl’
Hyrax Configuration Summary • For our chosen configuration, we used only Tomcat, plus the Hyrax web application which consists of the BES and the OLFS • The tools bescmdln, getdap and a web browser were used to test the installation • There are a lot of options, but the default settings produce a working server • Security is a must for a web application; use a firewall to isolate the BES so only the local host can connect to it.