Download
1 / 55
550 likes | 558 Views
Learn how to customize filters and data grids in the extranet to narrow down results and modify column headings for personalized viewing.

E N D
Filters and Data Grids Before we start looking at the extranet, let’s take some time to discuss settings that can be customized by each user for themselves in the extranet. Filters – Several pages of the extranet will contain a Filters section. This section allows you to narrow down the results displayed on the page. The default filters can be adjusted by clicking the Manage Filters* option in the top right corner of this section. Data Grids – When viewing pages with filter options, just below the filters is a data grid. This data grid will display a list of records matching the criteria specified in the filters. Each default column heading in a data grid can be modified by clicking the sprocket* icon in the top right corner of the grid. * Remember, any adjustments made with the sprocket or the Manage Filters apply only to the person making the changes.
Filters and Data Grids Here is an example of the RFPs filter page. Once the desired criteria have been set in the filters, click the Apply Filters button to see the results. Notice the Manage Filters button that was mentioned previously.
Filters and Data Grids (cont’d) Once the filters have been applied, the data grid will update with the matching results. Several icons may appear on the records within the grid. The appearance of these icons will depend on the page being viewed. These icons are: Pencil – allows editing of a record Eyeball – allows viewing of a record Clone – allows duplicating of a record Add Button - Depending on the page, an Add button may appear in the top left of the data grid. When this option is available, clicking allows the addition of a new record. Notice the sprocket icon that was mentioned previously.
Filters and Data Grids (cont’d) Clicking on the sprocket icon or the Manage Filters button will trigger a menu as shown here. This menu provides options for personalizing the filters, data grid columns, and ordering of each. By changing these options, changing of these options effects ONLY the person making the changes.
Home Screen At A Glance is a brief view of an Account’s listings and special offers tracking. Clicking on the See All link to the right, engages a more detailed view of the Account and its interaction with the Bureau.
Home Screen (cont’d) Post Board allows a user to communicate with other properties within their destination. Clicking on the caption bubble icon allows a user to reply to a post. There is also an email icon for contacting the poster via email.
Home Screen (cont’d) Partner Bulletins are important notices, documentation, events, etc. posted by the Bureau. Important bulletins will be marked with a blue and white exclamation mark.
Home Screen (cont’d) Clicking the Member Profile icon displays a property’s information, such as contacts, Account details and information about interaction with the Bureau (same as the See All link in the At A Glance section), in addition to invoices sent by the Bureau. Note: Some of these options are just view and/or edit and/or add. More on these options later in the presentation.
Home Screen (cont’d) Cicking the Collateral icon, displays options for listings/publication guides, special offers, calendar of events, media (i.e. images), occupancy data, and materials request from the Bureau. Note: Some of these options are just view and/or edit and/or add. More on these options later in the presentation.
Home Screen (cont’d) Clicking the Opportunities icon, displays options for RFPs sent by the Bureau. Opportunities are broken in toRFPs (Meeting and Tour Leads), Media Leads (travel writer RFPs), Service Requests (non-room specific RFPs). More on these options later in the presentation.
Home Screen (cont’d) By clicking the Reports icon, displays reports the Bureau has posted. To view a report just click the name of the report.
Manage Profile - Accounts After you click the Profile icon and then Accounts, you will be presented with your account name and various action you can perform. If you see multiple account names, this is due to your property being associated with another property. The pencil icon will allow you to edit your property information. By clicking the eyeball icon, you can view your property information. The down arrow icon will allow you to view and edit your amenity and meeting space information.
Manage Profile - Accounts (cont’d) When you view or edit your property information, you can quickly scroll to a section on the page by clicking the links on the left of the page. If you are viewing the account , the top left will display an Edit button. If you are editing the account , the top left will display a Save button. You must click the Save button before changes are applied!
Manage Profile - Contacts After you click the Profile icon and then Contacts, you will be presented with a list of all the contacts associated with your property. On this page you can Add, Edit, View, or Clone (i.e. duplicate) a contact depending upon your extranet permissions.
Manage Profile - Contacts (cont’d) When you view or edit a contact, you can quickly scroll to a section on the page by clicking the links of the left of the page. If you are viewing a contact, the top left will display an Edit button. If you are editing a contact, the top left will display a Save button. You must click the Save button before changes are applied! IMPORTANT NOTE: If a contact has left your property it is your responsibility to notify the Bureau and/or change their contact type to “Inactive”.
Manage Profile - My Benefits After you click the Profile icon and then My Benefits, you will be presented summary reports based on the Bureau’s interaction with your property. The information you see on this page is specifically related to your property.
Manage Profile - Invoices After you click the Profile icon and then Invoices, you will be presented with a list of invoices sent to your property. To view the details of the invoice you can either click the eyeball icon or the Print icon. To pay an invoice, click the eyeball icon to first view the invoice.
Manage Profile - Invoices (cont’d) When viewing an invoice you can see the payment history associated to the invoice. If the invoice has an outstanding balance, you will see a Pay Now button in the top left of the page. Clicking the Pay Now button will take you to a secure page to pay using a credit card, much like any online payment portal on the internet. NOTE: Pay Now will only appear if this feature has been enabled by the Bureau.
Collateral - Listings After you click the Collateral icon and then Listings, you will be presented with your property’s listings. These listings may be website listings or publication guide listings. The pencil icon will allow you to edit your listing information. By clicking the eyeball icon, you can view your listing information. The clone icon will allow you to duplicate a listing. You can also create a new listing by clicking the Add Listing button. NOTE: Add Listing and Clone will only be available if the Bureau has enabled this feature.
Collateral – Listings (cont’d) When you view, edit, or add (if enabled) a listing, you can quickly scroll to a section on the page by clicking the links of the left of the page. If you are viewing a listing, the top left will display an Edit button. If you are editing a listing, the top left will display a Save button. You must click the Save button before changes are applied! IMPORTANT NOTE: Any edits or adding of listings will require approval from the Bureau. Upon saving your updates, the Bureau will be notified of your changes/additions.
Collateral – Listings (cont’d) When you edit or add (if enabled) a listing, you can select one or multiple images to associate to the listing by selecting the Listing Images pull down menu. As mentioned previously, any edits or adding of listings will require approval from the Bureau. Upon saving your updates, the Bureau will be notified of your changes/additions. More on images in the Collateral – Media slide. NOTE: Not all listing types allow for images to be added.
Collateral – Special Offers After you click the Collateral icon and then Special Offers, you will be presented with your property’s offers. The pencil icon will allow you to edit an existing offer. By clicking the eyeball icon, you can view the existing offer. The clone icon will allow you to duplicate an offer. You can also create a new offer by clicking the Add Offer button.
Collateral – Special Offers (cont’d) When you view, edit, or add an offer, you can quickly scroll to a section on the page by clicking the links of the left of the page. If you are viewing an offer, the button in the top left will say Edit. If you are editing an offer, the top left will display a Save button. You must click the Save button before changes are applied! As with listings, you have the ability to attach images to your offers. IMPORTANT NOTE: Any edits or adding of offers will require approval from the Bureau. Upon saving your updates, the Bureau will be notified of your changes/adds.
Collateral – Calendar of Events After you click the Collateral icon and then Calendar of Events, you will be presented with your property’s events. The pencil icon will allow you to edit an existing event. By clicking the eyeball icon, you can view the existing event. The clone icon will allow you to duplicate an event. You can also create a new event by clicking the Add Event button.
Collateral – Special Calendar of Events (cont’d) When you view, edit, or add an event, you can quickly scroll to a section on the page by clicking the links of the left of the page. If you are viewing an event, the top left will display an Edit button. If you are editing an event, the top left button will say Save. You must click the Save button before any of your changes are actually saved! IMPORTANT NOTE: Any edits or adding of events will require approval from the Bureau. Upon saving your updates, the Bureau will be notified of your changes/adds.
Collateral – Special Calendar of Events (cont’d) The Calendar of Events has a recurrence model built in. You can make your event a one-time event, daily, weekly, monthly, or yearly. If it is not a one day event, you can choose your recurring days of the event. Depending upon if it is daily, weekly, monthly, or yearly, your recurrence may change. At the bottom of the recurrence section, you can choose to end your event after a certain number of occurrences or on a specified date.
Collateral – Special Calendar of Events (cont’d) As with Listings and Special Offers you can add images to your event. Adding images to an event is a little different though. In the image Gallery section on the event, you can drag and drop and image or click the Browse button to search your computer for an image.
Collateral – Media After you click the Collateral icon and then Media, you will be presented with your property’s images available for use on listings and special offers. The pencil icon will allow you to edit an existing image. By clicking the red x icon, you can delete an existing image. The clone icon will allow you to duplicate an image. You can also create a new event by clicking the Add Event button.
Collateral – Media (Cont’d) As with Calendar of Events you can browse your hard drive or drag and drop an image. Once you upload a new image or edit an existing one you can attach the image to one or multiple listings by selecting the Listings pull down menu.
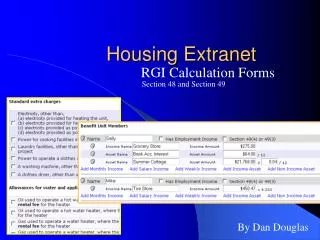
Collateral – Occupancy After you click the Collateral icon and then Occupancy, you will be presented options to enter your hotel occupancy numbers by year. Click the pencil icon next to the year to enter/edit your occupancy numbers.
Collateral – Occupancy (cont’d) Once you click the pencil icon to add/edit your occupancy number, you will be presented with a grid of all the months for that year. You can choose to enter your occupancy by percentage or by Rooms. As you enter this data, you will see the % Occupied or Rms Occupied fields auto-calculate based upon the data entered and the Available column data. As with all add/edit pages in the extranet, be sure to click the Save button!
Collateral – Materials Request After you click the Collateral icon and then Materials Request, you will be presented with a list of orders you have submitted to the Bureau. This feature will allow you to request collateral such as publication guides from the Bureau. To request new materials click the Add Materials Request button. You can also edit, view, or clone (duplicate) an existing order by clicking the Pencil, Eyeball, or Clone icons.
Collateral – Materials Request (cont’d) Upon editing or creating a new request, you will be presented with an order form. Within the order form there is an Order Detail section where you can select from available inventory, just enter the quantity of each product you are requesting. You will not be able to order more of a product than is in the Available column. Upon clicking the Save button, the Bureau will be notified of your request.
Opportunities – RFPs After you click the RFP icon and then RFPs, you will be presented with your property’s Sales and Tour Leads. The filters in this grid determine what Leads are presented. You can change your filters to narrow your results. This is done by editing the filter fields and clicking the Apply Filters button. By Default, you will see all of your Open Leads and Opens Leads you have already bid on. For more on Lead statuses and their definitions see the next slide.
Opportunities – RFPs (cont’d) LEAD STATUS DEFINITIONS On the extranet you will see 10 different statuses in which a Lead can be in. These statuses are: 1. Closed / No Bid Sent: These Leads can be Tentative, Definite, Lost, or Cancelled. The Closed/No Bid Sent status signifies this is business your property did not bid on and the response due date has passed. 2. Open: These are Leads in a tentative status that your property has not bid on and the response due date has not passed. 3. Open / Bid Sent: These are Leads in a tentative status that your property has already placed a bid on and the response due date has not passed. In this status, you can update your response at any time. 4. Turned Down: These Leads can be Tentative, Definite, Lost, or Cancelled. The Turned Down status signifies you responded to the Lead, but stated you are not pursuing the business. 5. Closed / Decision Pending: These are Leads in a tentative status that your property has placed a bid on, but the response due date has passed thus you cannot edit your response. 6. Closed / Lost to Another City: These are Leads you were pursuing, but the business has been lost. 7. Closed Cancelled: These are Leads where you won the business, but the group has cancelled. 8. Closed / Won: These are definite Leads in which your property was selected. 9. Closed / Won - Properties TBD: These are definite Leads but the group has not decided on a hotel yet. 10. Closed Lost: These are definite Leads in which your property was not selected for the business.
Opportunities – RFPs (cont’d) Below the filters section, you will see a data grid with all your Leads based on the selected filters. As mentioned in the Filters and Data Grid section of this presentation, you can change these data grid column headings to your preference by clicking the sprocket icon in the top right corner of the data grid. One of the more important column headings is the Group Type. This signifies if you are looking at a Meeting Sales or Tour Lead. To view a Lead, click on the Eyeball icon or the Lead Name
Opportunities – RFPs (cont’d) When viewing the Lead, you can skip to difference sections by clicking the left navigation. For notes and attachments on the Lead, these can generally be found in one of two areas: Lead Information and/or Notes section. In the above graphic, this is the Lead section; attachments will be found in the Meeting Specs field. For the Notes section, see next slide.
Opportunities – RFPs (cont’d) When scrolling to the Notes section, you will see the detailed notes for this piece of business. If an attachment is present, this will be signified with a paperclip icon. After you have reviewed the Lead, scroll to the Responses section. Here you will see options to either add or edit your existing response. Note: these options are not available once the Response Due Date has passed. Click the Add Response button or Pencil icon to enter/edit your response.
Opportunities – RFPs (cont’d) When adding/editing your response, you will need to tell the Bureau if you are pursuing the business by selecting Yes or No to the Pursuing this Lead option
Opportunities – RFPs (cont’d) The Room Information section of the response page is where you can enter the number of rooms, by room type, that your property can commit to for this Lead.
Opportunities – RFPs (cont’d) To attach a proposal to your response, scroll to the File Attachments section of the response page and click the Attach File button, to browse for the attachments. You can also click and drag your attachment from your computer to the attach file section. Once you have finished entering all your response information don’t forget to click the save button!
Opportunities – Media Leads By clicking the RFP icon and then selecting Media Leads, you can view Leads sent to your property by the Bureau’s Media/PR department. These are usually requests for hosting travel writers. These Leads can be responded to by viewing the Lead; see next slide for responding. Note: Media Leads function the same as Sales and Tour Leads including their statuses. See Opportunities – RFPs section for more details on this.
Opportunities – Media Leads (cont’d) As with Sales and Tour Leads you can also respond or edit an existing response to Media Leads by scrolling to the Responses section and clicking the Pencil icon. Within responses you are also able to specify if you are pursuing the business and add attachments.
Opportunities – Service Requests By clicking the RFP icon and then selecting Service Requests, you can view non-room night specific Leads sent to your property. These requests can range from transportation, audio/visual, catering, etc… Once you have adjusted your filters as you prefer, click the eyeball icon to view detailed information about the service request or click the name of the request.
Opportunities – Service Requests (cont’d) When viewing the service request, you can get detailed information in the Request information section along with RFP attachment downloads. Depending upon the Bureau’s preferences, this information may be contained in the Additional Notes and Documents section of the Service Request.
Opportunities – Service Requests (cont’d) If the Response Due Date has not passed, you are able to add/edit a response by clicking the Pencil icon in the Accounts/Responses section of the service request. Once clicked, you can tell the Bureau if you are pursuing this piece of business by clicking the Yes or No option in the Pursuing section to the right side of the page.
Opportunities – Service Requests (cont’d) As you scroll down the response page on the right, you have the ability to attach proposals by clicking Attach File button or click and drag the file from your computer. Be sure to scroll to the button and click the Update button to save your changes!
Opportunities – RFP Pickup A part of your Lead process may be to add room Pickup information. This data can only be added to RFPs that your Property has won and if the DMO has identified you as a Pickup Manager.