Download
1 / 8
80 likes | 218 Views
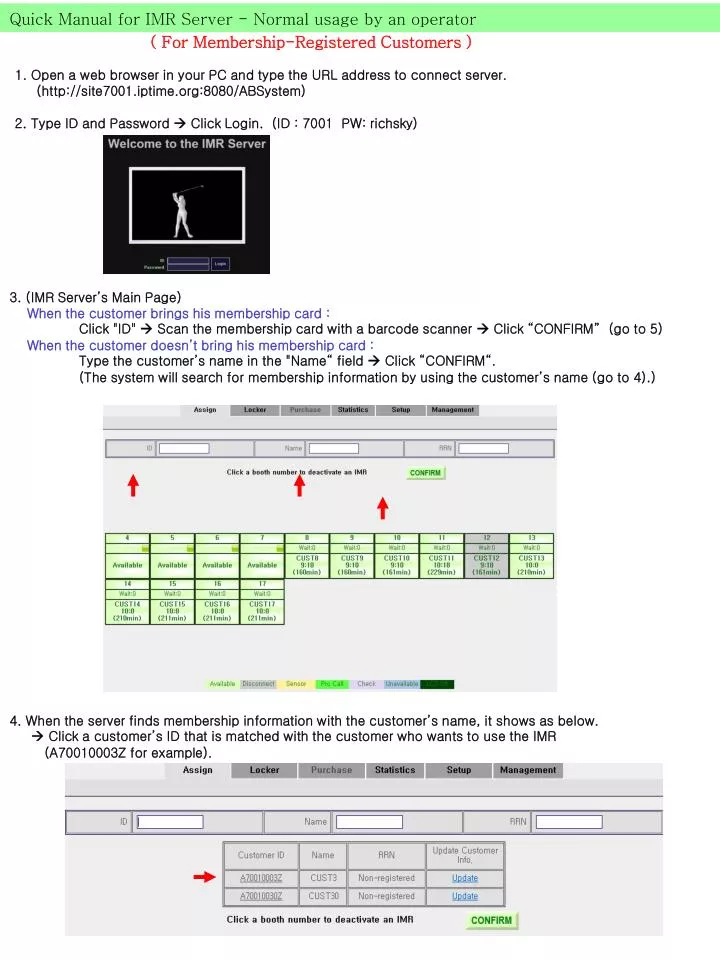
Quick Manual for IMR Server - Normal usage by an operator. ( For Membership-Registered Customers ). 1. Open a web browser in your PC and type the URL address to connect server. (http://site7001.iptime.org:8080/ABSystem). 2. Type ID and Password Click Login. (ID : 7001 PW: richsky).

E N D
Quick Manual for IMR Server - Normal usage by an operator ( For Membership-Registered Customers ) 1. Open a web browser in your PC and type the URL address to connect server. (http://site7001.iptime.org:8080/ABSystem) 2. Type ID and Password Click Login. (ID : 7001 PW: richsky) 3. (IMR Server’s Main Page) When the customer brings his membership card : Click "ID" Scan the membership card with a barcode scanner Click “CONFIRM” (go to 5) When the customer doesn’t bring his membership card : Type the customer’s name in the "Name“ field Click “CONFIRM“. (The system will search for membership information by using the customer’s name (go to 4).) 4. When the server finds membership information with the customer’s name, it shows as below. Click a customer’s ID that is matched with the customer who wants to use the IMR (A70010003Z for example).
5. Click an "Available" tee block where the customer will use. You can cancel by clicking “CANCEL” 6. Select “Service Time” and " Starting time“ Click “CONFIRM" O. K. CANCEL 7. When the customer(CUST3) is successfully assigned to tee block 5, the server shows the current state of IMR systems as below (CUST3 is assigned to tee block 5) Name Time to finish Remained time
(Forced Termination) 1. If you want a forced termination of an IMR during a customer is using an IMR Click the tee block cell it will show the following window, then click “QUIT”. 2. When you see the following reconfirm window, click “QUIT" again. . Forced Term.
How to Register A New Customer 1. Click "ID" field and scan a new membership card with a barcode scanner. 2. Enter the new customer’s name, sex, phone number, email address. Click “Enter”.
3. The window automatically goes to “Purchase” page. Select one of customer type and click “CONFIRM”. Forced Term.
4. Assign a tee booth where the new customer will use now. If the new customer doesn’t want to use an IMR, click “CANCEL”.
IMR System Maintenance (Check Points At the Client Side) 1. At IMR Server’s main page, you can check everything for all IMR systems. When any problem occurs on an IMR system, the color of the corresponding cell on the Status Panel changes. : Light Green (Available) – Everything is good. : Gray (Disconnect) - When there is any problem in the communication channel between the IMR server and the IMR system. : Yellow (Sensor) - When there is any problem in the Laser Shaft Sensors of the IMR system. IMR Status Panel ( Check Points ) : Gray (Disconnect) 1. Check whether the IMR system is turned on. 2. Check the network module of the IMR system is properly inserted at the bottom side of IMR System. 3. Check the Access Point (AP) is turned on and the network cable between the AP and the Router. (When there is any problem in an AP, all the IMR systems which are serviced by the AP will have network connection problem, so up to 15 consecutive cells of IMR Status Panel will be changed to gray color) 4. Try to reboot the IMR system by pressing the RESET button at the bottom side of the IMR system, or turn off the IMR system and turn on again by unplugging the DC power cable at the bottom side of the IMR system. : Yellow (Sensor) 1. Check the two laser beams are properly aligned and inside the reflector. 2. Check whether there is any dust on the reflector. (Clean up the reflector every two month in normal) 3. When the sensors are in good state the ACT1 LED and ACT2 LED should be turned off. Each LED should be turned on when the corresponding laser beam is hided by any objects.
2. When you cannot connect to the IMR Server’s page Check the IMR Server is turn on Check the network router is properly working (How to restart IMR Server) Push the power button at the front panel and wait until the green LED to be turned off After checking the green LED is turned off, push he power button again. Wait for 3 minutes and try to connect to the IMR Server. (How to restart the network router) Turn off the power switch of network router Turn on the network router again and wait for 3 minutes Try to access the IMR Server 3. Check the angles of front & side camera on every two month.