Download
1 / 55
550 likes | 663 Views
Macromedia Flash Design & Application. Chapter 5. Adding Sound, Video, and Basic Interactivity with Buttons. Performance Objectives. List the audio formats supported in Flash. Import sound to a movie's library. Add sound to an animation in a keyframe.

E N D
Macromedia FlashDesign & Application Chapter 5 Adding Sound, Video, and Basic Interactivity with Buttons
Performance Objectives • List the audio formats supported in Flash. • Import sound to a movie's library. • Add sound to an animation in a keyframe. • Change synchronization, sound effects, and loop sound. • Edit the sound envelope to customize a sound effect and control volume. • Specify the compression setting for the sound file. • Describe how sampling rate and sample size affect a sound file. • Use sounds from the common library. • Increase the layer height to display sounds in frames.
Performance Objectives • List the video formats supported in Flash. • Import a video clip to a movie. • Specify import video settings. • Modify a video clip instance. • Create a button symbol. • Modify a button instance. • Test the button in the authoring environment. • Add sound to a button. • Add an action statement to a button to control a movie using the Actions panel. • Create a movie clip symbol. • Create an animated button. • COMMANDS REVIEW
Adding Sound to a Movie • Sound is added to a movie by importing the sound file to the library • then adding an instance of the sound to the frame in the Timeline in which you want the sound to start playing • Flash can import sound files in the following file formats with QuickTime 4 or later installed: • wav • aif • au • mp3 A Windows-based computer without QuickTime 4 installed cannot import au files. A Macintosh-based computer without QuickTime 4 installed cannot import wav files.
Importing a Sound File File, Import or Ctrl + R change to the sound file format that you want to import
Importing a Sound File…/2 Flash imports sound files directly to the library. Window, Library or F11 click the Play button to hear the recording waveform for selected audio file
Adding Sound in Animation • Insert a new layer in the Timeline • not required but is recommended for ease of editing • Insert a keyframe at the required frame in the Timeline • Insert sound in a keyframe by dragging an instance of the sound from the library to the stage with the keyframe active • can also be added by choosing the sound file name in the Properties panel
Adding Sound in Animation…/2 sound waveform displays in Timeline pointing at the waveform displays a tooltip with the name of the sound file
Synchronizing Sound to the Animation Sync sound properties can be applied to the keyframe from the Properties panel to synchronize the sound with the other elements in an animation.
Sync Sound Options • Event • starts playing when the playhead reaches the keyframe and continues playing to completion • completely downloaded before it begins to play • Start • same as an event sound with the exception that any existing instances of the same sound will be stopped when the start sound plays • Stop • use to discontinue playing a sound • Stream • is synchronized with the Timeline and will stop playing when the playhead reaches the end of the frames • can begin playing almost immediately while the remainder of the data is downloaded in the background
Looping a Sound Instance Key a value for a sound keyframe to specify the number of times in which the sound should be replayed.
Applying Sound Effects The Effect drop-down list for a sound keyframe provides preset options to control the volume level or channel from which the sound plays.
Sound Effect Options • Left Channel • plays in left channel only • Right Channel • plays in right channel only • Fade Left to Right • volume pans from left channel to right channel • Fade Right to Left • volume pans from right channel to left channel • Fade In • volume gradually increases as sound is played • Fade Out • volume gradually decreases as sound is played • Custom • opens Edit Envelope dialog box • customize volume or define starting and ending points for sound
Editing the Sound Envelope Envelope handle Envelope line Sound Timeline Left channel editing window Right channel editing window Time In Display Timeline in frames Display Timeline in seconds Stop Play Zoom
Editing the Sound Envelope…/2 • Drag envelope handles up or down to increase or decrease the volume • Drag Time In or Time Out markers to change the point in the sound file at which the sound will start or finish • Changes made apply to the selected sound instance only
Defining Sound Properties select sound and click Properties button
Defining Sound Properties…/2 • Sound is recorded digitally through a process called sampling • device attached to the computer measures the waveform at regular intervals • Sampling rate is the number of times per second a sample of the waveform is recorded • Sample size refers to the amount of information stored for each sampled waveform • High sample rate and sample sizes provide high quality sound • also require larger sound file size to store the information
Compressing Sound Files Depending on the active compression option, you can test the level at which a sound file will be compressed using various sample rates and bit rates to achieve a balance between the quality of sound and file size. to update the sound file if you have edited the original file outside Flash to change all instances of the sound to a different file to hear the quality of the compressed sound file to discontinue playing a sound after clicking the test button
Compression Options • ADPCM – Adaptive Differential Pulse Code Modulation • only the difference between samples is recorded • recommended for short sound effects • MP3 (file extension for MPEG) – Motion Picture Experts Group • removes redundant and irrelevant parts • no noticeable loss in quality • Raw • no compression but allows you to resample at a new rate • Speech • compression specific for voice data
Using Sounds from the Common Library Flash provides a common sound library containing various sound effects that can be copied to the current movie's library. Window, Common Libraries With the keyframe active for which you want to insert a sound, drag the sound from the common library to the stage. The sound is added to the current movie's Library panel.
Increasing Layer Height to Display Sound in Frames enlarges display of waveforms Modify, Layer click to select layer height setting
Layer Height Settings 100% 200% 300%
Finding Sound on the Internet Sound effects can be downloaded from the Web for free or for a small fee for use in a Flash movie.
Video File Formats • Flash can import video clips in the following file formats with QuickTime 4 or later installed: avi, dv, dvi, mpg, mpeg, mov, and flv • A Windows-based computer with DirectX 7 or later installed can also import a wmv (Windows Media File) format • Flash imports and exports video using the Sorenson Spark codec which controls the compression in Flash and the decompression in the Flash Player • Users will require Flash Player Version 6 to view a movie with embedded video
Importing Video File, Import or Ctrl + R change to the video file format that you want to import
Importing Video…/2 Import a QuickTime video clip as an embedded movie clip or as a link to an external video file. Choosing to link a QuickTime video externally requires that the movie be published as a QuickTime movie.
Choosing the Import Video Settings Import settings that control the compression level of a video clip are set before the video is imported. drag slider or key value between 0 and 100 to specify compression level synchronize the video with the timeline drag slider or key value between 0 and 48 to set the number of video keyframes audio may or may not be able to be imported depending on program used to record tracks drag slider or key value between 1 and 100 to specify the percentage of pixel dimensions
Choosing the Import Video Settings…/2 displays progress bar indicates number of frames required in the movie Timeline The video clip is added to the library.
Importing Video Directly to the Library File, Import to Library Insert by dragging an instance of the video to the stage.
Embedded Video Properties select video clip and click Properties button
Modifying a Video Instance An instance of a video can be scaled, rotated, or skewed using the Free Transform tool or moved to a new location on the stage using the Arrow tool. display the Properties panel to change the dimensions of the clip
Importing Video in a Movie Clip Symbol Gains the advantage of having its own Timeline and the ability to control the clip's brightness, tint, and alpha properties. Insert, New Symbol or Ctrl + F8 key a name click Movie Clip Behavior
Importing Video in a Movie Clip Symbol…/2 File, Import or Ctrl + R change video import settings as necessary change to the video file format that you want to import
Importing Video in a Movie Clip Symbol…/3 after the import process has completed, click the Back button insert a layer and/or create frames to place the video drag an instance to the stage modify the movie clip symbol instance as necessary
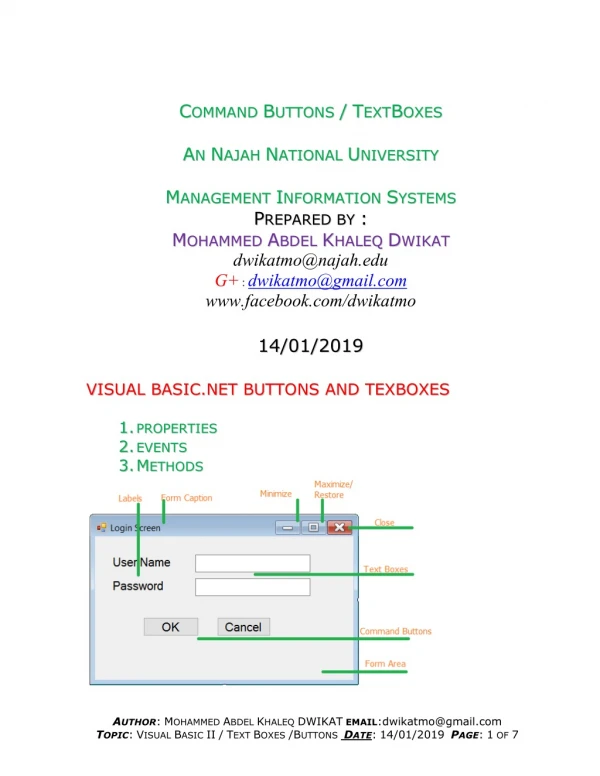
no mouse action over it mouse rolled over it has been clicked defines the boundaries Up Over Down Hit Creating Buttons Create buttons to add simple interactivity with the user in which the user can control the movie's playback. A button is created as a symbol with four states.
Creating Buttons…/2 Insert, New Symbol or Ctrl + F8 key a name click Button Behavior
Modifying a Button Instance insert keyframes and define the button's appearance for each of the four button states draw the button around the registration point Flash will use the button's Up state as the Hit property if no image is created in the Hit keyframe.
Inserting an Instance of a Button With the appropriate keyframe active, drag a button instance from the Library panel to the stage.
Testing a Button By default, Flash does not display a button's attributes during movement of the mouse over the button within the authoring environment. Control, Enable Simple Buttons or Ctrl + Alt + B Control, Test Movie or Ctrl + Enter Use the Buttons common library to copy button symbols to the current movie.
Adding Sound to a Button With the button in symbol editing mode, insert a keyframe in the Down frame of the button sound layer. select the sound from the drop-down list
Adding an Action to a Button • ActionScript • a programming language used to instruct Flash on what actions to perform when a button is clicked by the user • like learning a new language of words and syntax to convey instructions to the computer • create using a point-and-click approach in the Actions panel
Adding an Action to a Button…/2 • Creating an action statement for a button involves associating ActionScript statements with a mouse event • Mouse event • occurs when the user interacts with the button • triggers Flash to perform the action statement associated with the event • most common are: • Press • Release • Roll Over
Actions Panel Click to open the Reference Panel Window, Actions or F9 Toolbox ActionScript area Displays the current script that you are editing. Click the down arrow to navigate to other scripts. Parameters area
Actions Panel…/2 • An event handler beginning with the keyword on is required at the beginning of any ActionScript statement for a button • created automatically when you add actions using the Actions panel • Double-click an action in the Toolbox to add the action to the ActionScript area • The Movie Control actions Stop, Play, Goto, and stopAllSounds are used to allow the user to control the playback of the movie when assigned to a button
Creating a Movie Clip Symbol • Insert, New Symbol • key a name • click Movie Clip in the Behavior section • click OK • File, Import • change the Files of type • double-click the file name • Click the Back button to exit symbol editing mode
Creating Animated Buttons Insert the movie clip symbol within a button's Up, Over, or Down keyframes to create a button that animates.
Commands Review How do you display the Actions panel? Window, Actions or F9
Commands Review How do you view the common button or sound library? Window, Common Libraries
Commands Review How do you create a new symbol? Insert, New Symbol or Ctrl + F8
Commands Review How do you enable the buttons on the stage? Control, Enable Simple Buttons or Ctrl + Alt + B