Download

1 / 231
2.59k likes | 3.26k Views
Implementing the Cisco Adaptive Security Appliance (ASA). IOS Firewall Solution. An IOS router firewall solution is appropriate for small branch deployments and for administrators who are experienced with Cisco IOS.

E N D
IOS Firewall Solution • An IOS router firewall solution is appropriate for small branch deployments and for administrators who are experienced with Cisco IOS. • However, an IOS firewall solution does not scale well and typically cannot meet the needs of a large enterprise.
ASA 5500 Firewall Solution • The ASA 5500 firewall appliance is a multi-service standalone appliance that is a primary component of the Cisco SecureX architecture. • ASA 5500 appliances incorporate: • Proven firewall technology. • High-performance VPNs and always-on remote-access. • Comprehensive, highly effective intrusion prevention system (IPS) with Cisco Global Correlation and guaranteed coverage. • Failover feature for fault tolerance.
ASA Models • Cisco ASA devices scale to meet a range of requirements and network sizes. • There are six ASA models, ranging from the basic 5505 branch office model to the 5585 data center version. • All provide advanced stateful firewall features and VPN functionality. • The biggest difference between models is the: • Maximum traffic throughput handled by the device. • The types and the number of interfaces on the device. • The choice of ASA model will depend on an organization's requirements, such as: • Maximum throughput • Maximum connections per second • Available budget
ASA Models ASA 5585 SSP-60(40 Gbps, 350K cps) ASA 5585 SSP-40(20 Gbps, 240K cps) Multi-Service (Firewall/VPN and IPS) ASA 5585 SSP-20(10 Gbps, 140K cps) ASA 5585 SSP-10(4 Gbps, 65K cps) ASA 5540 (650 Mbps,25K cps) Performance and Scalability ASA 5520 (450 Mbps,12K cps) ASA 5510 (300 Mbps, 9K cps) ASA 5505 (150 Mbps, 4000 cps) ASA SM(16 Gbps, 300K cps) ASA 5550 (1.2 Gbps, 36K cps) SOHO Branch Office Internet Edge Campus Data Center * Mbps and Gbps = maximum throughput * cps = maximum connection per second
Advanced ASA Feature: Virtualization • One single ASA device is divided into three virtual ASA devices (security context) serving the needs of three separate customers. Single ASA Device Security Context A Customer A Internet Security Context B Customer B Customer C Security Context C
Advanced ASA Feature: High Availability • Traffic leaving PC-A takes the preferred path using ASA-1. • ASA-1 and ASA-2 are identical ASA devices configured for failover and each device monitors the other device over the LAN failover link. • If ASA-2 detects that ASA-1 has failed, then ASA-2 would become the Primary/Active firewall gateway and traffic from PC-A would take the preferred path using ASA-2. ASA-1 Primary/Active 10.1.1.0/29 192.168.1.0/24 .1 .1 .1 10.2.2.0/30 .3 Internet .2 PC-A .2 .2 LAN failover link ASA-2 Secondary/Standby
Advanced ASA Feature: Identity Firewall • A Client attempting to access Server resources must first be authenticated using the Microsoft Active Directory. Internet Internet Server Client Microsoft Active Directory AD Agent
Advanced ASA Feature: Identity Firewall • Full IPS features are provided by integrating special hardware modules with the ASA architecture. • The Cisco Advanced Inspection and Prevention Security Services Module (AIP-SSM) is for the ASA 5540 device. • The Cisco Advanced Inspection and Prevention Security Services Card (AIP-SSC) is for the ASA 5505 device. AIP-SSM for the ASA 5540 AIP-SSC for the ASA 5505
Networks on a Firewall • Inside network • Network that is protected and behind the firewall. • DMZ • Demilitarized zone, while protected by the firewall, limited access is allowed to outside users. • Outside network • Network that is outside the protection of the firewall.
Routed vs. Transparent Mode • An ASA device can operate in one of two modes: • NOTE: • The focus of this chapter is on Routed Mode.
ASA Licenses • ASA appliances come pre-installed with either a: • Base license • Security Plus license • Additional time-based and optional licenses can be purchased. • Combining additional licenses to the pre-installed licenses creates a permanent license. • The permanent license is activated by installing a permanent activation key using the activation-key command. • Only one permanent license key can be installed and once it is installed, it is referred to as the running license. • To verify the license information on an ASA device, use the commands: • show version • show activation-key
ASA 5505 Base License ciscoasa# show version <Output omitted> Licensed features for this platform: Maximum Physical Interfaces : 8 perpetual VLANs : 3 DMZ Restricted Dual ISPs : Disabled perpetual VLAN Trunk Ports : 0 perpetual Inside Hosts : 10 perpetual Failover : Disabled perpetual VPN-DES : Enabled perpetual VPN-3DES-AES : Enabled perpetual AnyConnect Premium Peers : 2 perpetual AnyConnect Essentials : Disabled perpetual Other VPN Peers : 10 perpetual Total VPN Peers : 25 perpetual Shared License : Disabled perpetual AnyConnect for Mobile : Disabled perpetual AnyConnect for Cisco VPN Phone : Disabled perpetual Advanced Endpoint Assessment : Disabled perpetual UC Phone Proxy Sessions : 2 perpetual Total UC Proxy Sessions : 2 perpetual Botnet Traffic Filter : Disabled perpetual Intercompany Media Engine : Disabled perpetual This platform has a Base license. Serial Number: JMX15364077 Running Permanent Activation Key: 0x970bc671 0x305fc569 0x70d21158 0xb6ec2ca8 0x8a003fb9 Configuration register is 0x41 (will be 0x1 at next reload) Configuration last modified by enable_15 at 10:03:12.749 UTC Fri Sep 23 2011 ciscoasa#
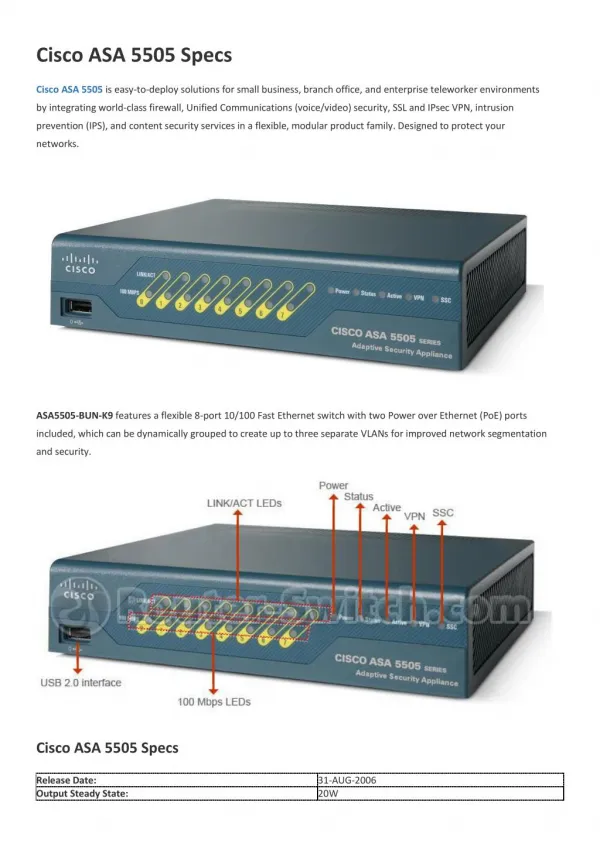
ASA 5505 • The Cisco ASA 5505 is a full-featured security appliance for small businesses, branch offices, and enterprise teleworker environments. • It delivers a high-performance firewall, SSL VPN, IPsec VPN, and rich networking services in a modular, plug-and-play appliance.
ASA 5505 Front Panel • Speed and link activity LEDs • Solid green speed indicator LED indicates 100 Mb/s; no LED indicates 10 Mb/s. • Green link activity indicator LED indicates that a network link is established. • Blinking link activity indicator indicates network activity. • Status LED • Flashing green indicates that the system is booting and performing POST. • Solid green indicates that the system tests passed and the system is operational. • Amber solid indicates that the system tests failed. • Active LED • Solid green LED indicates that this Cisco ASA is configured for failover. • VPN LED • Solid green indicates that one or more VPN tunnels are active. • Security Services Card (SSC) LED • Solid green indicates that an SSC card is present in the SSC slot. 2 4 5 6 7
ASA 5505 Back Panel • One Security Service Card (SSC) slot for expansion. • The slot can be used to add the Cisco Advanced Inspection and Prevention Security Services Card (AIP-SSC) to provide intrusion prevention services. • USB ports (front and back) can be used to enable additional services and capabilities. • Consists of an 8-port 10/100 Fast Ethernet switch. • Each port can be dynamically grouped to create up to three separate VLANs or zones to support network segmentation and security. • Ports 6 and 7 are Power over Ethernet (PoE) ports to simplify the deployment of Cisco IP phones and external wireless access points. NOTE: • The default DRAM memory is 256 MB (upgradable to 512 MB) and the default internal flash memory is 128 MB for the Cisco ASA 5505. 2 6 7 8
ASA 5510 Back Panel 3 5 4 1 7 2 8 6
Security Levels • The ASA assigns security levels to distinguish between inside and outside networks. • Security levels define the level of trustworthiness of an interface. • The higher the level, the more trusted the interface. • Security levels range between 0 (untrustworthy) to 100 (very trustworthy). • Each operational interface must have: • A name. • A security level from 0 (lowest) to 100 (highest) assigned. • An IP address (routed mode).
ASA 5505 Deployment - Small Branch • In a small branch deployment, a common deployment would include: • An inside network (VLAN 1) with security level 100. • An outside network (VLAN 2) with security level 0.
ASA 5505 Deployment - Small Business • In a small business, the ASA 5505 can be deployed with two different protected network segments: • The inside network (VLAN 1) to connect workstations and IP phones. • The outside interface (VLAN 2) is used to connect to the Internet. • The DMZ (VLAN 3) to connect a company web server.
ASA 5505 Deployment - Enterprise • In an enterprise deployment, the ASA 5505 can be used by telecommuters and home users to connect to a centralized location using a VPN.
ASA Command Line Interface (CLI) • The ASA CLI is a proprietary OS which has a similar look and feel to the router IOS. • Like a Cisco IOS router, the ASA recognizes the following: • Abbreviation of commands and keywords. • Using the Tab key to complete a partial command. • Using the help key (?) after a command to view additional syntax. • Unlike an ISR, the ASA: • Can execute any ASA CLI command regardless of the current configuration mode prompt and does not require or recognize the do IOS CLI command. • Can provide additional help listing a brief command description and syntax by using the EXEC command help followed by the CLI command. (e.g., helpreload) • Interrupts show command output by simply using the letter Q.(Unlike the Ctrl+C (^C) IOS CLI key sequence.)
ASA Factory Default Configurations • hostname ciscoasa • enable password 8Ry2YjIyt7RRXU24 encrypted • passwd 2KFQnbNIdI.2KYOU encrypted • names • ! • interface Ethernet0/0 • switchport access vlan 2 • no shut • ! • interface Ethernet0/1 • no shut • <Output omitted> • interface Vlan1 • nameif inside • security-level 100 • ip address 192.168.1.1 255.255.255.0 • ! • interface Vlan2 • nameif outside • security-level 0 • ip address dhcp setroute • <Output Omitted> • object network obj_any • nat (inside,outside) dynamic interface • <Output Omitted> • http server enable • http 192.168.1.0 255.255.255.0 inside • <Output Omitted> • dhcpd auto_config outside • ! • dhcpd address 192.168.1.5-192.168.1.36 inside • dhcpd enable inside • <Output Omitted> Default management settings. The outside interface is configured. E0/1 is configured as the outside interface. E0/2 – E0/7 are not configured and are all shutdown. Inside network VLAN (VLAN 1) is configured with name (inside), security level (100) and internal IP address. Outside network VLAN (VLAN 2) is configured with name (outside), security level (0) and to acquire its IP address and default route from the upstream device. PAT is configured so that inside addresses are translated using the outside interface IP address. HTTP access for ASDM is configured. The outside is to discover its WINS, DNS, and domain information from the upstream devices. DHCP Server settings for inside hosts.
CLI Setup Initialization Wizard • If the default configuration is not required, erase and reload the ASA using the write erase and reload commands. • Note that the ASA does not recognize the erase startup-config command. • Once rebooted, the CLI Setup Initialization wizard prompts to pre-configure the firewall appliance using interactive prompts. • Entering “no” cancels the wizard and the ASA will display its default prompt. • The Setup Initialization wizard is an optional method for initially configuring an ASA. • It also provides most of the settings needed to access the ASA using ASDM.
CLI Setup Initialization Wizard • The CLI Setup Initialization wizard configures the following: • Firewall mode • Enable password • Enable password recovery • Time and date settings • Inside IP address and mask • ASA device host name • Domain name
CLI Setup Initialization Wizard • <Bootup output omitted> • Pre-configure Firewall now through interactive prompts [yes]? • Firewall Mode [Routed]: • Enable password [<use current password>]: cisco • Allow password recovery [yes]? • Clock (UTC): • Year [2012]: • Month [Oct]: • Day [3]: • Time [03:44:47]: 6:49:00 • Management IP address: 192.168.1.1 • Management network mask: 255.255.255.0 • Host name: CCNAS-ASA • Domain name: ccnasecurity.com • IP address of host running Device Manager: 192.168.1.2 • The following configuration will be used: • Enable password: cisco • Allow password recovery: yes • Clock (UTC): 6:49:00 Oct 3 2011 • Firewall Mode: Routed • Management IP address: 192.168.1.1 • Management network mask: 255.255.255.0 • Host name: CCNAS-ASA • Domain name: ccnasecurity.com • IP address of host running Device Manager: 192.168.1.2 • Use this configuration and write to flash? yes • INFO: Security level for "management" set to 0 by default. • WARNING: http server is not yet enabled to allow ASDM access. • Cryptochecksum: ba17fd17 c28f2342 f92f2975 1e1e5112 • 2070 bytes copied in 0.910 secs • Type help or '?' for a list of available commands. • CCNAS-ASA> Default values are displayed in brackets [ ]. To accept the default input, press Enter.
Configure Basic Settings • Basic management settings are configured in global configuration mode. NOTE: • The first time global configuration mode is accessed, a message prompting you to enable the Smart Call Home feature appears. • This feature offers proactive diagnostics and real-time alerts on select Cisco devices, which provides higher network availability and increased operational efficiency. • To participate, a CCO ID is required and the ASA device must be registered under a Cisco SMARTnet Service contract.
Steps to Configure Basic Settings • Configure basic management settings. • (i.e., hostname, domain name, and enable password.) • Enable the master passphrase. • Configure the Inside and Outside SVIs (on an ASA 5505). • Assign Layer 2 ports to VLANs (on an ASA 5505). • Enable Telnet, SSH, and HTTPS access. • Configure time services. • Configure a default route.
1 - Configure Basic Management Settings • In global configuration mode, configure the ASA host name, domain name, and privileged EXEC mode password using the following commands: • hostname name- Changes the name of the ASA. • domain-name name- Changes the domain name. • enable password password- Configures the privileged EXEC mode password. • Note that there is no secret option. • passwd password- Configures the Telnet / SSH password. • ciscoasa# conf t • ciscoasa(config)# hostname CCNAS-ASA • CCNAS-ASA(config)# domain-name ccnasecurity.com • CCNAS-ASA(config)# enable password class • CCNAS-ASA(config)# passwd cisco • CCNAS-ASA(config)#
2 - Enable the Master Passphrase • A master passphrase securely stores plaintext passwords in encrypted format. • Similar to the IOS service password-encryption command. • To configure a master passphrase, use the following commands: • key config-key password-encryption [new-passphrase[old-passphrase]] • Creates or changes an existing master passphrase (8 to 128 characters in length). • password encryption aes • Enables password encryption. • CCNAS-ASA(config)# key config-key password-encryption cisco123 • CCNAS-ASA(config)# password encryption aes • CCNAS-ASA(config)#
3 - Configure Inside and Outside SVIs • On ASA 5510 and higher, routed interfaces are configured with IP configurations. • However, the ASA 5505 has an integrated 8 port Layer 2 switch and therefore IP configurations are accomplished by: • Configuring the inside and outside switched virtual interfaces (SVIs) by assigning interface names, security level, and IP address. • Assigning Layer 2 ports to the inside and outside SVI VLANs. NOTE: • Optionally, a third SVI (DMZ) could also be configured if required. • However, ASA 5505 with a Base License can only support a limited SVI.
3 - Configure Inside and Outside SVIs • Use the following commands to configure the inside and outside SVI VLAN interfaces: • interface vlan vlan-number- Creates a switch virtual interface (SVI). • nameif {inside | outside |name}- Assigns an interface name. • security-level value- Assigns a security level to the SVI interface. • By default, the inside interface is assigned 100 and the outside interface is 0. • ip address ip-address netmask – Manually configure an IP address. • CCNAS-ASA(config)# interface vlan 1 • CCNAS-ASA(config-if)# nameif inside • INFO: Security level for "inside" set to 100 by default. • CCNAS-ASA(config-if)# security-level 100 • CCNAS-ASA(config-if)# ip address 192.168.1.1 255.255.255.0 • CCNAS-ASA(config-if)# exit • CCNAS-ASA(config)# interface vlan 2 • CCNAS-ASA(config-if)# nameif outside • INFO: Security level for "outside" set to 0 by default. • CCNAS-ASA(config-if)# security-level 0 • CCNAS-ASA(config-if)# ip address 209.165.200.226 255.255.255.248 • CCNAS-ASA(config-if)# exit • CCNAS-ASA(config)#
3 - Configure Inside and Outside SVIs • Optionally, instead of manually configuring an IP address, the interface could also be configured as a: • DHCP client using theip address dhcp [setroute] command. • PPPoE client using theip address pppoe [setroute] command. NOTE: • An ASA can also be configured as a DHCP server which is covered later.
3 - Configure Inside and Outside SVIs • An ASA 5505 with the Security Plus License automatically supports the creation of additional VLANs to create other zones such as a DMZ zone. • However, an ASA 5505 with a Basic License only supports a third “restricted" SVI. • This SVI is limited from initiating contact to another specified VLAN. • The following command must be configured to support the third restricted VLAN SVI on an ASA 5505 with a Base License: • no forward interface vlan vlan-id • vlan-id specifies the VLAN to which this interface cannot initiate traffic. • Configure this command only once the inside and outside VLAN interfaces are configured. • The new SVI must also be named, assigned a security level value, and IP address.
4 - Assign Layer 2 ports to VLANs • The Layer 2 ports must be assigned to a VLAN. • By default, all ports are members of VLAN 1. • Use the following commands to change the VLAN assignment: • interface interface number– Enter interface configuration mode. • switchport access vlan vlan-id– Change the VLAN assignment. • no shutdown – Enable the physical interface. • To verify VLAN settings, use the show switch vlan command. • CCNAS-ASA(config-if)# interface e0/1 • CCNAS-ASA(config-if)# switchport access vlan 1 • CCNAS-ASA(config-if)# no shut • CCNAS-ASA(config-if)# exit • CCNAS-ASA(config)# interface e0/0 • CCNAS-ASA(config-if)# switchport access vlan 2 • CCNAS-ASA(config-if)# no shut • CCNAS-ASA(config-if)# exit • CCNAS-ASA(config)#
Verify SVI and Interface Settings CCNAS-ASA# show switch vlan VLAN Name Status Ports ---- -------------------------------- --------- ----------------------------- 1 inside up Et0/1, Et0/2, Et0/3, Et0/4 Et0/5, Et0/6, Et0/7 2 outside up Et0/0 CCNAS-ASA# CCNAS-ASA# show interface ip brief Interface IP-Address OK? Method Status Protocol Ethernet0/0 unassigned YES unset up up Ethernet0/1 unassigned YES unset up up Ethernet0/2 unassigned YES unset administratively down up Ethernet0/3 unassigned YES unset administratively down up Ethernet0/4 unassigned YES unset administratively down down Ethernet0/5 unassigned YES unset administratively down down Ethernet0/6 unassigned YES unset administratively down down Ethernet0/7 unassigned YES unset administratively down down Internal-Data0/0 unassigned YES unset up up Internal-Data0/1 unassigned YES unset up up Vlan1 192.168.1.1 YES manual up up Vlan2 209.156.200.226 YES manual up up Virtual0 127.0.0.1 YES unset up up CCNAS-ASA#
5 - Enable Telnet, SSH, and HTTPS Access • Enable Telnet access (if required). • SSH is recommended instead of Telnet. • Although simple authentication is provided using the passwd command, securing Telnet access using AAA authentication and the local database is recommended. • Use the following commands to enable AAA authentication: • username name password password • aaa authentication {telnet | ssh} console {LOCAL | TACACS-server | RADIUS-server} • telnet host-ip host-mask inside • telnet timeout minutes CCNAS-ASA(config)# username admin password class CCNAS-ASA(config)# aaa authentication telnet console LOCAL CCNAS-ASA(config)# telnet 192.168.1.3 255.255.255.255 inside CCNAS-ASA(config)# telnet timeout 10 CCNAS-ASA(config)#
5 - Enable Telnet, SSH, and HTTPS Access • Similarly configured as Telnet but requires: • AAA authentication to be enabled • RSA crypto key generated • To verify the SSH configuration, use the show ssh command. CCNAS-ASA(config)# username admin password class CCNAS-ASA(config)# aaa authentication ssh console LOCAL CCNAS-ASA(config)# crypto key generate rsa modulus 1024 WARNING: You have a RSA keypair already defined named <Default-RSA-Key>. Do you really want to replace them? [yes/no]: y Keypair generation process begin. Please wait... CCNAS-ASA(config)# ssh 192.168.1.3 255.255.255.255 inside CCNAS-ASA(config)# ssh timeout 10 CCNAS-ASA(config)# exit CCNAS-ASA# CCNAS-ASA# show ssh Timeout: 5 minutes Versions allowed: 1 and 2 192.168.1.3 255.255.255.255 inside CCNAS-ASA#
5 - Enable Telnet, SSH, and HTTPS Access • HTTPS is required for ASDM. • To remove and disable the ASA HTTP server service, use theclear configure http global configuration command. CCNAS-ASA(config)# http server enable CCNAS-ASA(config)# http 192.168.1.3 255.255.255.255 inside CCNAS-ASA(config)#
6 - Configure Time Services • Time setting can be set by configuring the local system time. • This is not the recommended method. • Use an authoritative time source and NTP. • CCNAS-ASA# clock set 8:05:00 3 OCT 2011 • CCNAS-ASA#