Download
1 / 15
150 likes | 296 Views
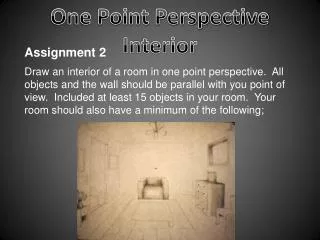
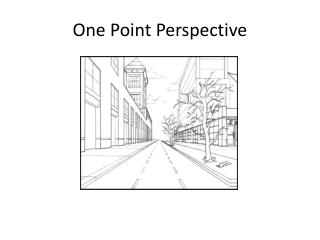
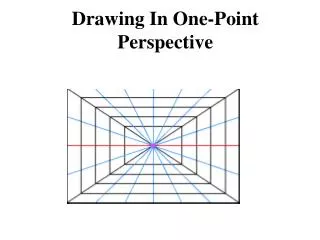
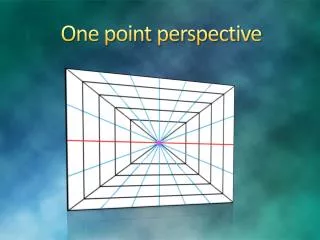
One-Point Perspective. Part II – The Sequel. Step 1. Begin with a simple room (just like last time) Draw a flat door. Step 2. Instead of adding a little bit of depth to your door, extend the horizontal lines until they reach the outer vertical line of your door.

E N D
One-Point Perspective Part II – The Sequel
Step 1 • Begin with a simple room (just like last time) • Draw a flat door.
Step 2 • Instead of adding a little bit of depth to your door, extend the horizontal lines until they reach the outer vertical line of your door. • Now it looks as though the door extends even further into the wall. • Erase the bottom orthogonal to make it look as though the floor extends back into the space.
Step 3 • To make it look like a hallway intersects, draw two vertical lines from the floor to the ceiling. • Just like you did with your door, draw two horizontal lines that extend to the outer vertical line. • Erase the bottom and the top orthogonals this time to extend the floor and the ceiling back into the space.
Step 4 • Start with a simple rectangle coming out of the wall, just like you did with the small rectangle last time. • This time, make sure it is taller than your vanishing point.
Step 5 • Draw the top and bottom orthogonals to create a flat front. • Connect them with a vertical line.
Step 6 • To divide the front face in half, draw an “X”. • At the intersection, draw a vertical line. • This divides the space in half. • After you have drawn your vertical line, erase the “X”
Step 7 • Repeat this process again, only this time divide the two halves. • This creates four spaces. • Erase the two “X”s.
Step 8 • Continue to divide the spaces until you basically can’t divide them anymore. • Continue erasing the “X”s after each vertical line is drawn. If you don’t do this, it will look like one big jumbled mess.
Step 9 • Divide the top half from the bottom half by finding middle of the height of your lockers (you can just eyeball it) and drawing an orthogonal right through. • Now move to the back wall. First divide the space in half. • Then divide the halves in half. • Then divide the quarters in half. • Then divide the eighths in half.
Step 10 • Draw orthogonals from each of your points. • Now it looks like you have a bowling lane on your ceiling. Wouldn’t that be sweet if you did?
Step 11 • To correctly space the ceiling tiles apart, draw a diagonal line (not in perspective) from one corner to the other. See how I did it in the picture? Make sure it’s drawn in lightly. • Next, at each intersection of the diagonal line and orthogonal, you will draw a horizontal line. • When you are finished, erase the diagonal line.
Step 12 • Now what if you want to have a hallway that is partially hidden behind your lockers? • Draw the vertical lines like before, except this time, have one stop at the top of the lockers. • Erase the bottom and top orthogonals and voilà!, you now have a hallway that is hidden behind the front of the lockers. Now that looks awesome!
Step 13 • Now suppose your hallway doesn’t end at a flat wall. What if it extends back to the right and left? • Erase the bottom horizontal line and just move it up a bit. • Do the same to the top, except you’ll be moving it down a bit. • Make sure you continue the ceiling tiles too! • Now it looks like someone can walk down the hallway and turn to the right or left and continue on their journey.
…and that’s it! • Congratulations! Your drawing looks awesome! • You can now start combining what you learned the first time with what you have just learned. • Remember, you can still combine/alter/manipulate all of these shapes/objects and create any number of things. The possibilities are endless! • Go forth, young grasshopper. Make art!