Download
1 / 38
380 likes | 587 Views
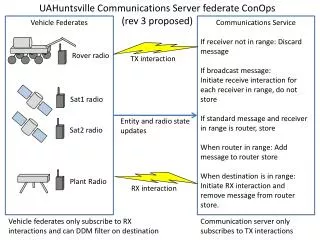
Using ROVER Server. End-to-End Building Data Tool. ROVER (FEMA 154). ROVER (ATC-20). ROVER Server. ShakeCast & HAZUS. Other DB. Sync (wired/wireless). Sync (wired/wireless). RedROVER. Pre-earthquake. Post-earthquake . FEMA 154. ATC-20 Rapid Evaluation Form.

E N D
End-to-End Building Data Tool ROVER (FEMA 154) ROVER (ATC-20) ROVER Server ShakeCast & HAZUS Other DB Sync (wired/wireless) Sync (wired/wireless) RedROVER Pre-earthquake Post-earthquake
ATC-20 Rapid Evaluation Form • ROVER has rapid & detailed forms
ROVER Uses and Benefits • Print-ready form • Emulates original pen and paper worksheet • Existing inventories can lack important attributes such as building type • Inventories can used for enforcement, of seismic ordinances such as arequirement to anchor roofs at the time of re-roofing. • Inventories can be used with HAZUS
3 Ways to Enter Field Data Via Web browser on smartphone or tablet. Here: Asus Transformer Android (3.2) tablet Windows Mobile app. No Internet connection required. Sync with server later. Windows ROVER Server on PC. No Internet connection required. Sync with other servers later. OR OR For wireless sync, provide users with URL Provide users with URL
ROVER Server • Python Server - currently supported under Windows (XP and higher) • Interact via a standard Web browser
ROVER Server Installation • Run the .exe setup file. This will guide you through the Server installation on your MS Windows machine.
ROVER Server Startup • Finish Server Installation • You may launch the server when installation is complete • You may launch the server from the Start menu
Start Server from Start Menu … which starts this … Then press this. Note the host URL and port; you will need this info
ROVER Main Menu • Select pre- or post-earthquake data view • Note the URL: same as shown when starting the ROVER server (previous slide)
Log in to server • Default login is admin, rover
Rover Server Interactions • Add new screeners • Create or edit sites • Generate reports • Configure HAZUS export
ROVER Server – View Sites • View site info • Edit site info • Print reports
Server – Edit Site • Edit Basic Site Info
Server – Edit Worksheet • Edit any worksheet information, including adjusting scoring.
Soil, SS and Modifiers from Lat/Lon • Scoring starts using FEMA 154’s high, medium, or low aggregate hazard levels and user-selected soil. • Server contains USGS maps of hazard and soil, so score can be site-specific (more accurate)
SS and Modifiers from Lat/Lon • Click “Calculate Ss and Modifier Set from Location” • Server looks up SS (%g) and adjusts basic score.
Server – Print Form • Print-ready form • Emulates original pen and paper worksheet
Wired Syncing of Windows Mobile App on Windows • Optional setup of wired PC synching using built in Windows Pocket PC Sync • Or use wifi within local area network • Or use wifi to sync with web-accessible server
ROVER Wired Sync • Choose “This computer is connected to: The Internet”
Sync ROVER Client • Enter URL and port for server. Get it from your IT person or ROVER service provider. • Click “Sync” in Menu to start synchronization.