Download

1 / 25
250 likes | 257 Views
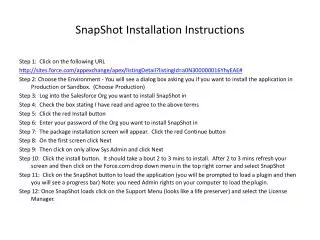
AgACIS Installation Instructions – eFOTG. Proceed to eAuthentication at: https://my.nrcs.usda.gov/nrcs.aspx Login to My.NRCS. AgACIS Installation Instructions – eFOTG. At the NRCS Today page select the Technology Tab On the Technology Page you should see a map of the US in the eFOTG section

E N D
AgACIS Installation Instructions – eFOTG • Proceed to eAuthentication at: https://my.nrcs.usda.gov/nrcs.aspx • Login to My.NRCS
AgACIS Installation Instructions – eFOTG • At the NRCS Today page select the Technology Tab • On the Technology Page you should see a map of the US in the eFOTG section • Select your State from the Map
AgACIS Installation Instructions – eFOTG • Your State map should have appeared with two selections on the right portion of the web page • Click on the Here to the right of the map and following To access the eFOTG Content Manager, click.
AgACIS Installation Instructions – eFOTG • Select Section II Soils and Site Information • Expand Section II so you can see the subsections by clicking on the + sign to the left of the Section
AgACIS Installation Instructions – eFOTG • The subsections of section II should appear and a Climate Data subsection should be in that list. • If a subsection for Climate Data does not exist create a subsection by clicking on the ADD SUBSECTION button in the gray area at the top of the eFOTG Maintenance Structure Panel • Fill in the boxes for the subsection in the right side panel and save the subsection
AgACIS Installation Instructions – eFOTG • Expand the Climate Data subsection by clicking on the + sign to the left of the subsection • If a + sign does not exist then no items are currently installed in the subsection • Click on the ADD CONTENT button in the gray area at the top of the eFOTG Maintenance Structure Panel
AgACIS Installation Instructions – eFOTG • Fill in the Display Title with one of the following choices • AgACIS • Agricultural Applied Climate Information System • AgACIS (Agricultural Applied Climate Information System) • Move to the Location Section • Click the Hyperlink radial button so that it is selected (on) • Fill in the Location Box with http://efotg.nrcs.usda.gov/proxy_climate.aspx
AgACIS Installation Instructions – eFOTG • Move to the Accessibility section about the middle of the page • Make sure you click the Internal Radial Button so that it is selected (on) • The remaining sections of this form should be filled in as outlined in State web requirements or directives
AgACIS Installation Instructions – eFOTG • Move to the bottom of the page when all sections of the Adding Contents page have been completed and click/press the Save button. • The content can be checked by clicking the Refresh Menu in Blue just above the eFOTG Maintenance Structure section, Refresh Menu, and just below the NRCS at the top of the page • Review the results and make any corrections
AgACIS Installation Instructions – eFOTG • Once the content has been refreshed check to verify that the changes have been recorded correctly