Download
1 / 6
60 likes | 208 Views
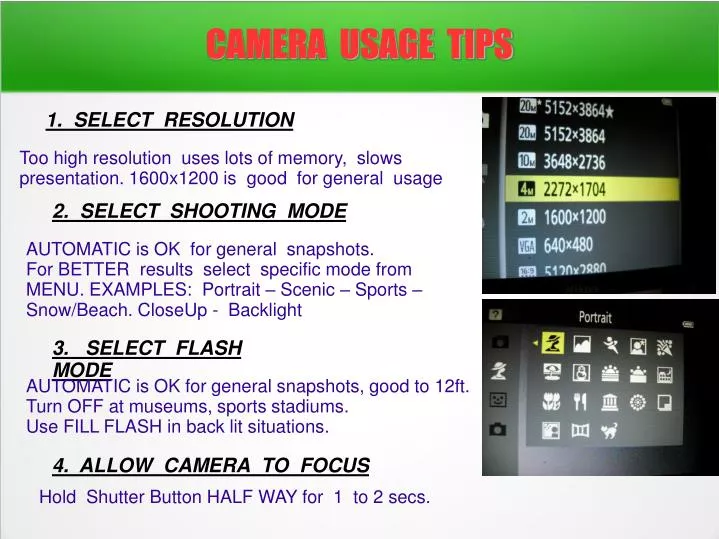
CAMERA USAGE TIPS. 1. SELECT RESOLUTION. Too high resolution uses lots of memory, slows presentation. 1600x1200 is good for general usage. 2. SELECT SHOOTING MODE. AUTOMATIC is OK for general snapshots.

E N D
CAMERA USAGE TIPS 1. SELECT RESOLUTION Too high resolution uses lots of memory, slows presentation. 1600x1200 is good for general usage 2. SELECT SHOOTING MODE AUTOMATIC is OK for general snapshots. For BETTER results select specific mode from MENU. EXAMPLES: Portrait – Scenic – Sports – Snow/Beach. CloseUp - Backlight 3. SELECT FLASH MODE AUTOMATIC is OK for general snapshots, good to 12ft. Turn OFF at museums, sports stadiums. Use FILL FLASH in back lit situations. 4. ALLOW CAMERA TO FOCUS Hold Shutter Button HALF WAY for 1 to 2 secs.
ORGANIZE FOLDERS PLACING PHOTOS IN LABELED FOLDERS Automatically Windows will place all your photos in “My Pictures” and it will be difficult to find them. Therefore you should create new folders. In Windows XP 1. Click green [Start] tab in lower LH corner 2. Click “My Computer” tab, then Click on “C: drive” (or other available drive) 3. Click “File” tab on top line, then “New”, then “Folder” in pop-up menus; 4. Type in desired name, example “ Photos 2014”, Press [Enter] key. To open sub-folder. Click on existing Folder, then repeat steps 3 & 4, Giving each sub-folder new name; examples: “Ski trip” , “Joe birthday” In Windows 7 Same as above, except in step 1, Click [Win] key In Windows 8 Click [WIN] key, open “ File Explorer” App (picture of file folder), which may be in Ribbon at bottom of page in any other App you might be using. Clic on “ New Folder” Icon and then proceed as above
DOWNLOAD FROM CAMERA TO PC THE EASIEST WAY 1. Install the program from CD that came with camera. 2. Connect camera to PC UBS port with cable provided. 3. Turn on camera, a pop-up appears on screen, follow instructions – change the default destination to the folder that you set up. ADVANTAGE: Program remembers which photos you upload. When you start a new batch, it only uploads new photos. NO CD. NO PROGRAM - WHAT TO DO? Steps 2 and 3 as above – PC recognizes new hardware like a new CD with many files. 4. Hold CTRL key and click on all photos to be transferred. Hold down left button on mouse and slide all checked photos to desired folder on PC. Some new laptops have slot for camera memory cards. Remove card from camera and insert in slot. Continue as above. If Microsoft Camera Wizard becomes option in pop-up menu, use it and follow instructions.
SENDING YOUR PHOTOS ATTACH TO EMAIL You can attach your photos to any email message. However the number of photos and total size of attachments is limited. Make photos smaller, max 800x600. GMAIL: At bottom of email form see a paper clip Icon, click on it and select photos from folder, then click “ Open” - the photos will be attached and sent. Hold down CTRL to select several photos at once. MS Outlook Express: after writing email, Then click on Insert/Photo, select folder then photo. Click OK. Each photo has to be attached separately. POST ON WEB – Google Picasa If you want to send many photos to a group of people, use PICASA. You can select large number, or a whole folder and post in an album on line. You may elect to make Public, viewable by anyone, or private – viewable only by people to whom you send an authorization link by email. After posting photos in album, you may arrange in desired order, You may write captions or add notes., remove specific photos or add later.
ARCHIVE YOUR PHOTOS BACK UP YOUR PHOTOS Computers are mechanical devices, they can break down. If your hard drive goes bad, you will lose everything on it! USB Flash Drives, USB Thumb Drives Shown on left, are the cheapest and easiest to use. Plug in to USB port and transfer files from PC to Flash Drive, click and hold LH Mouse button to drag entire folder, or individual photos. Expected life up to 5 years. CD Optical Media Most laptops have a recordable CD Drive and a Recording program. Once written it is not possible yo revise or add files. It is suggested that once a year a new Archive CD be made. The expected life is as good as a paper album.
MODIFY TO IMPROVE PHOTO Many photos can be improved by modifying Crop – lighten – darken – sharpen – reduce size. Expensive programs: ADOBE PHOTOSHOP, COREL PAINTSHOP. FREE program: PAINT.NET simple & effective. EXAMPLE: Upper picture is an overall view. We need a picture of people in foreground. Use PAINT.NET 1. Click “ Tool select” . Then “Rectangle select” 2. Draw rectangle as shown by yellow lines. 3. Click “ Image/Crop to selection” Result like bottom image, but people too dark. 4. Click “ Adjustments/ Brightness-Contrast” Click on sliders and adjust until satisfied, then “ Save as” with new name. Final result at bottom. 5. If needed, click “Effects/Photo/Sharpen” Smaller version for emails Click “ Image” then “ Resize” (Make sure “ Absolute size” and “ Maintain ratio” are checked). Type in desired width, click OK. “ Save as” with new name