Download
1 / 5
50 likes | 205 Views
Bill to ID - Lock/Unlock. The Lock/Unlock screen allows you to:. Enter one Bill to ID that you Administer and select an Action. Or, choose one or many Bill to IDs. The Actions you can select are:. Lock Bill to ID(s) Unlock Bill to ID(s) Lock Collaborative Contracts only .

E N D
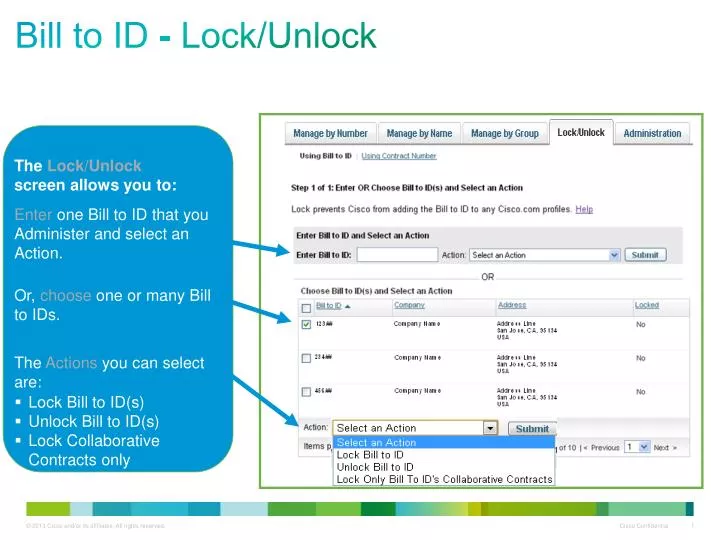
Bill to ID - Lock/Unlock The Lock/Unlockscreen allows you to: Enter one Bill to ID that you Administer and select an Action. Or, choose one or many Bill to IDs. The Actions you can select are: • Lock Bill to ID(s) • Unlock Bill to ID(s) • Lock Collaborative Contracts only
Bill to ID – Lock/Unlock: Lock Bill to ID - Screen 1 of 1 To Lock a Bill to ID so Cisco cannot add it to any Cisco.com profiles, on the Lock/Unlock screen: 2 3 • Screen 1 of 1: • Enter a Bill to ID that you manage. 1 • Select Lock Bill to ID. • Click the Submit button. OR OR • Choose Bill to ID(s). • Select Lock Bill to ID. • Click on the Submit button. A success message will be displayed. An email confirmationwill be sent to all Administrators for that Bill to ID. 1 3 2 Note: You cannot see a Bill to ID in the tool unless that number is in your Cisco.com profile and you are set up to manage it. See slide 71 for how to add Bill to IDs to your profile.
Bill to ID – Lock/Unlock: Lock Bill to ID - Screen 1 of 1 To Unlocka Bill to ID so Cisco cannot add it to any Cisco.com profiles, on the Lock/Unlock screen: 2 3 • Screen 1 of 1: • Enter a Bill to ID that you manage. 1 • Select Lock Bill to ID. • Click the Submit button. OR OR • Choose Bill to ID(s). • Select Unlock Bill to ID. • Click on the Submit button. 1 3 A success message will be displayed. An email confirmationwill be sent to all Administrators for that Bill to ID. 2 Note: You cannot see a Bill to ID in the tool unless that number is in your Cisco.com profile and you are set up to manage it. See slide 71 for how to add Bill to IDs to your profile.
Bill to ID – Lock/Unlock: Collaborative Lock Bill to ID - Screen 1 of 1 To Lock a Bill to ID for Collaborative contracts so Cisco cannot add them to any Cisco.com profiles, on the Lock/Unlock screen: 3 2 • Enter a Bill to ID that you manage. 1 • Select Lock Only Bill to IDs Collaborative Contracts OR • Click the Submit button. OR • Choose Bill to ID(s). • Select Lock Only Bill to IDs Collaborative Contracts 1 3 • Click on the Submit button. 2 A success message will be displayed. An email confirmationwill be sent to all Administrators for that Bill to ID. Note: You cannot see a Bill to ID in the tool unless that number is in your Cisco.com profile and you are set up to manage it. See slide 71 for how to add Bill to IDs to your profile.
Bill to ID – Other Tool Functions • If an individual attempts to request a blocked or lockedBill to ID be added to his Cisco.com profile using the Cisco.com Profile Manager, a message will be displayed directing him to the Administrator(s) for that Bill to ID. • An email will automatically be sent: 1) to the Administrator with the individual’s information, and 2) to the individual with the Administrator’s information. The request will not be sent to Cisco. • If Cisco attempts to add a blocked or lockedBill to ID to a Cisco.com profile using Cisco’s internal tools, a message will be displayed indicating the Bill to ID cannot be added. • An email will automatically be sent: 1) to the Administrator with the individual’s information, and 2) to the individual with the Administrator’s information. • If Cisco adds a Bill to ID to a Cisco.com profile, all Administrators will be informed via email (you can request not to receive this email).