Download
1 / 27
270 likes | 454 Views
Copying & Installation Procedures of VAAP Tracking and Monitoring System (From Diskette <Drive A:> to PC <Drive C:>). 1. Create a new folder in drive (C:) where to save the VAAP Programs (Tracking & Monitoring System). 2. Provide four (4) new subfolders under the main

E N D
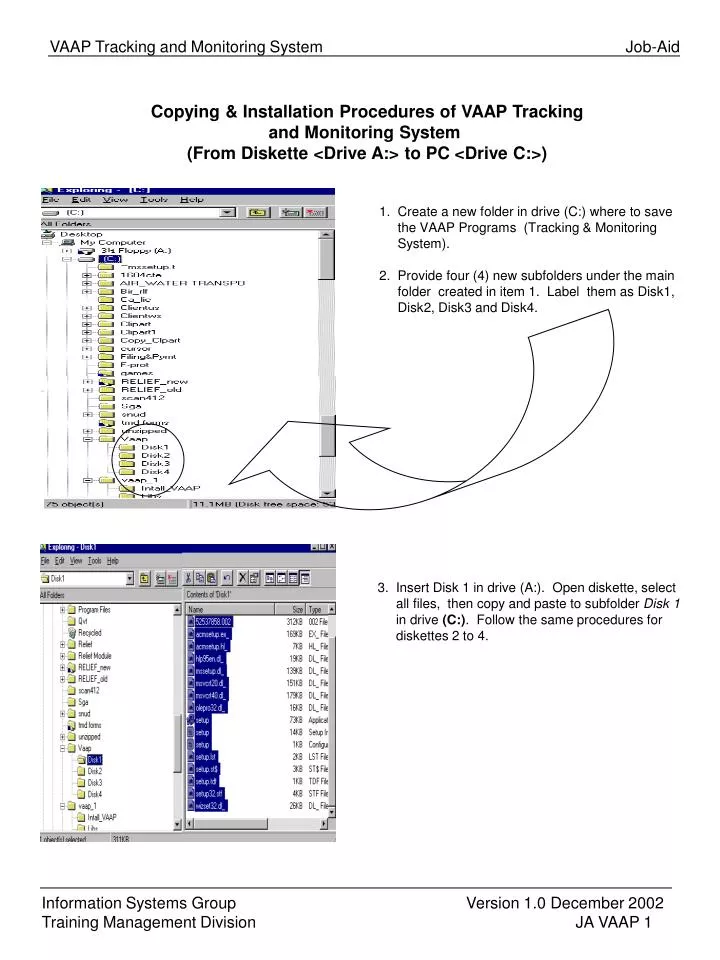
Copying & Installation Procedures of VAAP Tracking and Monitoring System (From Diskette <Drive A:> to PC <Drive C:>) 1. Create a new folder in drive (C:) where to save the VAAP Programs (Tracking & Monitoring System). 2. Provide four (4) new subfolders under the main folder created in item 1. Label them as Disk1, Disk2, Disk3 and Disk4. 3. Insert Disk 1 in drive (A:). Open diskette, select all files, then copy and paste to subfolder Disk 1 in drive (C:). Follow the same procedures for diskettes 2 to 4.
4. After copying all diskette files in drive (C:), open Disk1 subfolder. Select and double click setup.exe file(w/ computer icon) to install the program. 5. A series of RELIEF Data Entry System screens will appear starting with <Initializing Setup…..>. 6. Click <Continue> button. 7. Click <OK> button. Note: It is advisable to close all programs (I.e. MS Office, Shortcut Bar, etc.) prior to the installation of the RELIEF System.
8. Encode the user name and company name, then click <OK> button. 9. Click <OK> button to confirm encoded data on the previous screen. Otherwise, click on the <Change> button to correct the information entered. 10. Click <OK> button to confirm installation of the program. 11. Click the largebutton to install the program. F
12. Click <Continue> button. 13. Click <OK> button to acknowledge complete installation of VAAP Program. 14. The process installs the Voluntary Assessment and Abatement Program. To start the module, click <Start> button on the desktop. Select <Programs> and <Vaap>. Then select and click on VAAP Data Entry.
A. Login 1. Click the icon on the VAAP System Data Entry and the User Login pop up will appear. Encode the <User Name> and <Password>, then click the <OK> button or press E.
2. The BIR VAAP Main Menu will appear. The eight (8) different selection buttons are now displayed and activated, (i.e. Letter Notice, Form 0611-VAAP Payment Form, Form 2111- for all other tax types covered by the program, Form 2111V-VAT, Form 2111 IT-Income Tax, Form 2111 X-Excise, Reports and Utilities). Click on the desired button and press E.
B. Letter Notices 3. After clicking the Letter Notice button on the VAAP Main Menu, the <LetterNotice> screen will appear. Click the <Add> button to encode new transactions. Fill in all mandatory fields. Click <Save> button after encoding the transactions. User may use all activated buttons (I.e. <Top> <Previous>,<Next>,<Bottom>) to go to other records. 4. Click <Edit> button to edit or undo encoded data or a particular Letter Notice. The <Save>, <Cancel> buttons will automatically appear.
C. Form No. 0611 (Add/Edit/Inquire) 5. After clicking the <Form 0611> button on the VAAP Main Menu, the <BIR Form No. 0611> screen will appear. BIR Form No. 0611 is the Voluntary Assessment and Abatement Program Payment Form. At the <Background Information> screen, click the <Add> button to encode new transaction. Fill in all mandatory fields. 6. To proceed to the computation, click the <Tax Computation> button, fill up all mandatory field then click the <Payment Acknowledgement> button.
7. At the Payment Acknowledgement screen, fill up all mandatory fields (name of the taxpayer, date of payment, mode of payment and the total amountpaid). Click <Save> button after encoding transactions. The <Edit> button is used if there are corrections on the encoded data, then the <Save> <Cancel> buttons will appear automatically. User may use all activated buttons (I.e. <Top> <Previous>,<Next>,<Bottom>) to go to other records. Click <Back> button to go back to the VAAP Main Menu screen.
D. Form No. 2111 (Add/Edit/Inquire) 8. BIR Form No. 2111 is the form used for other tax types covered by the Program. At the <Background Information> screen , click the <Add> button to encode new transaction. Type in the TIN of the taxpayer in the <TIN> field and the other fields will automatically be populated. Use the cursor to move/navigate to other fields. In the <Date of Filing> field, type in the necessary information. Automatically, the cursor will go to the <TaxType/Taxable Year> field. Click the <Arrow> button and choose from the list of valid values. Bring cursor to the <Date Transaction> field and type the transaction date. Click the <Tax Computation> button for more data entry.
9. At the <Tax Computation> screen, fill up all mandatory fields. Click the <Acknowledgement> button for more data entry. 10. At the <Acknowledgement> screen, fill up all mandatory fields. User can move from one field to another by simply bringing the cursor to the particular field using the mouse or by using the Tkey. Click <Save> button after encoding the transactions and then click <Back> button to go back to the VAAP Main Menu. Note: The Taxpayer’s Name/TIN/ Address are already populated.
11.User can also inquire/edit by using all activated buttons (I.e. <Top> <Previous>,<Next>,<Bottom>) to go to other records. To edit, click the <Edit> button and make the necessary corrections, then the <Save/Cancel> buttons will appear automatically. To go back to the VAAP Main Menu, click <Back> button.
E. Form No. 2111V (Add/Edit/Inquire) 12. After clicking the Form 2111V from the VAAP Main Menu screen, users can view the <Background Information> screen. Click the <Add> button to encode new transactions. Bring the cursor to the <TIN> field and encode the TIN of the taxpayer. Automatically, the others fields will be populated. Bring the cursor to the <Transaction Date> field and click the arrow button, select the month from the list of valid values. Use the Tkey to move to the next field or click the <Year> field to enter the year of the transaction. Bring the cursor to the <Date ofFiling> field and type in the date. Click the <Tax Computation I> button.
13. After clicking the <Tax Computation I> or the <Tax Computation II> buttons, fill in all mandatory fields. User can move from one field to another by simply bringing the cursor to the particular field using the mouse or by using the Tkey.
14. At the <Acknowledgement> screen, fill up all mandatory fields. User can move from one field to another by simply bringing the cursor to the particular field using the mouse or by using the T key. Click <Save> button after encoding the transactions and then click <Back> button to go back to the VAAP Main Menu screen. Note: The Taxpayer’s Name/TIN/ Address are already populated.
F. Form No. 2111IT (Add/Edit/Inquire) 15. After clicking the Form 2111IT from the VAAP Main Menu screen, users can view the <Background Information> screen. Click the <Add> button to encode new transactions. Bring the cursor to the <TIN> field and encode the TIN of the taxpayer. Automatically, the other fields will be populated. Bring the cursor to the <Return Period> field and click the <Arrow> button and select the month from the list of valid values. Use the Tkey to move to the next field or click the <Year> field to enter the year of the transaction. Bring the cursor to the <Date of Filing> field and type in the date. Then click the <Tax Computation I> button for the tax computation.
16. After clicking the <Tax Computation I> <Tax Computation II> buttons, fill in all mandatory fields. User can move from one field to another by simply bringing the cursor to the particular field using the mouse or by using the Tkey.
17. At the <Acknowledgement> screen, fill up all mandatory fields. User can move from one field to another by simply bringing the cursor to the particular field using the mouse or by using the Tkey. Click <Save> button after encoding the transactions and then click <Back> button to go back to the VAAP Main Menu screen. Note: The Taxpayer’s Name/TIN/ Address are already populated. Users can also inquire/edit by using all activated buttons (I.e. <Top> <Previous>,<Next>,<Bottom>) to go to other records. To edit, click the <Edit> button and make the necessary corrections. The <Save/Cancel> buttons will appear automatically. To go back to the VAAP Main Menu, click <Back> button.
G. Form No. 2111X (Add/Edit/Inquire) 18. BIR Form No. 2111 X is the VAAP-Application Form for Excise Tax. At the <Background Information> screen , click the <Add> button for data entry. Click the <TIN> field and encode the TIN of the taxpayer. Automatically, the other fields (name of the taxpayer, trade name and address) will be populated. Bring the cursor to the <Return Period> field and click the arrow button to choose the month in the list of valid values. Press the Tkey to move to the next field. Enter the year. Automatically, the cursor will go to the <Date of Filing> field. Enter the necessary data. Click the <Tax Computation> button for more data entry.
19. At the <Tax Computation> screen, fill up all mandatory fields. User can move from one field to another by simply bringing the cursor to the particular field using the mouse or by using the Tkey. Click the <Acknowledgement> button for more data entry.
20. At the <Acknowledgement> screen, fill up all mandatory fields. User can move from one field to another by simply bringing the cursor to the particular field using the mouse or by using the T key. Click <Save> button after encoding the transactions and then click <Back> button to go back to the VAAP Main Menu. Note: The Taxpayer’s Name/TIN/ Address are already populated. 21. Users can also inquire/edit by using all activated buttons (I.e. <Top> <Previous>,<Next>,<Bottom>) to go to the other records. To edit, click the <Edit> button and make the necessary corrections. The <Save/Cancel> buttons will appear automatically. To go back to the VAAP Main Menu, click <Back> button.
H. VAAP Reports 22. Click the <Reports> button on the VAAP Main Menu screen. The <VAAP Report> screen will appear. It contains five (5) selection buttons. Select and click the desired button to be used. To view/print a desired report, user must specify a particular RDC. Click the arrow button to view the list of valid values for RDC Code selections. Click <Preview> button to proceed.
23. After clicking the <Preview> button from the VAAP Report screen, user may now view/inquire a particular report. To print, click the printer icon at the top of the page. To exit, click the<X> button on the upper right side corner of the screen. To go back to the list of VAAP Reports, click the <Cancel> button.
I. VAAP Utilities 24. Click the <Utilities> button on the VAAP Main Menu screen and the Utilities and Admin Menu screen will appear. Select and click the button to be used (add new user, delete user, change user, change password and main menu).
25. To add user, click the <Add New User> button on the Utilities and Admin screen. Fill in all mandatory fields, then click <OK>. 26. To delete user, click the <Delete User> button on the Utilities and Admin screen. Only user with “ROOT” Access Code can delete other users with code “ADD” and INQ”.
27. To change user, click the <Change User> button on the Utilities and Admin screen. A pop screen that says “file is in use” will appear. Click the <OK> button and the <User Login> screen will appear. Type in the the <User Name> and <Password> then click <OK> to proceed.
28. To change the password of the current user, click the <Change Password> button on the Utilities and Admin screen. Fill in all enterable fields, then click the <OK> button. A pop up screen will appear confirming if the password has been successfully changed.