Download
1 / 24
240 likes | 415 Views
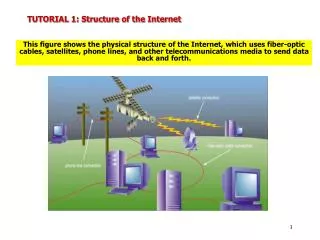
This figure shows the physical structure of the Internet, which uses fiber-optic cables, satellites, phone lines, and other telecommunications media to send data back and forth. TUTORIAL 1: Structure of the Internet. This figure shows how topics can be related in a hypertext fashion,

E N D
This figure shows the physical structure of the Internet, which uses fiber-optic cables, satellites, phone lines, and other telecommunications media to send data back and forth. TUTORIAL 1: Structure of the Internet
This figure shows how topics can be related in a hypertext fashion, as opposed to a linear fashion. Hypertext Documents • Hypertext offers a better way of locating information. • When you read a book, you follow a linear progression, reading one page after another. • With hypertext, you progress through pages in whatever way is best suited to you and your objectives. • Hypertext lets you skip from one topic to another.
Hypertext Documents Continued • The key to hypertext is the use of links, which you activate to move from one topic to another. • a link can open a document on a computer anywhere in the world • Hypertext has become the dominate method of sharing and retrieving information on the Internet, becoming known as the World Wide Web, or the Web. • Documents on the Web are known as Web pages. • A Web page is stored on a Web server, which makes the page available to users of the Web. • To view a Web page, the user runs a Web browser, a software program that retrieves the page and displays it. • A Web browser can either be text-based, or graphical.
HTML: The Language of the Web • Some of the most common Web browsers available today are: • FireFox • Microsoft Internet Explorer • Safari • Chrome • Web pages are text files, written in a language called Hypertext Markup Language or HTML. • A markup language is a language used to describe the content and format of documents. • HTML was developed from the Standard Generalized Markup Language (SGML), a language used for large-scale documents. • SGML proved to be cumbersome and difficult, thus HTML was created. • HTML allows Web authors to create documents that can be displayed across different operating systems. • HTML code is easy to use, that even nonprogrammers can learn to use it. • HTML describes the format of Web pages through the use of tags. • it’s the job of the Web browser to interpret these tags and render the text accordingly
Tools for Creating HTML Documents, Syntax, and Tags • HTML documents are text files, which a text editor such as Windows NotePad can be used to create. • We will use only NotePad to create the text document that can be displayed in a browser as a web page. • (Do notuse Word or even WordPad to create your web pages.) • Document content is what the users sees on the page, such as headings and images. • Tags are the HTML codes that control the appearance of the document content. • tag is the name of the HTML tag • attributes are properties of the tag • document content is actual content that appears in the Web page • Tags can be one-sided or two-sided. • two-sided tags contain an opening tag <B> that tells the browser to turn on a feature and apply it to the contact that follows, and a closing tag </B> that turns off the feature • one-sided tags are used to insert noncharacter data into the Web page, such as a graphic image or video clip <tag attribute> • Tags are not case sensitive.
Creating the TEMPLATE.html Using NotePad Page 1.12 Create a file named TEMPLATE.HTML to use as a starting point for your web pages. Use only NotePad to do this.
The Initial HTML File in Internet Explorer The text in the <TITLE> tag appears in the blue title bar of the display address box indicates the name and location of the HTML file Page content appears in this area of the display
This figure illustrates the general appearance of the six heading styles. Your browser might use slightly different fonts and sizes. Creating Heading Tags • HTML supports six levels of headings, numbered <h1> through <h6>, with <h1> being the largest and most prominent. • Headings are always displayed in a bold font.
Entering Heading Tags and Text The <CENTER> tag is used center the following tags on the display. Every item through the </CENTER> will be centered.
Pages 1.17-1.22 Entering Paragraph Text <P> </P>
Paragraph Text as viewed in the Browser The <P> tag causes a blank row to appear before and after the paragraph.
Creating Lists • HTML supports three kinds of lists: • an ordered list, which is used to display information in a numeric order <OL> • an unordered list, which list items are not listed in a particular order i.e. bullets <UL> • a definition list, which is a list of terms, each followed by a definition line that is typically indented slightly to the right <DL> Entering an Unordered List <UL> The List <LI> = List Item
The Unordered List in the Browser Different Bullet Types in the Unordered List <UL TYPE="disc"> see example above…"disc" is default <UL TYPE="circle"> Note: When using of Internet Explorer, type in the bullet type in lower case. <UL TYPE="square">
Ordered List Types Modifying the code of the list from <UL> to <OL>: Results in the following output when viewed in the browser: Ordered List of bullet types: <OL TYPE="1"> is default (see the above example) <OL TYPE="a"> creates the lower case letters a, b, c, etc. <OL TYPE="i"> creates lower case Roman numerals
The Definition List Page 1.24 <DL> is the opening tag <DT> = data term <DD> = data definition </DL> ends the list The output from the above Definition List
Creating Character Tags • The character tags we will be using will be • <B> for bold • <U> for underline • <I> for italics • <SUB> for subscript • <SUP> for superscript
Inserting Horizontal Lines • A horizontal ruler (or line) can improve the appearance of a Web page. • The syntax for creating a horizontal line is: <HR ALIGN="align" SIZE="size" WIDTH="width" COLOR="color"> • The HTML horizontal syntax includes the following: • align specifies the horizontal alignment of the line on the page (center, left, or right…default is "center") • size specifies the height of the line in pixels or percentage of the screen width • width indicates the width of the line in pixels or percentage of the screen width • color indicates the color of the line • noshade specifies that the browser display a solid line • Use the <BR> tag to place subsequent on the next line of the display screen • <BR> stands for "break"
Different Line Styles <hr align="center" size="12" width="100%"> size=12 width-100% <hr align="center" size="6" width="50%"> size=6 width-50% <hr align="center" size="3" width="25%"> size=3 width-25% <hr align="center" size="1" width="10%"> size=1 width-10%
Horizontal Line Added to the Page A red horizontal ruler (line) The HTML code that generates the rule
Two Horizontal Lines Added to the Lower Part of the Page horizontal ruler (line) The HTML code that generates the rulers
Inserting a Graphic Image file SMUCOXLogo.gif HTML code to display image