Download
1 / 30
300 likes | 444 Views
Appalachian Student Advising Program - ASAP. Central Desk Functions. Login. Go to https://www.webapp.appstate.edu/advisingschedule/CentralDesk/HandleLogin.asp (be sure to bookmark this page) Username – VMS username Password – VMS password Click “Submit” to enter the system.

E N D
Appalachian Student Advising Program - ASAP Central Desk Functions
Login • Go to https://www.webapp.appstate.edu/advisingschedule/CentralDesk/HandleLogin.asp (be sure to bookmark this page) • Username – VMS username • Password – VMS password • Click “Submit” to enter the system
Check In Advisees • Allows you to indicate when a student has arrived for a scheduled appointment with his/her advisor. • This notification will be sent to the advisor. • Select student(s) that have arrived for their advising appointment • Click “Check-in selected Advisees”
Check Out Advisees • If student needs to be checked out, select the student by clicking inside the checkbox in front of their name. • Scroll to the bottom of the screen and click “Check-out Selected Advisees” button
Report Generator • Select report (see next slide) • Select advisors to include in report • Select beginning and ending dates (be sure to use mm/dd/yyyy format)
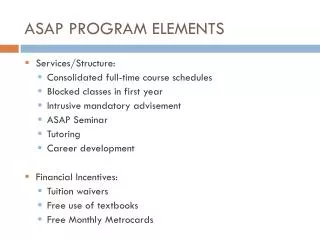
What are the valid reports? • Purpose Summary – cumulative sum of each purpose as designated by the advising group • No Show Summary – tally of students who miss scheduled appointment • Daily Schedule – daily schedule for each individual advisor (defaults to next day)
For Students This allows the central desk to perform functions on the behalf of students
Schedule the Student • Select student, then select desired day for appointment • Click on the day, to select a time for the appointment • After time is selected, click “Schedule Appointment” • An e-mail notification will be sent to the student after successful scheduling Click a Day
Reschedule the Student Select student, then select desired day for appointment Click on the day, to select a time for the appointment After time is selected, click “Reschedule Appointment” An e-mail notification will be sent to the student after successful rescheduling Click a Day
Cancel Appointment for Student • Confirm correct information • Click “Cancel Appointment” • After cancellation, time slot is open for scheduling
For Advisors • Allows Central Desk to perform duties on the behalf of advisors
What is Advisor Mirroring? • The ability to log in as any advisor in your area • What can I do in advisor mirroring? • Schedule • Reschedule • Cancel • Switch appointments between advisors
Select the appropriate advisor from the “Login As” dropdown list. Further actions will be enacted on the behalf of the advisor selected How do I Mirror Advisor?
Advisor Calendar • What is the Calendar? • Graphical representation of selected advisor’s scheduled events.
Event Types • What types of events can I schedule? • Advising: • Opens a timeslot for students to make an appointment • Lunch • Indicates lunch hours • Meeting • Indicates when you will be involved in a meeting • Holiday • University Sponsored Holidays • Vacation • Planned Vacation Days • Out • Generic label for when you will not be in the office.
Legend • Empty Slot • Nothing has been scheduled on that day/time. • Open Timeslot • Timeslot is open for students to schedule an appointment. • Scheduled Appointment • A student has scheduled an appointment for the timeslot. • Other Event • An event other than “Advising” (see previous slide)
Calendar (Week at a Glance) • Allows advisor to see weekly schedule of scheduled appointments and available timeslots.
Calendar (Month View) • Scrolling Between Months • << or >> • rewind/advance by 1 month. • <<< or >>> • rewind/advance by 1 year. • Change to Week View • Click the “W” at the beginning of each week.
Calendar (Week View) • Scrolling Between Weeks • << or >> • rewind/advance by 1 week. • <<< or >>> • rewind/advance by 1 month. • Change to Day View • Click on the desired day of the week.
Calendar (Day View) • Scrolling Between Days • << or >> • rewind/advance by 1 day. • <<< or >>> • rewind/advance by 1 week. • Use the and to move up/down within the day.
Reschedule Appointments • Allows advisor to reschedule one appointment to another already open (yellow) timeslot. • Step 1: • Select the appointment you wish to reschedule by checking the box under the “Reschedule?” category. • Click “Continue”
Reschedule Appointments (cont’d) • Step 2: • Select the open timeslot by checking the circle in the “Switch to?” category. • Enter a reason as to why you are rescheduling the appointment. • Will be sent to the student via email. • Click “Reschedule Appointment”
Cancel Appointments • Allows the advisor to cancel one or many scheduled appointments with students. • Filtering Options: • Can easily select which appointments are displayed. • Directions: • Select the Appointments you wish to cancel by checking the box under the “Cancel” category. • Enter a reason in the TEXTAREA, which will be sent to the student in an email notification. • Click “Cancel Selected Appointments”
Switch Appointments Between Advisors • Filtering options-allows user to search for appointments by day, week or month • Select which appointment to switch
Switch Appointments (con’t) • Select the new advisor and time slot • Give reason for the switch • The student will be sent an email notification
Student Notes • What are student notes? • These are the notes that will appear in the email sent to the advisee to remind them of the appointment. • What is the default note? • The default note will be sent to the student in a reminder email, if you have not specifically created a note for that student.
Student Notes (Edit Default Note) • Allows advisor to set the default note. • Directions: • Enter the appropriate text of the message in the TEXTAREA. • Click “Save Default Note” • Note: This can also be done in the “Set Preferences” option from the main menu.
1 2 Student Notes (Create New Notes) • Step 1: • Select the students to receive the note by checking the box under the “Set Note?” category. • Click “Continue to Enter Note” • Step 2: • Enter the content of the note in the TEXTAREA • Select how you want the default note appended • Click “Save Note”
1 2 Student Notes (Update Existing Notes) • Step 1: • Select the student whose note you wish to update. • Click “Update Note” to continue to Step 2. • Click “Delete Note” to remove the student note. • Step 2: • Change the content of the note in the TEXTAREA • Click “Update Note”
Log Out Be sure to log out at the end of your session!