Download
1 / 23
230 likes | 339 Views
CENG415 – Communication Networks. Lectures 16 Network layer – IP addressing – IP translation. How to get an IP address. hard-coded by system admin in a file Windows 7 control-panel network and sharing center change adapter settings

E N D
CENG415 – Communication Networks Lectures 16 Network layer – IP addressing – IP translation
How to get an IP address hard-coded by system admin in a file • Windows 7 • control-panel network and sharing center change adapter settings • Right click on the adapter and go to properties • Select Internet Protocol version 4 • Click on properties Alternative config can be used when the system cannot use the IP defined in the General Tab • UNIX • /etc/rc.config file • or using 'ifconfig’
How to get an IP address • DHCP:Dynamic Host Configuration Protocol • dynamically get address from as server • As seen in Packet Tracer LAB • Mechanism will be covered in next chapter
How to get a network address Q: How does network get subnet part of IP address? A: gets allocated portion of its provider ISP’s address space (or space assigned to organization*). • Autonomous Systems (AS) buy connectivity from ISPs. • Small companies may lease IP addresses from ISP as well. ISP's block 11001000 00010111 00010000 00000000 200.23.16.0/20 Organization 0 11001000 00010111 00010000 00000000 200.23.16.0/23 Organization 1 11001000 00010111 00010010 00000000 200.23.18.0/23 Organization 2 11001000 00010111 00010100 00000000 200.23.20.0/23 ... ….. …. …. Organization 7 11001000 00010111 00011110 00000000 200.23.30.0/23 * see http://www.iana.org/ - Internet Assigned Numbers Authority
Who assign IPs How does an ISP (or organization) get a block of addresses? ICANN: Internet Corporation for Assigned Names and Numbers (www.icann.org) • allocates addresses (no, IANA does this) • manages DNS (domain names can be registered through several dozen registries (e.g., verisign.com) • assigns domain names, resolves disputes
Private IPs • RFC 1918 is a standard that reserves several ranges of addresses within each of the classes A, B and C. • Private addresses can be used internally by hosts in an organization as long as the hosts do not connect directly to the Internet. • Therefore, the same set of private addresses can be used by multiple organizations. • Private addresses are not routed on the Internet and will be quickly blocked by an ISP router. • The use of private addresses can provide a measure of security since they are only visible on the local network, and outsiders cannot gain direct access to the private IP addresses.
Private IPs • From Class A: • 10.0.0.0/8 is a private network IP that can accommodate over 16 million private addresses • From Class B: • Networks between 172.16.0.0/16 and 172.31.0.0/16 are reserved as private networks each providing over 65000 private addresses • From Class C: • networks between 192.168.0.0/24 and 192.168.255.0/24 are reserved as private networks each providing 254 private addresses There are also private addresses that can be used for the diagnostic testing of devices. This type of private address is known as a loopback address. The class A, 127.0.0.0 network, is reserved for loopback addresses.
Network Address Translation rest of Internet local network 10.0.0/24 10.0.0.1 • The organization (on the right) uses private network IPs • The default router has two interfaces, on public on the Internet and one private on the LAN • The organization leased ONE IP from the ISP • Messages leaving hosts of the organization and festinated to the Internet has Private IP as source IP • The router cannot allows these messages to travel the Internet 10.0.0.4 10.0.0.2 138.76.29.7 10.0.0.3
Network Address Translation rest of Internet local network 10.0.0/24 10.0.0.1 • Routers perform network address translation or NATing • Advantages: • range of addresses not needed from ISP: just one IP address for all devices • can change addresses of devices in local network without notifying outside world • can change ISP without changing addresses of devices in local network 10.0.0.4 10.0.0.2 138.76.29.7 10.0.0.3
NAT implementation Outgoing messages: (source IP is private) • Router to replace private IP (source IP)with its IP and source port with a new port number • Message leaves the router with public IPs • Router to keep translation in his translation table Private IP : port Router IP : new port Incoming messages: • Destination IP is router IP • Router search for a match in his translation table • When found, replace router IP by the private IP • Replace port by the original port • Deliver to the appropriate host
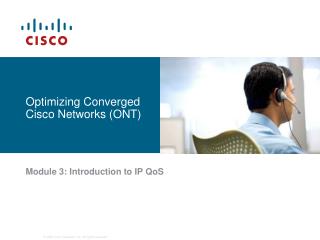
NAT Example Message leaving Host with private IP Destination Web Server
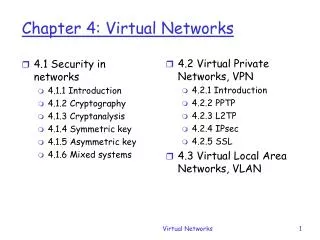
NAT Example Source IP and port number changed in router Now the message can travel the Internet
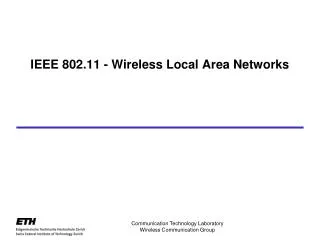
NAT Example The message reaches the Web server The server reply to the linksys router (the sender)
NAT Example The router consults his ATT Replace destination IP and Port
NAT A network of hundreds or thousands of computers can operate using ONE Public IP • Delay in router processing translation NAT make it possible to have more computers on the Internet than we have possible IPs • address shortage should instead be solved by IPv6
LAB: Configuring router with NAT 72.9.9.2/24 Static IP 192.168.1.0/24 We will build the following network Fa0/0 82.0.0.1/8 72.9.9.1/24 82.0.0.2/8 This LAN is using DHCP. Default router 192.168.1.1
LAB: Configuring router with NAT Configuring router 1 for RIP Router> enable Router# configure terminal Router(config)# router rip Router(config-router)# network 82.0.0.0 Router(config-router)# exit Router(config)# exit Router# copy running-config startup-config We do not publish private IPs
LAB: Configuring router with NAT Configuring router 0 for RIP Router> enable Router# configure terminal Router(config)# router rip Router(config-router)# network 82.0.0.0 Router(config-router)# network 72.0.0.0 Router(config-router)# exit Router(config)# exit Router# copy running-config startup-config
LAB: Configuring NAT – Step 1 Configuring NAT on router 1. • interface FastEthernet 0/0 is inside • Interface FastEthernet 0/1 is outside Router# configure terminal Router(config)# interface fastethernet0/0 Router(config-if)# ipnat inside Router(config-if)# exit Router(config)# interface fastethernet0/1 Router(config-if)# ipnat outside Router(config-if)# exit Router(config)# exit
LAB: Configuring NAT – Step 2 Create a list (access list) of all the hosts that need to have their address translated. • Access lists are lists of hosts • They use an IP and a mask • The mask bit is 1 to indicate a host bit Router(config)# access-list 1 permit 192.168.1.0 0.0.0.255
LAB: Configuring NAT – Step 3 Use the access list to tell the router to translate Router(config)# ipnat inside source list 1 interface fastEthernet0/1 overload Do not forget to copy your settings Router# copy startup-config running-config To test it: open a command prompt window from a private host and ping 72.9.9.2 you should get a reply To see it: next slides
LAB: NAT - Simulation • Open a CMD and ping 72.9.9.2 • Keep the CMD opened and click on simulation to enter simulation mode • Ping again 72.9.9.2 and minimize the window • You should see an envelop next to the computer, this is the generated message by ping • Double click on the message to open. Check IPs • Click on Capture / Forward to move the message • Keep monitoring the IPs
LAB: NAT - Simulation When the message reaches the router