Download
1 / 9
90 likes | 222 Views
Lab 6: Geocoding. You have received a dBase file that contains the address list of over 500 homes in your neighborhood that have had reports of lead poisoning in infants and toddlers over the past 10 years. You have been asked to locate these addresses on a map within your study area.

E N D
Lab 6: Geocoding You have received a dBase file that contains the address list of over 500 homes in your neighborhood that have had reports of lead poisoning in infants and toddlers over the past 10 years. You have been asked to locate these addresses on a map within your study area. How will you find these locations & display on a map using MapInfo? In this lesson, you will learn how to geocode using two methods of address matching: by interpolation & center of polygon You will also learn how to increase your match rate and display the geocoded locations on a map.
The following slides step through the geocoding process using the address method (interpolation) in MapInfo 1 4 5 2 1. Open the target db (table to geocode) 2. Determine the key field to use to geocode 3. Run the table of addresses through an address standardizer (if available) 4. Determine if a field such as such as zip code or city exists so that you use the refine search option with a polygon file 5. Create a new field to store the geocode result code (code gives idea why matches did not occur)
Reference db- Street Centerline Determine the reference db to use. Determine the key field that will be used as the match in the reference table. Determine the field name of the polygon file that contains the zip or city
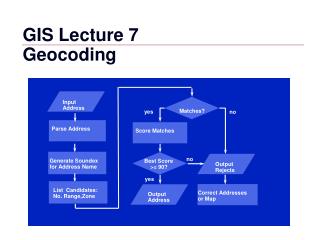
leaks 1 Address 2 Zip 3 Street_centerline Street 4 5 Zips_Ohio 6 Zipcode 7 In MapInfo, Select Table> Geocode 1 Table to geocode 2 Field containing address in table to geocode 3 Table to use to locate address 4 Field used to match address from #2 5 Optional refine by using zipcode table 6 Field containing the zipcode in refine table 6a Field with zipcode in table to geocode 1 12 2 6a 3 4 13 5 6 7 14 • 7 Select Options button • 8 Place result code in this field • 9 The offset distance from street when using interpolation • 10 The distance in percent from end of street to start • placing points • Select OK to the options selected • Select Mode- Automatic on 1st pass • Select symbol icon to display geocoded point • Select OK to begin geocoding your data 8 9 10 11
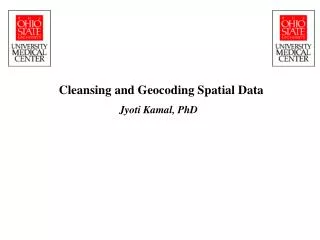
Geocoded points result using address matching to street centerline Interpolation Method
Result code values Any negative value means that the record did not geocode The code may give you an idea of the error.
Geocoding using the polygon method Polygon method finds exact match between the 2 address fields (columns) of the 2 tables. It must be a perfect match to locate the point. The result is a geocoded point symbol in The centroid (weighted center) of the parcel polygon.
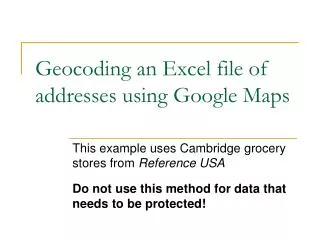
Geocoding results using both Interpolation and Polygon Methods
You are now ready to begin MapInfo Exercise- Lab 6 • Geocoding. The main objectives are: • To open a dBase attribute table to geocode • To geocode using both methods: • interpolation along a street centerline • by Polygon centroid using matched address fields • Begin exercise- lab 6