Download

1 / 21
230 likes | 1.12k Views
Pulleys. Vanderbilt Student Volunteers for Science Fall 2013. Important!. Please use this resource to reinforce your understanding of the lesson! Make sure you have read and understand the entire lesson prior to picking up the kit!

E N D
Pulleys Vanderbilt Student Volunteers for Science Fall 2013
Important! • Please use this resource to reinforce your understanding of the lesson! Make sure you have read and understand the entire lesson prior to picking up the kit! • We recommend that you work through the kit with your team prior to going into the classroom. • This presentation does not contain the entire lesson—only selected experiments that may be difficult to visualize and/or understand.
Management Notes • Groups should have at least 3 students. • ALL VSVS volunteers need to know how to do this experiment. We highly encourage that you practice using the pulleys before teaching them! • VSVS members should each supervise one or two groups of students to ensure that the groups are following instructions and using materials properly to achieve appropriate results. • Write down balance readings from each group on the board (tabular form may be the easiest to use).
I. Work and The Law of Conservation of Energy • Write the definitions of work on the board: • work = force x distance W = Fd • Work is only done when the force exerted on an object is done over a distance. • Energy cannot be created or destroyed. • Work done by a machine cannot be greater than the work done on the machine. • work input = work output • OR, input force x distance = output force x distance • So when the distance is increased, the input force decreases.
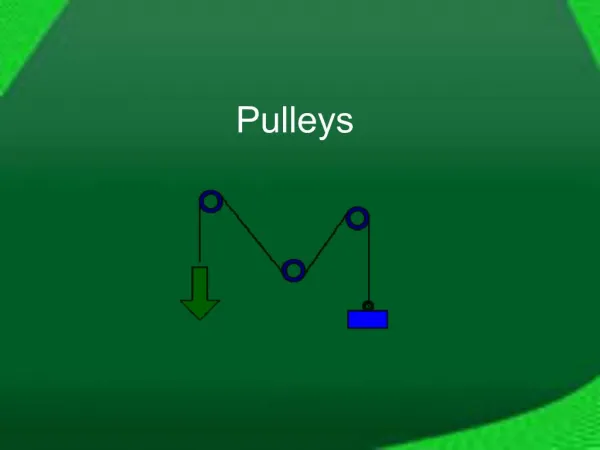
I. Introduction to Pulleys • Refer to manual for more details. • What are the six classes of simple machines? • What are pulleys? • Simple machines that are used in different ways to lift objects. • They can change direction of a force and can make it easier to lift heavy objects. • A single pulley can either change the direction of a force or can make it easier to lift heavy objects. A single pulley cannot do both at the same time, whereas combinations of pulleys can. • A fixed pulley is attached to a support and does not move. • A movable pulley is attached to the object and moves along with the object.
II. Demo: Tug of War • This introduces pulleys and the trade off between the distance an object moves and the amount of force needed to move an object. • Arrange the PVC pipes as shown on the right with the rope tied to one and wind the rope around the pipes. • Pick one of the smaller students to be the person that will pull the rope and have the student put on gloves (to prevent rope burns).
II. Demo: Tug of War (cont.) • Two VSVS volunteers, each holding a PVC pipe and pulling in opposite directions, try to separate the pipes. • At the same time, the student volunteer, standing along side of one of the VSVS volunteers and gripping the free end of the rope with both hands, pulls on the rope to attempt to draw the pipes together. • Unwind the rope until it is only around the pipes once. Then ask the student volunteer to try again (this time, the student will not be able to prevent the VSVS volunteers from separating the pipes).
III. Using a Spring Balance • Inspect the spring scale. Note the side marked “grams” and the side marked “Newtons”. • Show students the white “bolt” at the top of the spring scale – this is used to “zero” the balance. • We are interested in the side measuring Newtons (N) as it is a direct measurement of force. • Tell students that the plastic disc should always start out even with the 0 mark. • Tell students that they must "zero the balance" each time they measure.
III. Using a Spring Balance (cont.) • Have students hold the spring balance by the top metal ring. • Practice measuring the force needed to lift the 200g mass by hooking the spring balance to the hook on the mass and carefully raising the spring balance until the mass is hanging freely (about one inch or 2.5 cm off the table). Keep arm still to get a good reading. Every student should have an opportunity to use the spring balance to do this. • Record the reading in the Output force column on the pulley data sheet. (If student readings are a little less than 2N, ask them to round up to 2N for this column.) • Tell students that this is the Output Force for all the experiments, and to fill in all the lines in column 1.
IV. Single Fixed Pulley • The pulley stands must be placed near the edge of a table. • Masses need to sit flat on the recessed end, and with the hook up.
IV. Single Fixed Pulley Hand out a set of pulley diagrams to each group. • Remind the students that it will take several group members to do each measurement—they will need to work together to manipulate and string the pulleys. • Have students follow the diagram for Single Fixed Pulley as a VSVS member gives the instructions. • Place a single pulley on the middle ring (B) of the stand. Place the mass on the #1 written on the base of the stand. • Take the short loose string off the straw. Thread the string through the top of the pulley (or between the pulley wheel and the metal bar surrounding it). Keep the string in the groove of the pulley. • Hook the left paper clip to the mass. Let go of the string on the left, but keep tension on the string on the right by pulling down gently.
IV. Single Fixed Pulley (cont.) • Take the spring balance, check the zero, and hold the balance upside down. • Hook the spring balance onto the right paper clip. (Be sure the spring is still in the groove of the pulley.) • Pull the spring balance down(not out) gently until the mass lifts off the platform. Lift about 1” (2-3 cm). Keep the tension on the balance, and take a reading from the balance. • Record the reading in the “Input Force” column (column 2) on the Single Fixed Pulley row of the Pulley Data Sheet. (The reading should be 2N, or very close.) • Groups report the reading to the VSVS volunteer at the board. (8 readings will be noted.) • Give the groups a few minutes to calculate the average balance reading. • Dismantle the setup. Wind the string around the straw and put it back in the ziploc bag.
B. Mechanical Advantage • The mechanical advantage of a machine is the number of times the machine multiplies the input force • mechanical advantage tells you how much effort the user saves by using a machine. The more times a machine multiplies the input force, the easier it is to do the job. • But there is a tradeoff for less input force; the force is exerted over a greater distance. • The greater the mechanical advantage of a machine, the smaller the amount of force we need to accomplish a task. A good mechanical advantage is greater than 1.
C. Calculating the Mechanical Advantage • Mechanical advantage (MA) = Output force (in Newtons) Input force (in Newtons) • Demonstrate this calculation by writing this example on the board: • In the experiment just done with the single fixed pulley, the output force is 2N(ewtons). • The input force is the force the student uses to lift the mass with the pulley, and in this case it is the same, 2 N. • The MA = 2N/2N = 1 We do not receive a mechanical advantage when we use a single fixed pulley or when the mechanical advantage is 1.
V. Single Movable Pulley Unwind the short string already attached to ring A on the pulley stand. Note: the pulley may twist around if the student is not holding it properly. Before a balance reading is taken, students should make sure that neither the pulley nor the string is twisted. • Place the mass on the #1 on the base of the stand. Hold the hook above the wheel on the single pulley and hook its bottom hook to the mass. One student should continue to hold the pulley through diagram #3. • Thread the short string attached at "A” through the bottom of the pulley (from left to right), and slip it in the groove of the pulley. Grasp the paper clip and hold it up toward the top of the stand. Make sure that the string is in the groove of the pulley. • Hold the balance upright and check the zero. Attach the spring balance to the paper clip that is being held up in the air. • Let go of the pulley and slowly raise the balance until the mass is about 1” (2 -3 cm) above the base of the stand. MAKE SURE THE STRING IS PULLED UP, NOT HORIZONTALLY OUT.
V. Single Movable Pulley (cont.) • Take a reading from the balance. • Record the reading in the “Input Force” column . • Report the Balance Reading to the VSVS volunteer at the board. • Rewind the short string around the bar near “A” • Guide the groups as they calculate both the average class reading and the mechanical advantage. Each group should record the answers on the data sheet. • Ask students what it means if there is a mechanical advantage of 2. • Ask students if they notice any connection between the mechanical advantage and the numbers of sections of string that support the mass.
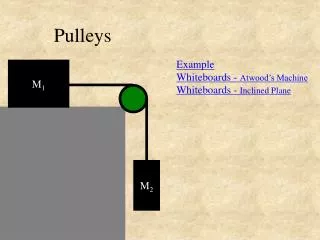
VI. Single Fixed Pulley Plus Single Movable Pulley • Unwind the long string at “C”. • Place the weight on the #2 on the base of the stand. Hook a single pulley to ring B on the stand. Grasp one of the hooks of the other single pulley and attach it to the weight. (One student should continue to hold it through Diagram #3.) • Take the long string attached to ring C on the stand and thread the string through the bottom of the lower pulley (right to left) and over the top of the fixed upper pulley (thread from left to right). Grasp the end of the paper clip and pull down gently so the string remains taut.
VI. Single Fixed Pulley Plus Single Movable Pulley (cont.) • Let go of the pulley and make sure the strings are still in the grooves of the pulleys. • Zero the spring balance. Hold the spring balance upside down and attach it to the paper clip at the end of the string. • Gently pull down until the weight is about 1 inch (2-3 cm) above the base of the pulley. • Take a reading from the spring balance. • Record the reading in the “Input Force” column. • Report the reading to the VSVS volunteers at the board. • Guide the groups as they calculate both the average class reading and the mechanical advantage and record them on the data sheet.
Double Fixed Pulley with Single Moveable Pulley • Ask students to look at diagram 4 for the Double Fixed Pulley with a Single Fixed Movable Pulley and make a prediction about the mechanical advantage they will find using this pulley system. Accept predictions and ask why they made that prediction. • Instruct students to use the long string (the one wrapped around the straw) and follow the diagrams to arrive at a balance reading for this pulley system. • Record the reading in the Balance Reading column in the "Double Fixed with the Single Movable" row of the data sheet. • .70N).
Double Fixed Pulley with Single Moveable Pulley • Tell groups to record the balance reading on the data chart and report the results to the teacher at the board. (The balance reading should be approximately .65 - .7N • Guide the groups as they calculate both the average class reading and the mechanical advantage and record them on the data sheet.
Optional Activity • Use the optional activity sheet and the triple pulley if there is time. • Pass out the Pulley Optional Activity Sheet. • Have students observe the diagrams and do the calculations • Discuss the results.