Download
1 / 30
330 likes | 974 Views
Discover the benefits of OCR technology in converting and organizing various types of documents into editable, searchable data. Learn about popular OCR software, text-to-speech applications, and techniques involved in OCR implementation. Enhance your digital document management with OCR tools.

E N D
Optical Character Recognition Senthil K.N Chimera technologies
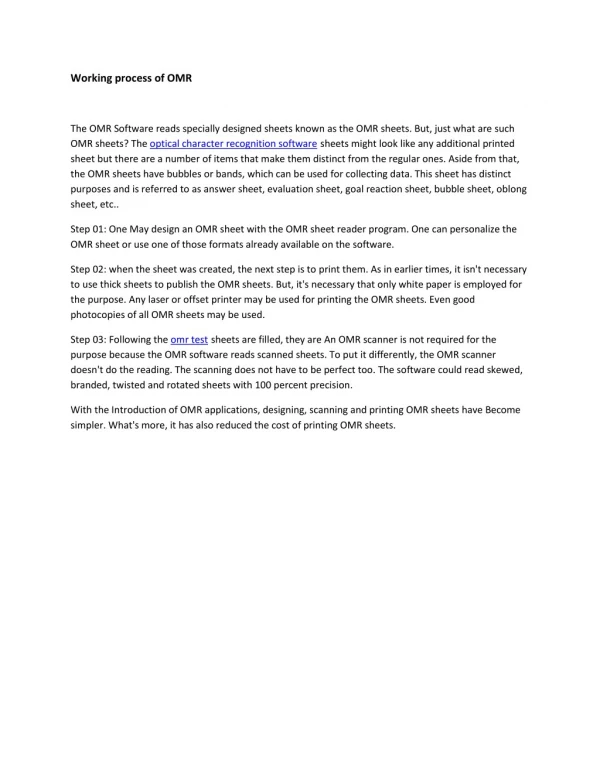
What is OCR Optical Character Recognition, or OCR, is a technology that enables you to convert different types of documents, such as scanned paper documents, PDF files or images captured by a digital camera into editable and searchable data.
Why OCR Quick Digital Search: You can make use of the OCR software to convert scanned text into a word processing file and this enables you to do a quick digital search using keyword or phrases as reference. You may be able to search hundreds of documents and locate what you need within seconds using the digital search feature. Edit Texts: After you have scanned the documents, you may be able to edit texts easily. This can allow you to add any relevant information to the document at a later date. You do not have to search for the original document to do so and this can help save a lot of time. Access: You can make use of this application to scan any type of invoice, papers and other information. The scanned documents can be accessed from anywhere and this helps provide a lot of convenience. People may be able to access the invoice easily and this is really convenient for organizations that have branches in different locations. Retyping Can Be Avoided: Even if you accidentally erase a digital file, you do not have to worry as this can be easily replaced using the OCR software. All that you need to do is to scan the original document and this can help save a lot of effort. You do not have to type the document from scratch and this ensures that the work is done quickly. Storage Space: When you start scanning documents and storing them in digital form, you will end up saving a lot of space. A backup can also be created and this can protect the documents against any type of damage.
Where we use OCR Text-to-speech Text mining Pattern recognition Artificial intelligence Computer vision
OpenSource Tesseract ocr GOCR VietOCR FreeOCR
Commercial Products • Adobe Acrobat Pro • Captiva • Abbyy • Informatica
Tesseract OCR Tesseract is an optical character recognition engine for various operating systems. It is free software, released under the Apache License, Version 2.0, and development has been sponsored by Google since 2006.Tesseract is considered one of the most accurate open source OCR engines currently available. Steps involved in OCR 1. Training phase. 2. Test phase.
Training phase Commands • tesseract • unicharset_extractor • mftraining • cntraining • combine_tessdata
Train Tesseract for own font Create boxes Edit boxes manually Extract unicharset Shape clustering Combine files
Steps 1. Install Tesseract on your computer 2. Get your TIF’s in order First of all, you need some sample data to train the scanner with. Try to get images as clean as possible, shape them up with Photoshop or equivalent software, make the background white and the text black. The more samples you have — the better. You will need at least every character that you will need to recognize to be in the images. Cut out everything else from the image and put the characters on a single line. Make sure that each character is separated with enough space to not make them bleed over each other. Create at least five different images with the characters in and in different order. Remember that Tesseract will try to learn to recognize words, so be careful if you plan to scan codes that you don’t always put characters in the same order for each sample. Create a folder somewhere on your filesystem to keep all the training files in one place. Name the images with [language].[fontname].exp[samplenumber].tif eng.strangelabelmachinefont.exp0.tif EX: phone number image
3. Create the box files Now, for each of the sample files, run Tesseract to create the box files. A box file is a register of all the characters that Tesseract recognizes and at which position that character is. Open up that good ol’ terminal and type in for each of the TIF’s: tesseract [language].[fontname].exp[samplenumber].tif [language].[fontname].exp[samplenumber] batch.nochop makeboxor as in our case: tesseract eng.strangelabelmachinefont.exp0.tif eng.strangelabelmachinefont.exp0 batch.nochop makebox
4. Correct the box files • + 27 21 57 50 0 • 4 65 20 89 55 0 • ? 92 20 116 55 0 • 5 119 23 142 58 0 • 8 147 23 171 58 0 • 0 175 23 199 58 0 • 6 388 22 413 56 0 • 6 417 21 441 56 0 • The leftmost character on each row is the character that Tesseract thought it did find. • The rest is coordinates in pixels left/top and so on. • As you can see it made a mistake with the character “7” and guessed it to be a “?”. • The positioning of the characters would be VERY hard to guess unless you have an amazing talent for imagining pixels in your head. • Luckily there are some tools available to help you with this step. • The only tool that i found to work and/or to be useful is jTessboxeditor. • You can get it here: http://vietocr.sourceforge.net/training.html • Correct the characters that were wrong, and make sure that the surrounding boxes fit the entire characters and in place. If not — correct the values on the top row. • Once you are happy and done, press save and move on to the next file.
5. Training time Now that you have some good boxes its time to start the actual training of the scanner. For each of your TIF/Box pairs, run the following command tesseract [language].[fontname].exp[samplenumber].tif [language].[fontname].exp[samplenumber] box.train or tesseract eng.strangelabelmachinefont.exp0.tif eng.strangelabelmachinefont.exp0 box.train 6. Create the unicharset file Run the unicharset_extractor with each of the boxes as a parameter unicharset_extractor eng.strangelabelmachinefont.exp0.box eng.strangelabelmachinefont.exp1.box…You will probably not need to edit this file, unless you are on some strange old system like windows 95.
7. Create the font_properties file • Create a new file and name it lang.font_properties. • In this file, create a row for each font you are using in your training files. • If you are like me, trying to scan a receipt or label with a strange unknown font, you will likely just need one row. • Each row starts with the name of the font, then it will have a boolean value for each of the possible font properties. • <fontname> <italic> <bold> <fixed> <serif> <fraktur> • Example: • somestrangelabelmachinefont 0 0 1 0 0 • Important — Make sure to add an extra line break at the end of the file.
8. Clustering • Time to cluster all the features of the trained font. • Enter the following in the terminal: • shapeclustering -F font_properties –U unicharset [language].[fontname].exp0.tr [language].[fontname].exp1.tr… 9. Shapetable • Enter the following in the terminal: • mftraining -F font_properties –U unicharset [language].[fontname].exp0.tr [language].[fontname].exp1.tr…
11. unicharambigs • This file is manually created, and is supposed to have a list of commonly mistaken characters and what to substitute when. • language.unicharambigs • Also put in a blank line at the end of the file 12. Wrappin everything up • Now you’re good to go ahead and create the final training file that will be used in your app unless you had ANY errors prior to this step. • language.filename • Then run the final command • combine_tessdata lang. • language.traineddata
Test Character/Word Pre-processing De-skew – If the document was not aligned properly when scanned, it may need to be tilted a few degrees clockwise or counterclockwise in order to make lines of text perfectly horizontal or vertical. Despeckle – remove positive and negative spots, smoothing edges
Binarisation – Convert an image from color or greyscale to black-and-white (called a "binary image" because there are two colours). The task of binarisation is performed as a simple way of separating the text (or any other desired image component) from the background. Line removal – Cleans up non-glyph boxes and lines
Layout analysis – Identifies columns, paragraphs, captions, etc. as distinct blocks. Line and word detection – Establishes baseline for word and character shapes, separates words if necessary.
segmentation – For per-character OCR, multiple characters that are connected due to image artifacts must be separated; single characters that are broken into multiple pieces due to artifacts must be connected. Vertical Grid based.
Character recognition Matrix matching involves comparing an image to a stored glyph on a pixel-by-pixel basis; it is also known as "pattern matching", "pattern recognition", or "image correlation". First pass – read character. Second Pass – understand character.
Post processing Doc format Stored in DB. Plain text format Annotated pdf.
Refrence links https://blog.cedric.ws/how-to-train-tesseract-301 https://github.com/tesseract-ocr/tesseract/wiki/TrainingTesseract-4.00 https://en.wikipedia.org/wiki/Optical_character_recognition