Download
1 / 14
140 likes | 307 Views
Office Productivity Tools 2 Laboratory Exercise # 3 Inserting Objects Objectives: At the end of the exercise, the students are expected to be able to: v Insert graphics, clip arts, or image files to a presentation. v Use drawing tools. v Create charts and tables. Materials:

E N D
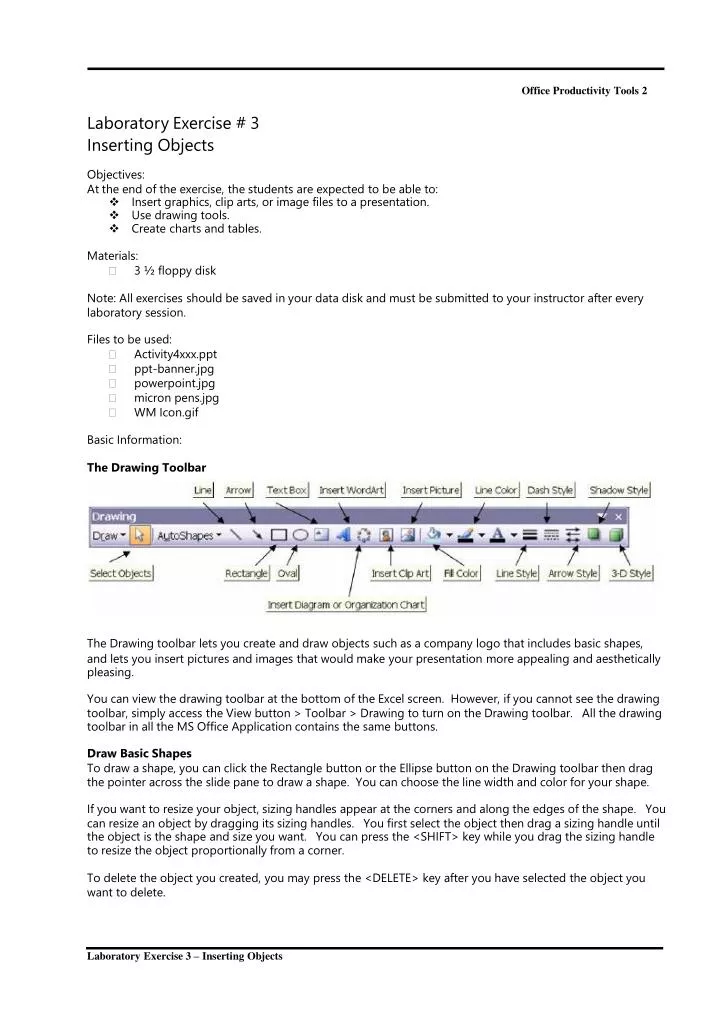
OfficeProductivityTools2 LaboratoryExercise#3 InsertingObjects Objectives: Attheendoftheexercise,thestudentsareexpectedtobeableto: vInsertgraphics,cliparts,orimagefilestoapresentation. vUsedrawingtools. vCreatechartsandtables. Materials: •3½floppydisk Note:Allexercisesshouldbesavedinyourdatadiskandmustbesubmittedtoyourinstructorafterevery laboratorysession. Filestobeused: •Activity4xxx.ppt •ppt-banner.jpg •powerpoint.jpg •micronpens.jpg •WMIcon.gif BasicInformation: TheDrawingToolbar TheDrawingtoolbarletsyoucreateanddrawobjectssuchasacompanylogothatincludesbasicshapes, andletsyouinsertpicturesandimagesthatwouldmakeyourpresentationmoreappealingandaesthetically pleasing. YoucanviewthedrawingtoolbaratthebottomoftheExcelscreen.However,ifyoucannotseethedrawing toolbar,simplyaccesstheViewbutton>Toolbar>DrawingtoturnontheDrawingtoolbar.Allthedrawing toolbarinalltheMSOfficeApplicationcontainsthesamebuttons. DrawBasicShapes Todrawashape,youcanclicktheRectanglebuttonortheEllipsebuttonontheDrawingtoolbarthendrag thepointeracrosstheslidepanetodrawashape.Youcanchoosethelinewidthandcolorforyourshape. Ifyouwanttoresizeyourobject,sizinghandlesappearatthecornersandalongtheedgesoftheshape.You canresizeanobjectbydraggingitssizinghandles.Youfirstselecttheobjectthendragasizinghandleuntil theobjectistheshapeandsizeyouwant.Youcanpressthe<SHIFT>keywhileyoudragthesizinghandle toresizetheobjectproportionallyfromacorner. Todeletetheobjectyoucreated,youmaypressthe<DELETE>keyafteryouhaveselectedtheobjectyou wanttodelete. LaboratoryExercise3–InsertingObjects
OfficeProductivityTools2 MicrosoftClipOrganizer PowerPointcomeswithseveralgraphics(picturesandclipart)storedinaprogramcalledtheMicrosoftClip Organizer.TheClipArtGalleryisacollectionofartgraphicsthatisusedtomakepresentationsmore visuallyattractive.Picturesinthegalleryarearrangedincategories,suchasanimals,business,oreducation, meetingyourneedsinfindingagraphiceasy. ThereareseveralwaysinusingtheClipArtGallery: • • ClickontheInsertClipArticonfromaplaceholder–thiswillthenopentheSelectPicturedialogbox fromwhichyoucansearchthepictureyouwant. ClickontheInsertClipArtbuttonontheDrawingtoolbartoopentheclipartgalleryonthetask pane. InsertingaPicture Youmaywanttochangetheappearanceofaslidebyaddingapicture.Forexample,somecorporationslike toincludetheircorporatelogoontheworksheet.Inaddition,picturesaresometimesaddedtoillustratedata containedinaslide. Youcaninsertaclipart,apicture,orascannedphotograph,importfromotherprogramsandlocations.If youinstalledClipGallerywhenyouinstalledMicrosoftOffice,youcaninsertclipartinyourpresentationby clickingontheInsertmenu>Picture>ClipArtoption. Ifyouwanttoinsertapicturefromfile,clicktheInsertmenu>Picture>FromFileoption.Locatethefolder thatcontainsthepictureyouwanttoinsert.Youcandouble-clickthepictureorselectthefilethenclickInsert button. EditingaPicture Onceapicturehasbeeninserted,youmaymoveitoreditittofityourneeds.Manyoftheeditfunctionsare containedonthePicturetoolbarwhichcanbedisplayedbyright-clickingonthetoolbarandselecting Picture. Thefollowingtableshowsyoutheeditingactivitiesyouwantforyourpicture: LaboratoryExercise3–InsertingObjects
OfficeProductivityTools2 However,youcannotcroporchangethefill,border,shadow,ortransparencyofananimatedGIFpictureby usingthePicturetoolbar.MakethesechangesinananimatedGIFeditingprogram,andtheninsertthefilein thepresentationagain. GIFstandsforGraphicsInterchangeFormat.OriginallydevelopedbyCompuServe,GIFisagraphicfile formatdesignedtotakeupaminimumofdiskspaceandtobeeasilyreadandexchangedbetweensystems. Thisformatiscommonlyusedforpublishingimagesof256colorsorlesstotheInternet. UsingAutoShapes TheAutoShapesmenuontheDrawingtoolbarincludesseveralcategoriesoftools.IntheLinescategory,you canusetheCurve,Scribble,andFreeformtoolstodrawlines,curves,andshapesthatcombinelinesand curves. AnAutoShapeisagroupofready-madeshapesthatincludesuchbasicshapesasrectanglesandcircles,plus avarietyoflinesandconnectors,blockarrows,flowchartsymbols,starsandbanners,andcallouts. Toinsertautoshapes,ontheDrawingtoolbar,clickAutoshapes,pointtoacategory,andthenclicktheshape youwant.Simplydragitontheslidepane. GroupingandUngroupingObjects Asyourdrawingbecomesmorecomplex,youwillfinditnecessaryto“glue”objectstogetherintogroups. Groupingallowsyoutoselectalltheshapesinthegroupandtreatthemasawholeobjectsothatcopying, duplicating,andmovingtheobjectbecomespossible.Yougroupobjectstomakeiteasiertomoveorresize alltheobjectsatthesametimeinsteadofmovingandresizingthemoneatatime. RotatinganObject Youcanmodifyanobjectbyrotatingit.ThethreerotatingcommandsincludetheRotateRight,RotateLeft, andtheFreeRotatecommand.TheRotateRightcommandmovesagraphicin90-degreeincrementstothe right.TheRotateLeftcommandrotatesthegraphicin90-degreeincrementstotheleft.TheFreeRotate commandletsyourotateagraphictoanyangle.WhenyouchoosetheFreeRotatecommand,theobject becomessurroundedwithgreenhandlesthatyouclickanddragtorotatetheobject. Youcanrotateanobjecttoanyangleusingthegreenrotatinghandleorrotateanobjectin90-degree incrementsusingtherotatecommandsfromtheRotateorFlipmenu.However,flippinganobjectmeans creatingaverticalorhorizontalmirrorimageoftheobject. LayeringObjects Objectsautomaticallystackinindividuallayersasyouaddthemtoaslide.Youseethestackingorderwhen objectsoverlap—thetopobjectcoversaportionofobjectsbeneathit.Ifyou“lose”anobjectinastack,you canpress<TAB>tocycleforward(or<SHIFT+TAB>tocyclebackward)throughtheobjectsuntilit’s selected. Youcanmoveindividualobjectsorgroupsofobjectsinastack.Forexample,youcanmoveobjectsupor downwithinastackonelayeratatimeoryoucanmovethemtothetoporbottomofastackinonemove. Youcanoverlapobjectswhenyoudrawtocreatedifferenteffects.Youdon’thavetodrawthebottomobject first—youcanalwaysmoveitlater. LaboratoryExercise3–InsertingObjects
OfficeProductivityTools2 Toadjustlayersofshapesorobjects,clickontheshapeorobject.FromtheDrawbutton,selectOrderand choosefromtheavailablesubmenu. Therearefourlayeringcommandsyoucanusetochangetheorderinwhichobjectsappear: • • • • BringtoFrontplacestheselectedobjectattheverytoplayeroftheslide.Allotherobjectsappear behindtheselectedobject. SendtoBackplacestheselectedobjectattheverybottomlayeroftheslide.Allotherobjectsappear infrontoftheselectedobject. BringForwardplacestheselectedobjectonelayerupontheslide. SendBackwardplacestheselectedobjectonelayerdownontheslide. AligningObjects Objectsthatarescatteredonaslidecanbealignedsothattheyareproperlylineduporspacedequallyapart. TheAligncommand,whichalignsobjectsrelativetooneanother,islocatedundertheDrawbuttononthe Drawingtoolbar. Selecttheobjectsyouwanttoalign.Therearetwowaysinselectingobjects:holddownthe<SHIFT>keyas youclickoneachobject;orclickanddragthemousecursoraroundtheobjectsyouwanttoselect.Fromthe AlignorDistributemenu,selectthealignmentyouwanttoapply. WordArt AWordArtisoneoftheeffectsyoucaneasilyapplytoyourplaintext.Itisapredefinedartistictexteffect, whichisavailableintheWordArtGallery.YoucaninsertaWordArtobjectthroughtheInsertmenuorby clickingtheInsertWordArtbuttonontheDrawingtoolbar.SelectaWordArtstyleintheWordArtGallery, thentypeandformatthetextintheEditWordArtTextdialogbox. AWordArtobject,wheninsertedinaslide,comeswiththeWordArttoolbar,whichisusedtoeditand modifytheobject.Ithassizingandrotatinghandles,whichyoucanusetoresizeandrotatetheobject.It alsohasadjustmenthandles,whichisusedtochangetheslantorslopeoftheobject. Using3-DEffects Whatdoesshadowsand3-Deffectsdo?Theseeffectsgivelifetoboring,one-dimensionalobjects.Applying ashadoweffecttoanobjectmakesitappearasiftheobjectwerecastingashadow.Youcanadda3-D effecttomostlines,AutoShapes,andfreeformdrawingobjects. TheShadowSettingstoolbarfromthe Shadowcommandsetsthelengthorplacementofashadow.A3-Deffect,however,turnsaflatobjectintoa dramaticthree-dimensionalobjectwithdepthandperspective.The3-DSettingsisalsousedtomodifythe3- Dobject.With3-Doptions,youcanchangethedepth(theextrusion)oftheobjectanditscolor,rotation, angle,directionoflighting,andsurfacetexture.Whenyouchangethecolorofa3-Deffect,thechange affectsonlythe3-Deffectoftheobject,nottheobjectitself. UsingShadows YoucanaddshadowstoAutoShapes-includingtextboxes-andyoucanchangethesize,direction,and colorofshadows.Whenyouchangethecolorofashadow,thechangeaffectsonlytheshadow,notthe objectitself.Youcanalsoaddsometypesofshadows-anoffsetshadow,forexample-tothebordersof pictures. CreatingaSlidewithCharts Usingachartisagoodopportunityforyoutoengagetheaudienceinyourtopic.AchartinPowerPointis alsoconsideredasanobject.Itcanbetheprimarypartofaslide(asintheChartAutoLayout),ormerelyone oftwoormorepartsofaslide(liketheText&ChartAutoLayout). CreatingaSlidewithOrganizationalCharts Inapresentation,anorganizationchartcanbeusedtoshowyouraudiencewherepeoplefitinthecorporate hierarchy.PowerPointmakesiteasyforyoutocreateormodifyorganizationcharts. TheAutoLayoutprovidesanoptiontocreateaslidewithorganizationalcharts.Choosethistypeoflayout andyou’reonyourwaytocreatingasimpleorganizationalchartforyourpresentation. LaboratoryExercise3–InsertingObjects
OfficeProductivityTools2 CreatingaTableSlide Whencreatingtableslides,PowerPointautomaticallyrunstheappropriateMicrosoftWordfunctionwhilestill inPowerPoint.ThiseliminatestheprocessofrunningMSWordseparatelyjusttocreatetables.Toadda TableSlide,chooseaslidelayoutwithtable. Activity#5InsertingObjects 1.OpenthefileActivity4xxx.ppt. 2.Onthefirstslide,accesstheEditmenuandchoosetheSelectAllcommand. 3.Pressthe<DEL>keyfromyourkeyboardtodeletealltheselectedelementsonyourfirstslide.Note thatthetextswillbedeletedandtheplaceholderswillremainintheslide. 4.ChangethetaskpanetoSlideLayout.Ifyoucannotseethetaskpane,right-clickontheslidepane andchooseSlideLayout. 5.ChoosetheBlankLayoutfromtheContentsLayoutportion.Obviously,thiswillchangetoablank slide. 6.AccesstheInsertmenu>Picture>FromFile.Askyourinstructorwheretolocatethefileppt- banner.jpg. 7.SelectthefileandclicktheOpenbutton.Thefileshouldbeverticallyinsertedinyourslide. 8.Click,hold-downanddragthegreencircleonthetoptotherightmakinga270ºrotation.Another wayistoclicktheRotateLeft90º buttonfromPictureToolbar.Clickthebuttonthricetomake it270º. 9.Theimagestillselected,movetheimagetotheleftmostsideoftheslidepane.Holddownthe <SHIFT>keyanddragittotherighttoresizeitaccordingly. 10.Yourfirstslidemustsomehowlookliketheimagebelow: 11.ClickontheInsertWordArt buttonfromtheDrawingtoolbar.TheWordArtGallerydialogbox appears. 12.ClickonthesecondtothelastWordArttypefromthethirdrowthenclickOK.TheEditWordArt Textdialogboxappears. 13.ChangetheFonttoLucidaSansandthefontsizeto72. 14.Keyin:Features.Remember,youmustfirstselectthetextbeforekeyinginanewtext. 15.WordArtstillselected,clickontheFormatWordArt FormatWordArtdialogboxappears. LaboratoryExercise3–InsertingObjects buttonfromtheWordArtdialogbox.The
OfficeProductivityTools2 16.FromtheColorandLinestab,clickontheColordrop-downboxandchooseFillEffects. 17.ClickontheColor1drop-downboxfromtheGradienttabandchooseMoreColorsoption. 18.FromtheColorsdialogbox,accesstheCustomtab.Acquirethesamefiguresinthedrop-down boxesfromtheimagebelow.ClickOKaftersettingthefigures. 19.Repeatstep17andacquiretheimagebelow.Notethatthistime;youaretoaccesstheStandardtab oftheColorsdialogbox. 20.YoushouldnowgobacktoFillEffectsdialogbox.ClickOK. LaboratoryExercise3–InsertingObjects
OfficeProductivityTools2 21.ClickOKfromtheFormatWordArtdialogbox.Acquirethepositionoftheelementsjustlikeshown below. 22.Accessyoursecondslide.Repeatstepsininsertingapicturefromfileandlocatetheimage: powerpoint.jpg. 23.Resizetheimageandrotateitlikeacquiringadiamondshape,justasshownbelow. 24.SavethefileasActivity5xxx.ppt. 25.Accessyourthirdslide.Again,insertapicturefromfile–micronpens.jpg. 26.Theimageistoosmall,soresizeit.Clickanddragtherightmostcornerhandletoresize. Noticethattheimagehasexcesswhitespacesaroundthepens.Thiscanbecropped. 27.SelecttheimageandclicktheCrop buttonfromthePicturetoolbar.Theimagewillhavea dottedlinearoundit. 28.Clickthelowerrightcorneroftheimageanddragitonceupwardandtotheright4x. 29.Clicktheupperleftcorneranddragitthricedownwardsandtwicetotheright,producingyouthe imagebelow.Noticethedifference. LaboratoryExercise3–InsertingObjects
OfficeProductivityTools2 30.Placethisfigureonthelowerrightcornerofyourslide.Press<ESC>keytodeselectanyelements. 31.Accessyourfourthslideandagain,insertapicturefromfile:WMIcon.gif. 32.Resizetheimageandplaceitonthelowerrightcornerofyourslide. 33.Accessyourfifthslide.ClicktheInsertClipArt buttonfromtheDrawingtoolbaroraccessthe Inertmenu>Picture>ClipArt.ClipArttaskpanebecomesavailable. 34.OnthelowerpartoftheClipArttaskpane,clickonthe hyperlinktobringonthe MicrosoftClipOrganizerdialogbox. 35.ClickontheplussignbesidetheOfficeCollectionsoptiontoviewmoreoptions. 36.ClickontheAcademicfolder. 37.Clickthedrop-downarrowofthethirdclipartandchooseCopy. 38.AccesstheEditmenuandchoosePastecommand.Placetheclipartonthelowerleftcornerofyour slide. 39.ClosetheMicrosoftClipOrganizerdialogbox.Whenyouareaskedifyoustillwanttoremainthe clipsyoucopiedontheclipboard,clickNo. 40.Saveyourwork. LaboratoryExercise3–InsertingObjects
OfficeProductivityTools2 Toexperimentmoreonthedrawingtools,theshapesinparticularandtoacquiretheimagebelow, whichwillbeyouroutput,followthesesteps: 41.AddanewslideafteryourfifthslideandmaketheslidelayouttoBlankLayout. 42.ClickontheRectanglebuttonfromtheDrawingtoolbar.Dragitontheslidepanejustlikethesize oftheRedOrangerectangle. 43.FromthePicturetoolbar,clickontheFormatAutoShape button. 44.FromtheFormatAutoShapedialogbox,ColorandLinestab,clicktheColordrop-downlistand chooseMoreColorsoption. 45.AcquirethecolorfromtheColorsdialogboxbelow.ClickOK. 46.YoumustnowbeontheFormatAutoShapedialogbox.FromtheLinesectionoftheColorsand Linestab,clicktheColordrop-downlistandchooseNoLineoption. 47.ClickOK.Placetherectangleshapejustlikeonthesampleoutput. 48.ClicktheTextBox button,dragitontheslidepane,justenoughtokeyin:By:<yourname>. 49.Selectthetextboxbyclickingonit,clickontheAlignRight button. 50.ClicktheFormatTextBox buttonfromthePicturetoolbar.FromtheColorsandLinestab,set theColorontheFillsectiontoNoFillandtheColorontheLinesectiontoNoLine.ClickOK. 51.SettheFonttoyourdesiredtypeandthesizeto17. LaboratoryExercise3–InsertingObjects
OfficeProductivityTools2 52.ClicktheAutoShapebutton,pointtoBasicShapestoaccessmorebasicshapes,andthenclickon Isoscelestriangle. 53.Dragitontheslidepane.Rotateitandresizeittoacquiretheimagebelow. 54. 55. 56. 57. 58. 59. 60. 61. 62. 63. 64. Shapestillselected,clickontheFormatAutoShapebuttonfromthepicturetoolbar. SettheColorfromtheLinesectiontoNoLine. AccesstheFillEffectsoptionfromtheColordrop-downlistontheFillsection. FromtheGradienttab,clickontheTwocolorsradiobutton.SetColor1toDarkGreyandColor2 toWhite. ClickontheHorizontalradiobuttonfromtheShadingStylessectionandclickonthefirstvariant. ClickOK. SettheColorontheLinesectiontoNoLine.ClickOKontheFormatAutoShapedialogbox. ClickontheInsertClipArtbuttonandclickontheOrganizeclipartshyperlink. ClickonOfficeCollections>Maps.Copytheclipartandpasteitontheslidepane. Resizeitandplaceitjustlikethesampleoutputshownabove.ClosetheClipOrganizer. Createarectanglewithasizeof:height–9.09andthewidth–0.83.Tosetthesize,selectthe rectangle,accessitsFormatAutoShape. FromtheSizetab,highlightinsidethedrop-downboxandkeyintheheightandwidth.ClickOK. 65.Also,keyinthe309ºontheRotationdrop-downbox,stillfromtheSizetaboftheFormatAutoShape dialogbox. 66.SwitchtoColorsandLinestab.ChangetheColorintheFillsectionasshownbelow.ClickOK. LaboratoryExercise3–InsertingObjects
OfficeProductivityTools2 67.Also,settheColorfromtheLinesectiontoNoColor.ClickOK. 68.Therectanglestillselected,accesstheEditmenuandclickDuplicatecommand. 69.Theduplicatecopywillbeonthetopoftheoriginal.Resizeitintoathinnersizeoftheoriginaland placeitontherightside. 70.Selectthetworectangle,accesstheEditmenu>Duplicate.Placeitjustliketheoutputshown above. Toselectseveralelementsintheslide,holddownthe<SHIFT>keyandclicktheelements.Todeselect theselectedelements,pressthe<ESC>key. 71.Selectthelasttworectangles,setColor1todarkblueandColor2toGrey. 72.Selectthefourrectangles,clicktheDrawbuttonfromtheDrawingtoolbarandchooseGroup command. 73.Therectanglesstillselected,clickontheDrawbutton>Order>SendtoBack. 74.Drawarectanglejustlikethesizeoftheslidepane.Acquirethecolorandthevariantfromthe outputshownabove. 75.MakeitsOrdertoSendtoBack. 76.Closetheapplication. Activity#6CreateChartsandTable 1.OpenMSPowerPoint2003application.PowerPointnowallowsyoutocreateanewpresentation. 2.AccesstheSlideLayoutPane,andmakeyourcurrentslide,TitleandDiagramorOrganizationChart Layout. 3.Clickthetitleplaceholderandkeyin:BusinessCompany,Inc.andalignedittotheright. 4.CreateaWordArtapplyingthethirdtypefromthefirstrowtype.KeyinABC. 5.ChangetheFonttypetoAlbertusExtraBoldandthesizeto40. 6.EditthefilleffectsoftheWordArttoOceanfromPresetcolors. 7.MaketheShadingStyletoVerticalandchoosethefourthvariantandplaceitbesidethetitle placeholder. 8.Double-clickontheadddiagramororganizationchart appears. 9.ChoosethefirstdiagramtypeandclickOK. LaboratoryExercise3–InsertingObjects iconandDiagramGallerydialogbox
OfficeProductivityTools2 10.Clickonthefirstshapeandkeyin:President. 11.Press<ENTER>keyandkeyin:JohnSmith. 12.Onthesecondrow,keyinthefollowingtextsaccordingly: a. Firstshape:VPMarketing><ENTER>>SusanJones b.SecondShape:VPSales><ENTER>>RachelParker c. ThirdShape:VPProduction><ENTER>>TomAllen 13.Clickonthefirstshapeonthesecondrow,fromtheOrganizationCharttoolbar,clickthearrowof theInsertShapebuttonandchooseSubordinate. 14.Firstshapestillselected,createanothersubordinate.YourVPMarketingshouldnowhavetwo subordinates. 15.Firstsubordinate,keyin:Manager><ENTER>>AliceJohnson 16.SecondSubordinate,keyin:Manager><ENTER>>TimMoore. 17.CreatetwosubordinatesforVPSalesRachelParker.Thetwosubordinateswillbe:Manager> <ENTER>>MichaelGrossandManager><ENTER>>KimDole. 18.CreatetwosubordinatesforVPProductionTomAllen.Thetwosubordinateswillbe:Manager> <ENTER>>KathyRobertsandManager><ENTER>>BettyFoster. 19.ClicktheVPMarketingshape.FromtheOrganizationCharttoolbar,clickonthearrowoftheLayout buttonandchooseRightHangingoption. 20.ApplythisalsototheVPSalesandVPProductionshapes. 21.Youmustnowhavethesameimageasshownbelow. LaboratoryExercise3–InsertingObjects
OfficeProductivityTools2 22.Toemphasizetheirposition,makeallpositiontitletext,Bold. 23.ClickthewholechartandchangethefonttoLucidaSansandthesizeto20. 24.Toaddstyle,chartstillselected,clicktheAutoformat button.TheOrganizationChartStyle Gallerydialogboxappears. 25.SelectanydesiredstyletoapplyandclickOK.However,youmayusetheFillColorbuttonifyou wanttoapplydifferenteffects. 26.SavethisasActivity6xxx. TheoutputusestheFirestyle. 27.CreateanotherslideandmakethelayoutasTitleandTableLayout. 28.Keyin:TOOLSonthetitleplaceholder.ChangethefonttoBroadway. 29.Double-clickontheaddtable buttonandtheInsertTabledialogboxappears. 30.Fromthedialogbox,keyin:5onthenumberofcolumnscomboboxandkeyin:15onthenumber ofrowscomboboxandclickOK. 31.Typeinthefollowingtextsfromthetablebelowonyourtable.Notethatwhenshiftingtootherfields simplypresstheup,down,left,andrightarrowkeyfromyourkeyboard.Alsonotethatthefirstrow isinBoldstyle. LaboratoryExercise3–InsertingObjects
OfficeProductivityTools2 32.SelectthewholetableandchangethefontofthesecondrowtothelasttoAvantgardeMdBtandthe sizeto15. 33.Changethesizeofthefontofthefirstrowto16. 34.Saveyourworkandexittheapplication. LaboratoryExercise3–InsertingObjects


![[Exercise Name]](https://cdn2.slideserve.com/4369850/exercise-name-dt.jpg)