Download
1 / 21
210 likes | 374 Views
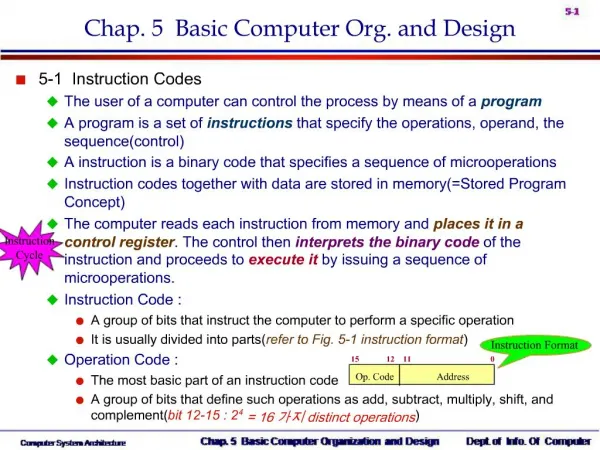
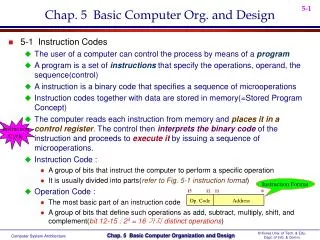
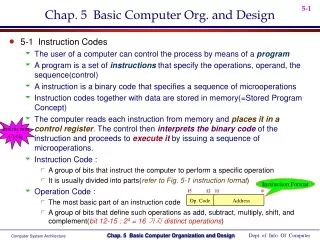
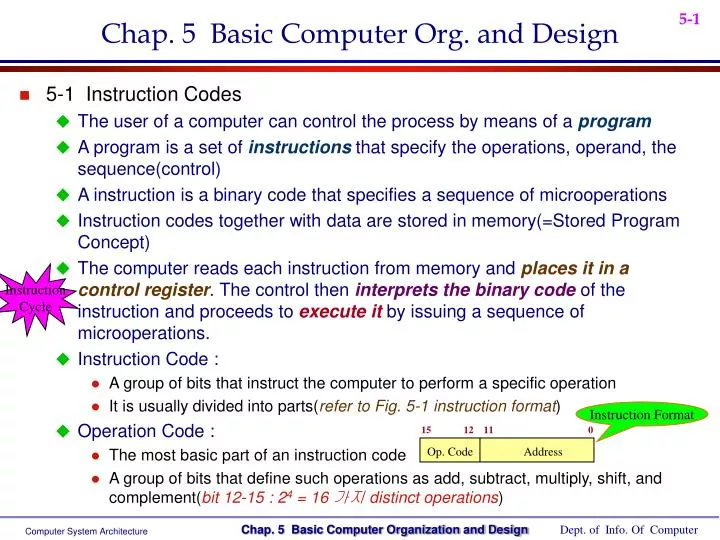
Chap. 5 Basic Computer Org. and Design. 15 12 11 0. Op. Code Address. 5-1 Instruction Codes The user of a computer can control the process by means of a program

E N D
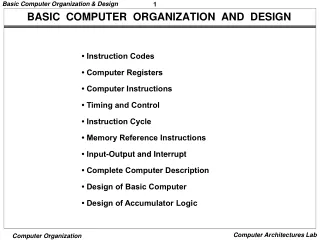
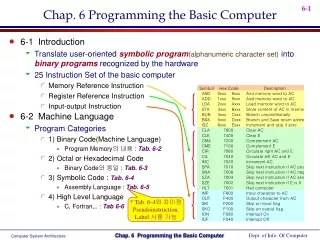
Chap. 5 Basic Computer Org. and Design 15 12 11 0 Op. Code Address • 5-1 Instruction Codes • The user of a computer can control the process by means of a program • A program is a set of instructions that specify the operations, operand, the sequence(control) • A instruction is a binary code that specifies a sequence of microoperations • Instruction codes together with data are stored in memory(=Stored Program Concept) • The computer reads each instruction from memory and places it in a control register. The control then interprets the binary code of the instruction and proceeds to execute it by issuing a sequence of microoperations. • Instruction Code : • A group of bits that instruct the computer to perform a specific operation • It is usually divided into parts(refer to Fig. 5-1 instruction format) • Operation Code : • The most basic part of an instruction code • A group of bits that define such operations as add, subtract, multiply, shift, and complement(bit 12-15 : 24 = 16 가지 distinct operations) Instruction Cycle Instruction Format
Stored Program Organization : Fig. 5-1 • The simplest way to organize a computer • One processor register : AC(Accumulator) • The operation is performed with the memory operand and the content of AC • Instruction code format with two parts : Op. Code + Address • Op. Code : specify 16 possible operations(4 bit) • Address : specify the address of an operand(12 bit) • If an operation in an instruction code does not need an operand from memory, the rest of the bits in the instruction(address field) can be used for other purpose(따라서 16개 이상의 instruction을 사용 : Tab. 5-2 참고, 총 25 개 instruction) • Memory : 12 bit = 4096 word(Instruction and Data are stored) • Store each instruction code(program) and operand (data) in 16-bit memory word • Addressing Mode • Immediate operand address : • the second part of an instruction code(address field) specifies an operand • Direct operand address : Fig. 5-2(b) • the second part of an instruction code specifies the address of an operand • Indirect operand address : Fig. 5-2(c) • the bits in the second part of the instruction designate an address of a memory word in which the address of the operand is found (Pointer로 사용됨) • One bit of the instruction code is used to distinguish between a direct and an indirect address : Fig. 5-2(a) Exam) Clear AC, Increment AC, Complement AC, ... I=0 : Direct, I=1 : Indirect
Effective Address • The operand address in computation-type instruction or the target address in a branch-type instruction • 5-2 Computer Registers • List of Registers for the Basic Computer : Tab. 5-1 • Basic computer registers and memory : Fig. 5-3 • Data Register(DR) : hold the operand(Data) read from memory • Accumulator Register(AC) : general purpose processing register • Instruction Register(IR) : hold the instruction read from memory • Temporary Register(TR) : hold a temporary data during processing • Address Register(AR) : hold a memory address, 12 bit width • Program Counter(PC) : • hold the address of the next instruction to be read from memory after the current instruction is executed • Instruction words are read and executed in sequence unless a branch instruction is encountered • A branch instruction calls for a transfer to a nonconsecutive instruction in the program • The address part of a branch instruction is transferred to PC to become the address of the next instruction • To read instruction, memory read cycle is initiated, and PC is incremented by one(next instruction fetch)
Input Register(INPR) : receive an 8-bit character from an input device • Output Register(OUTR) : hold an 8-bit character for an output device • Common Bus System • The basic computer has eight registers, a memory unit, and a control unit(in Sec. 5-4) • Paths must be provided to transfer information from one register to another and between memory and registers • A more efficient scheme for transferring information in a system with many registers is to use a common bus(in Sec. 4-3) • The connection of the registers and memory of the basic computer to a common bus system : Fig. 5-4 • The outputs of seven registers and memory are connected to the common bus • The specific output is selected by mux(S0, S1, S2) : • Memory(7), AR(1), PC(2), DR(3), AC(4), IR(5), TR(6) • 외부 Device와의 입출력은 AC를 통해서 가능하기 때문에 INPR과 OUTR은 선택 없음 • mux가 선택되어지면 memory 또는 register로 부터 데이터가 출력되어 bus위에 놓여진다 • When LD(Load Input) is enable, the particular register receives the data from the bus • Control Input : LD, INC, CLR, Write, Read • Address Register : 별도의 Address bus 불필요(하나의 Bus로 address와 data 동시처리) • AC는 DR을 통해서만 memory read 가능(p. 146, LDA 명령 참조) • Memory write는 AC의 내용을 직접 write 가능(p. 147, STA 명령 참조)
Accumulator(AC) : 3 종류의 입력 Path • 1) Register Microoperation : clear AC, shfift AC,… • 2) Data Register : add DR to AC, and DR to AC(연산결과는 AC에 저장하고 결과에 따라 End carry bit set/reset), memory READ(DR을 통해서만 가능) • 3) INPR : 외부 Device에서 데이터 입력(Adder & Logic을 거치지 않아도 됨) • Note) Two microoperations can be executed at the same time
15 14 12 11 0 15 14 12 11 0 15 14 12 11 0 I Opcode Address 0 1 1 1 Register Operation 1 1 1 1 I/O Operation • 5-3 Computer Instruction • 3 Instruction Code Formats : Fig. 5-5 • Memory-reference instruction • Opcode = 000 110 • I=0 : 0xxx ~ 6xxx, I=1: 8xxx ~Exxx • Register-reference instruction • 7xxx (7800 ~ 7001) : CLA, CMA, …. • Input-Output instruction • Fxxx(F800 ~ F040) : INP, OUT, ION, SKI, …. I=0 : Direct, I=1 : Indirect
Instruction Set Completeness • Arithmetic, Logical, and shift : CMA, INC, .. • Moving information to and from memory and AC : STA, LDA • Program control : BUN, BSA, ISZ • Input/Output : INP, OUT • 5-4 Timing and Control • Clock pulses • A master clock generator controls the timing for all registers in the basic computer • The clock pulses are applied to all F/Fs and registers in system • The clock pulses do not change the state of a register unless the register is enabled by a control signal • The control signals are generated in the control unit : Fig. 5-6 • The control signals provide control inputs for the multiplexers in the common bus, control inputs in processor registers, and microoperations for the accumulator • Two major types of control organization • Hardwired Control : Chap. 5 • The control logic is implemented with gates, F/Fs, decoders, and other digital circuits • + Fast operation,- Wiring change(if the design has to be modified) If the computer includes a sufficient number of instructions in each of the following categories
Microprogrammed Control : Chap. 7 • The control information is stored in a control memory, and the control memory is programmed to initiate the required sequence of microoperations • + Any required change can be done by updating the microprogram in control memory, - Slow operation • Control Unit : Fig. 5-6 • Control Unit = Control Logic Gate + 3 X 8 Decoder + Instruction Register + Timing Signal • Timing Signal = 4 X 16 Decoder + 4-bit Sequence Counter • Exam) Control timing : Fig. 5-7 • Sequence Counter is cleared when D3T4 =1 : • Memory R/W cycle time > Clock cycle time • 만약 위와 같이 가정하지 않으면, wait cycle을 추가해야 함.
Exam) Register transfer statement : • A transfer of the content of PC into AR if timing signal T0 is active • 1) During T0 active, the content of PC is placed onto the bus • 2) LD(load) input of AR is enabled, the actual transfer occurs at the next positive transition of the clock(T0 rising edge clock) • 3) SC(sequence counter) is incremented : • 5-5 Instruction Cycle • Instruction Cycle • 1) Instruction Fetch from Memory • 2) Instruction Decode • 3) Read Effective Address(if indirect addressing mode) • 4) Instruction Execution • 5) Go to step 1) : Next Instruction[PC + 1] • Instruction Fetch : T0, T1(Fig. 5-8) • T0 = 1 • 1) Place the content of PC onto the bus by making the bus selection inputs S2S1S0=010 • 2) Transfer the content of the bus to AR by enabling the LD input of AR T0 : Inactive T1 : Active Continue indefinitely unless HALT instruction is encountered
T1=1 T0=1 0 1 0 1 1 1 • T1 = 1 • 1) Enable the read input memory • 2) Place the content of memory onto the bus by making S2S1S0= 111 • 3) Transfer the content of the bus to IR by enable the LD input of IR • 4) Increment PC by enabling the INR input of PC • Instruction Decode : T2 • IR(12-14)에 따라 Fig. 5-6 에서 D0 - D7 출력 • Instruction Execution : T3, T4, T5, T6 D7=1 Register(I=0) D7I’T3(Execute) I/O (I=1) D7IT3 (Execute) D7=0 : Memory Ref. Indirect(I=1) D7’IT3( ) Direct (I=0) nothing in T3 • Register 와 I/O 명령은 T3에서 실행되며 Memory Ref. 명령은 T3에서 Operand의 effective address를 읽음 • Memory Ref. 명령은 종류에 따라 T4, T5, T6을 갖음 : Fig. 5-11 • Flowchart for instruction cycle(Initial Configuration) : Fig. 5-9 Op.code Address Di/Indirect Read effective Address
Register Ref. Instruction • r = D7I’T3 : 공통항 • IR(i) = Bi IR(0 -11) • B0 - B11 : 12 개의 Register Ref. Instruction (Tab. 5-3) • 5-6 Memory Ref. Instruction D7 : Register or I/O = 1 D6 - D0 : 7 개의 Memory Ref. Instruction(Tab. 5-4) • AND to AC • ADD to AC • LDA : memory read Address 로 사용되지 않음 Fig. 5-9 Flowchart for instruction cycle(initial) IR(12,13,14) = 111 3 X 8 Decoder
0 BSA 135 next instruction 21(return address) Subroutine 1 BUN 135 PC = 10 PC = 21 135 PC = 136 • STA : memory write • BUN : branch unconditionally • BSA : branch and save return address • Return Address : save return address ( 135 21 ) • Subroutine Call : Fig. 5-10 • ISZ : increment and skip if zero • Control Flowchart : Fig. 5-11 • Flowchart for the 7 memory reference instruction • The longest instruction : ISZ(T6) • 따라서 3 bit Sequence Counter로 구현가능(현재 4 비트는 확장에 대비함) Fig. 5-10 Example of BSA
5-7 Input-Output and Interrupt • Input-Output Configuration : Fig. 5-12 • Input Register(INPR), Output Register(OUTR) • These two registers communicate with a communication interface serially and with the AC in parallel • Each quantity of information has eight bits of an alphanumeric code • Input Flag(FGI), Output Flag(FGO) • FGI : set when INPR is ready(입력데이터가 있을 때), clear when INPR is empty • FGO : set when operation is completed(데이터 출력 완료), clear when output device is in the process of printing • Input-Output Instruction : Tab. 5-5 • p = D7IT3 : 공통항 • IR(i) = Bi IR(6 -11) • B6 - B11 : 6 개의 I/O Instruction • Program Interrupt • I/O Transfer Modes • 1) Programmed I/O, 2) Interrupt-initiated I/O, 3) DMA, 4) IOP • 본 교과서에서는 2) Interrupt-initiated I/O 방식 사용(FGI 또는 FGO가 1이면 Int. 발생) • Maskable Interrupt 사용( ION 또는 IOF 명령을 사용하여 Int. mask 가능) 1 : Ready 0 : Not ready Address 로 사용되지 않음
256(return address) 0 BUN 1120 Main Program Interrupt Service Routine 1 BUN 0 0 PC = 1 255 256 1120 Interrupt Here • Interrupt Cycle : Fig. 5-13 • During the execute phase, IEN is checked by the control • IEN = 0 : the programmer does not want to use the interrupt, so control continues with the next instruction cycle • IEN = 1 : the control circuit checks the flag bit, If either flag set to 1, R F/F is set to 1 • At the end of the execute phase, control checks the value of R • R = 0 : 보통의 instruction cycle로 들어감 • R = 1 : Instruction cycle로 들어감 • Demonstration of the interrupt cycle : Fig. 5-14 • The memory location at address 0 as the place for storing the return address • Interrupt 발생시 항상 Branch to memory location 1 • Interrupt cycle에서 항상 IEN=0 으로 함(따라서 ISR에서 Interrupt를 받기 위해서는 ISR 앞부분에서 반드시 ION 명령을 실행해야 함) • The condition for R = 1 • Modified Fetch Phase • Modified Fetch and Decode Phase Save Return Address(PC) at 0 Jump to 1(PC=1)
5-8 Complete Computer Description • The final flowchart of the instruction cycle : Fig. 5-15 • The control function and microoperation : Tab. 5-6 • 5-9 Design of Basic Computer • The basic computer consists of the following hardware components • 1. A memory unit with 4096 words of 16bits • 2. Nine registers : AR, PC, DR, AC, IR, TR, OUTR, INPR, and SC(Fig. 2-11) • 3. Seven F/Fs : I, S, E, R, IEN, FGI, and FGO • 4. Two decoder in control unit : 3 x 8 operation decoder, 4 x 16 timing decoder(Fig. 5-6) • 5. A 16-bit common bus(Fig. 5-4) • 6. Control Logic Gates : Fig. 5-6의 오른쪽 Box 부분에서Control Output 설계 • 7. Adder and Logic circuit connected to the AC input • Control Logic Gates • 1. Signals to control the inputs of the nine registers • 2. Signals to control the read and write inputs of memory • 3. Signals to set, clear, or complement the F/Fs • 4. Signals for S2 S1 S0 to select a register for the bus • 5. Signals to control the AC adder and logic circuit 이번 Section에서 설계하는 주요 내용
Register Control : AR • Control inputs of AR : LD, INR, CLR • Find all the statements that change the AR inTab. 5-6 • Control functions • Memory Control : READ • Control inputs of Memory : READ, WRITE • Find all the statements that specify a read operation in Tab. 5-6 • Control function • F/F Control : IEN • Control functions
Bus Control • Encoder for Bus Selection : Tab. 5-7 • S0 = x1 + x3 + x5 + x7 • S1 = x2 + x3 + x6 + x7 • S0 = x4 + x5 + x5 + x7 • x1 = 1 : • Control Function : • x2 = 1 : • x7 = 1 : • Same as Memory Read • Control Function : Encoder Multiplexer Bus Select Input x1 x2 x3 x4 x5 x6 x7 S0 S1 S2 “ “
5-10 Design of Accumulator Logic • Circuits associated with AC : Fig. 5-19 Fig. 5-21 Fig. 2-11 Fig. 5-20
Control of AC : Fig. 5-20 • Find the statement that change the AC : LD CLR INR
Adder and Logic Circuit : Fig. 5-21( 16 bit = 16 개 필요 ) * Fig. 2-11 로 대체 가능 Increment, Clear, Count 기능
Mano Machine • Fig. 5-4 : Common Bus(p.130) • Fig. 2-11 : Register(p. 59) • Fig. 5-6 : Control Unit(p. 137) • Fig. 5-16, 17,18 : Control Logic Gate(p.161- 163) • Fig. 5-4의 모든 Component의 Control Input • 각각의 Register, Memory, F/Fs, Bus Selection • Fig. 5-20 : AC control(p.165) • Fig. 5-21 : Adder and Logic(p.166) Integration ! Due Date : 기말고사 후 1 주일