Download
1 / 24

E N D
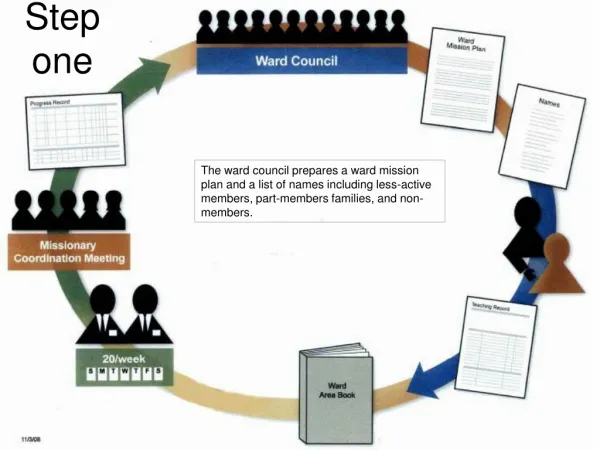
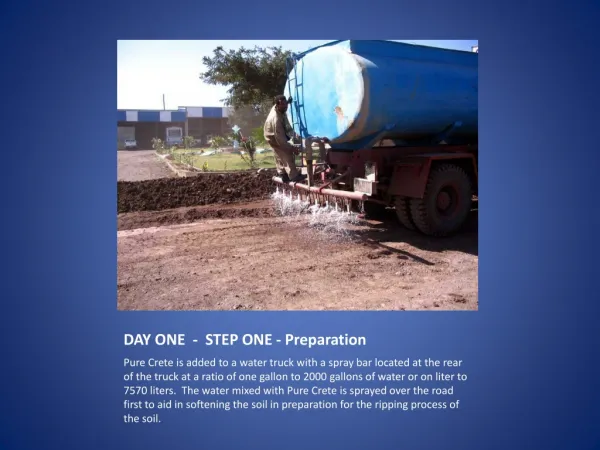
DAY ONE - STEP ONE - Preparation Pure Crete is added to a water truck with a spray bar located at the rear of the truck at a ratio of one gallon to 2000 gallons of water or on liter to 7570 liters. The water mixed with Pure Crete is sprayed over the road first to aid in softening the soil in preparation for the ripping process of the soil.
DAY ONE - STEP ONE continuing – Water truck Spraying The rate of application of the Pure Crete treated water should be approximately 3 to 4 mph depending on the moisture content of the soil. The characteristics of properly mixed product is a white foaming of the solution when sprayed on the soil.
DAY ONE - STEP TWO – Scarifying the soil Using a road grader equipped with a rear mounted seven teeth scarifying attachment, the soil should be broken up to the pre determined depth to achieve the desired thickness of the completed compacted layer.
DAY ONE - STEP TWO Continue - Scarifying The water truck should continue to wet the soil ahead of the grader to treat the soil and maintain a high moisture content during this ripping process. The smaller the soil can be broken up during this ripping process the better. The entire width of the road should be ripped up from shoulder to shoulder.
DAY ONE - STEP THREE – Mixing soil with grader After the grader has completed the surface ripping of the soil to maximum depth that is capable, using the blade, the grader should move the loose soil to the sides of the road. The water truck should continue to spray the soil to maintain a high moisture content of the soil.
DAY ONE – STEP THREE - continue Moving soil The grader should move the soil to both sides of the road in order to expose the solid un ripped up area of the road.
DAY ONE – STEP THREE continue Moving soil Move the soil to the shoulder of the road in a windrow formation. It will require the area on both sides of the road. Move all of the loose dirt and continue to keep it moist with the water truck leading the grader.
DAY ONE - STEP THREE – First phase complete With the water truck leading the grader with the scarifyers deployed, repeat step one, two and three until the desired depth is achieved. After the desired depth is achieved, the mixing process begins.
DAY ONE - STEP FOUR – Mixing begins After the desired depth is reached and the soil is moved to the side of the road, The mixing process begins.
DAY ONE – STEP FOUR – Mixing of the soil With the water truck leading and spraying the soil, the grader mixes the product into the soil by moving the soil with the blade from one side of the road and back again. Both sides of windrowed soil is moved to the opposite side of the road and back. This process should be continued all day on the first day.
DAY TWO – STEP ONE – Compacting soil The soil is wet with the water truck sprayer on the loose soil and the surface of the compacted soil.
DAY TWO – STEP TWO – Spreading soil continue With the soil being wet with the water truck and leading the grader, the grader spreads the soil for compaction in maximum two inch layers.
DAY TWO – STEP THREE – SHEEP’S FOOT The 2 inch layer of soil is compacted with first a 15 ton sheep's foot compactor as the first step in the compacting process. The compaction is conducted with the soil continued to be moisten by the water truck mixed with Pure Crete.
DAY TWO – STEP FOUR – DRUM COMPACTOR After the sheep’s foot compactor has completed its process, the drum compactor is used to complete the compaction process on this 2 inch layer of soil spread by the grader. A 20 ton smooth drum compactor is used for this process.
DAY TWO – STEP FOUR - Continue The water truck sprays more product suspended in the water on the surface and the grader spreads another layer of soil two inches deep to be compacted.
DAY TWO – STEP FOUR - Continue Compacting soil A 20 ton vibrating drum compactor, compact the 2 inch layer of soil until it is completely compacted. Make sure that the water truck keeps the soil moist so that the compactor can properly compact the soil.
DAY TWO – STEP FOUR - Compacting The vibrating drum compactor should be set on vibrate when possible and depending on the moisture content of the soil. The soil should be kept moist to prevent cracking and sticking of the soil to the drum.
DAY TWO – STEP FOUR – COMPACTING The grader should spread each 2 inc layer and this compacting process should be repeated until there is only two layer left to spread. At this time the vibrators should be turned off. The last two layers should be completed without the vibrator engaged.
DAY TWO – STEP FIVE - Finishing After the drum compactor has finished, the pneumatic tire roller compactor is employed to provide a smooth surface. Watering should be performed in a manner to aid in providing the best conditions to allow the tire roller to make a smooth surface.
DAY TWO – STEP SIX – Finishing Keeping the surface moist while the pneumatic roller compactor is finishing the surface. Care should be taken in not wetting the surface too much.
DAY TWO – STEP SEVEN – Clean up After the compaction is complete, clean up all loose dirt and rock with the blade
DAY TWO - FINISHED The is how a typical road will look like. It is hard and will get harder as it dries. It normally will teak 72 hours in hot weather to dry.
DAY THREE – FINISHED AND DRYING This is a typical view of a properly prepared road. It is hard and has a CBR of 70 or greater.
FINISHED SURFACES You have the option of at least three different surfaces with the use of Pure Crete. First, a soil/dirt surface that looks like a regular traditional dirt road with the difference being the strength and durability exceeding any traditional rock and gravel dirt road. Second, a Pure Crete topped with small size gravel or DME which possesses the same strength characteristics of a Pure Crete road and in addition exhibits a more desirable appearance. Third, an asphalt finish surface is the most pleasing in appearance and usability. There are several different thicknesses of asphalt that can be used as a finish surface on a Pure Crete road base.