Download
1 / 31
310 likes | 448 Views
Tutorial 4 Creating and Customizing Shortcuts. Objectives. Create shortcuts to a drive, folder, and file View shortcut properties Customize shortcuts Create shortcuts to programs Create a new shortcut from an existing shortcut Update a shortcut’s path. Objectives.

E N D
Objectives • Create shortcuts to a drive, folder, and file • View shortcut properties • Customize shortcuts • Create shortcuts to programs • Create a new shortcut from an existing shortcut • Update a shortcut’s path Windows 7 for Power Users Tutorial 4
Objectives • Add a shortcut to the Start menu and taskbar • Create a Control Panel shortcut • Use the Create Shortcut Wizard • Create a link in the Navigation pane • Customize a drive icon • Create Internet shortcuts • Add a shortcut to the Startup folder Windows 7 for Power Users Tutorial 4
Desktop Shortcuts Windows 7 for Power Users Tutorial 4
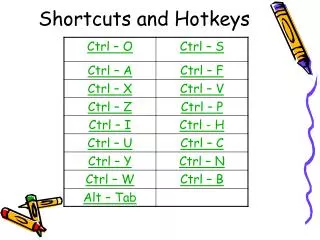
Using Shortcuts • A shortcut is a direct link to an object that you can place anywhere you frequently work • A UNC path references servers, printers, and other resources on a network • Shortcut examples Windows 7 for Power Users Tutorial 4
Creating Shortcuts • Techniques for creating shortcuts • Dragging • Right-dragging • Right-clicking • Using the Send To menu Windows 7 for Power Users Tutorial 4
Creating Shortcuts • Create multiple shortcuts at once by selecting multiple objects in a window • Using a selection rectangle • Using Ctrl+point • Using Ctrl+click • Using Shift+point • Using Shift+click • Using check boxes • Using Ctrl+A (Select All) Windows 7 for Power Users Tutorial 4
Creating Shortcuts Shortcut properties Advanced attributes Windows 7 for Power Users Tutorial 4
Creating a Shortcut to a Folder and Customizing the Shortcut Icon • Locate the folder you want to create a shortcut for • Right-click the folder icon, point to “Send to” on the shortcut menu, and then click “Desktop (create shortcut)” • Close the folder window Windows 7 for Power Users Tutorial 4
Creating a Shortcut to a Folder and Customizing the Shortcut Icon • If you want to change the shortcut’s icon, right-click the shortcut, click Properties, click the Change icon button on the Shortcut property sheet, and locate and select a new icon (or browse for an icon file) • Once you’ve selected and clicked an icon, click the OK button to close the Change Icon dialog box, and then click the OK button to close the Properties dialog box for the shortcut Windows 7 for Power Users Tutorial 4
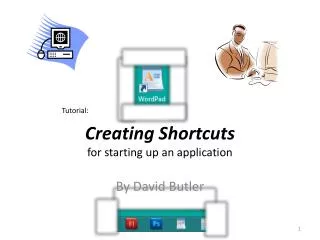
Creating a Shortcut to an Application • From the Start menu, point to All Programs, and then locate the application or program you want to create a shortcut for • Right-click the application or program name, point to “Send to”, and then click “Desktop (create shortcut)” • Click the Start button to close the Start menu Windows 7 for Power Users Tutorial 4
Creating a Shortcut to an Application Windows 7 for Power Users Tutorial 4
Automatic Updating of Shortcut Paths • If you change the name of the object to which the shortcut points or if you move the object, the shortcut still works • Windows 7 updates the path Windows 7 for Power Users Tutorial 4
Custom Shortcuts Windows 7 for Power Users Tutorial 4
Creating a Control Panel Shortcut • Open the Control Panel from the Start menu, click the View by button, and then click Large icons (or Small icons) • Drag a Control Panel applet to the desktop or • Open the Control Panel from the Start menu, locate the link you want to use for your shortcut, and then drag the Control Panel link to the desktop Windows 7 for Power Users Tutorial 4
Creating a Control Panel Shortcut Windows 7 for Power Users Tutorial 4
Adding Shortcuts to the Start Menu • Using the Taskbar and Start menu Properties dialog box • Pinning programs and shortcuts to the Start menu • Using drag and drop • Using the Start menu folder Windows 7 for Power Users Tutorial 4
Pinning a Desktop Shortcut to the Start Menu and Taskbar • To pin a desktop shortcut to the Start menu’s pinned items list, drag the desktop shortcut to the Start button, and then release the mouse button • To remove a Start menu pinned item, right-click the pinned item shortcut, and then click “Remove from this list.” • To pin a desktop shortcut to a taskbar Jump List’s pinned items list, drag the desktop shortcut to the taskbar, and then release the mouse button • To remove a pinned item from a Jump List, right-click the pinned item, and then click “Unpin from this list.” Windows 7 for Power Users Tutorial 4
Pinning a Desktop Shortcut to the Start Menu and Taskbar Windows 7 for Power Users Tutorial 4
Pinning a Control Panel Desktop Shortcut to the Taskbar • To pin Control Panel to the taskbar, open the Start menu, open Control Panel, right-click the Control Panel taskbar button, and then click “Pin this program to taskbar.” • To pin a Control Panel desktop shortcut to the Control Panel taskbar button, drag the Control Panel desktop shortcut to the Control Panel taskbar button, and when you see the Pin to Control Panel desktop shortcut, release the mouse button Windows 7 for Power Users Tutorial 4
Pinning a Control Panel Desktop Shortcut to the Taskbar • To remove a pinned item from the Control Panel taskbar button, right-click the Control Panel taskbar button, right-click the pinned item, and then click “Unpin from this list.” Windows 7 for Power Users Tutorial 4
Creating a Desktop Shortcut with the Create Shortcut Wizard • Right-click the desktop (or background of a folder window), point to New on the desktop shortcut menu, and then click Shortcut • In the “Type the location of the item” box, type the path to a program, or browse and locate and select the program file, and then click the Next button • Type a name for the shortcut in the “Type a name for this shortcut” box, and then click the Finish button Windows 7 for Power Users Tutorial 4
Adding and Removing Links in the Navigation Pane • To add a link to a folder under Favorites, drag the folder and drop it under Favorites in the Navigation pane • To move a link under Favorites, drag the link to another location under Favorites in the Navigation pane • To remove a Favorites link, right-click the Favorites link in the Navigation pane, and then click Remove Windows 7 for Power Users Tutorial 4
Adding and Removing Links in the Navigation Pane Windows 7 for Power Users Tutorial 4
Customize a Drive Icon • Customizing drive icons makes it easier to distinguish drives • All removable disk drives have the same icon by default • To create a custom icon: • Create autorun folder in top-level folder of drive • Copy icon file to the folder • Create autorun.inf file Windows 7 for Power Users Tutorial 4
Customize a Drive Icon Windows 7 for Power Users Tutorial 4
Customize a Drive Icon Windows 7 for Power Users Tutorial 4
Creating Internet Shortcuts • The target of an Internet shortcut is the Web site address • Called a favorite or a bookmark • Favorites are stored in the Favorites folder Windows 7 for Power Users Tutorial 4
Creating Internet Shortcuts Windows 7 for Power Users Tutorial 4
Adding Shortcuts to Your Startup Folder • Open the Start menu, point to All Programs, locate and right-click the Startup folder, and then click Open • Hold down the Ctrl key while you drag a desktop shortcut or an Internet shortcut into the Startup folder, or use the Create Shortcut Wizard to create a desktop or Internet shortcut in the Startup folder Windows 7 for Power Users Tutorial 4
Adding Shortcuts to Your Startup Folder • To remove a desktop or Internet shortcut from the Startup folder, open the Startup folder, right-click the desktop or Internet shortcut, click Delete, and in the Delete Shortcut dialog box, click the Yes button • Close the Startup folder window Windows 7 for Power Users Tutorial 4