Download
1 / 11
141 likes | 302 Views
Branding. 1 st Activity: Demonstrate the ability for Site Owners to adjust the Logo of the site within the SharePoint Site Navigate to Site Assets Upload the efclogo.jpg (located (d:/HOLD_TEST/Foundations) Right Click on the name of the file and select Copy shortcut

E N D
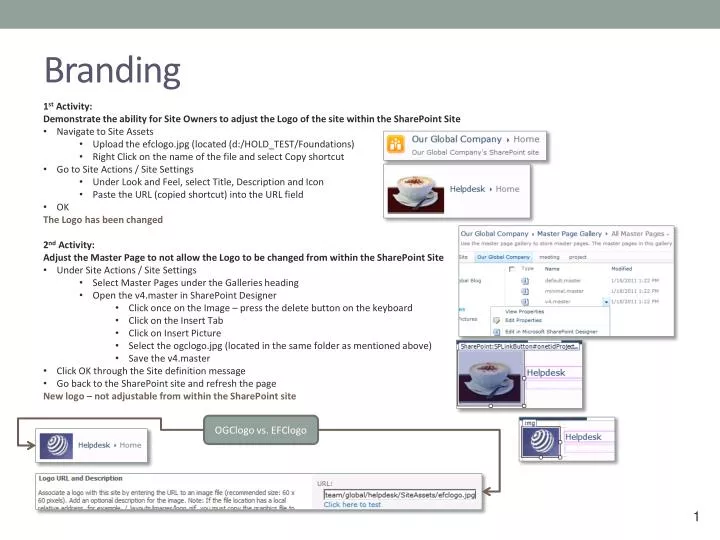
Branding • 1st Activity: • Demonstrate the ability for Site Owners to adjust the Logo of the site within the SharePoint Site • Navigate to Site Assets • Upload the efclogo.jpg (located (d:/HOLD_TEST/Foundations) • Right Click on the name of the file and select Copy shortcut • Go to Site Actions / Site Settings • Under Look and Feel, select Title, Description and Icon • Paste the URL (copied shortcut) into the URL field • OK • The Logo has been changed • 2nd Activity: • Adjust the Master Page to not allow the Logo to be changed from within the SharePoint Site • Under Site Actions / Site Settings • Select Master Pages under the Galleries heading • Open the v4.master in SharePoint Designer • Click once on the Image – press the delete button on the keyboard • Click on the Insert Tab • Click on Insert Picture • Select the ogclogo.jpg (located in the same folder as mentioned above) • Save the v4.master • Click OK through the Site definition message • Go back to the SharePoint site and refresh the page • New logo – not adjustable from within the SharePoint site OGClogo vs. EFClogo
SPL2-Lesson 1-Topic C Web Part Pages – Standards by Region
SPL2-Lesson 1-Topic C Standards by Region • Create a custom list – Regions • Add 4 regions – Northeast, etc. • Create an announcement list – named Standards • In settings of Standard list – change name of Body to Standard • Add a column name Region as a lookup column to the Region list – use Title field • Add 4 items – associate 2 items to Northeast, 1 to Southeast, and 1 to Northwest • Create a Web Part Page – Header, Left column and Body • Name as Brand Standards • Save in Site Pages • In left column add 2 web parts • Content Editor – to store link to page • Regions list – to filter Standards list by • In Body area add 1 web part • Standard list
SPL2-Lesson 1-Topic C Standards by Region • Modify web parts • Content Editor • Type in “Clear Filters” • Select this text and select Link from the Insert tab • Select From SharePoint • Select the Brand Standard page in Site Pages • Edit Web Part • Appearance – Chrome Type – None • Standards list • Edit Web Part • Toolbar type – No Toolbar • Edit the current view • Uncheck all columns except Standard • Select the Newsletter style • Region list • Edit Web Part • List View – Select <Summary> - Click apply • List View – Select “Edit the Current View” • Deselect the Title column (linked w/menu) • Select the Normal Title column (no options), Ok • Toolbar type – No Toolbar • Appearance – Title = Select a Region: • Appearance – Width = 200px • Miscellaneous – Uncheck Send 1st row to connected web part • Connect Web Parts • Edit Page • Region List • Select Web Part Menu • Select Connections • Select Send Row of Data to • Select Standards • Configure Connection • Provider = Title • Consumer = Region • Finish
SPL2-Lesson 2-Topics A B C Lists Create Site column – Office Data Type: Choice – Enter in at least 3 Office Names Create Custom List – named Regions Rename Title – Region Required – Yes Enforce Unique – Yes Add in 4 regions – Northeast, Northwest,Southeast and Southwest Create Custom List – named Petty Cash Rename Title – Employee Create column – Amount Disbursed – Currency Create column – Actual Exp Amount – Currency Create column – Variance – Calculated – (Actual – Disbursed) as Currency Add Site Column – Office Create Lookup column to Region – Region field Reorder columns Column Validation Amount Disbursed =AND(([Amount Disbursed]<200), ([Amount Disbursed]>0)) Amount must be between $0 and $200 Actual Exp Amount =[Actual Exp Amount]>0 Amount must be greater than $0 List Validation =[Amount Disbursed]>[Actual Exp Amount] Disbursed amount must be greater than Actual Expense amount Custom List – Petty Cash Create a View – set a default Display / Order columns Emp, Office, Region, AmtDis, ExpAmt, Var Sort by Office, then by Employee Group by Region Total Actual Exp Amount Click Ok Save as Template Under List Settings – select Save as Template Do not include content To fix how SUM appears Edit page in SPD – remove the text “sum =“ and right align the numbers Save page – preview in SharePoint List & Column Validation
4 Steps to Document Content Types • Step 1: • Gather File(s) to be placed under the New Document Menu • Locate the file(s) to be placed in the “New Document” menu • Step 2: • Create a Content type • Go to Site Actions / Site Settings / Galleries / Site Content types • Click the Create button • Name the new content type • From the Select Parent Content Type From drop down, select Document Content Type • From the Parent Content Type drop down, select Document • From the Existing Group drop down, select Document Content Types • Click OK • Step 3: • Associate the file(s) to the Content type • From the Settings area for this new Document Content Type, select Advanced Settings • Select Upload a new document template • Browse to locate file • Click OK • Step 4: • Associate the new Content Type to a Document Library • Go to a Document Library, Click the Library Tab, then Library Settings • From the General Settings column, select Advanced Settings • Click “Yes” for allow management of content types • Click OK out of Advanced Settings • From the Library Setting page – a new section appeared called Content Types • Click Add from existing Site Content Types • Find the newly created content type and click “Add” • Click OK
SPL2-Lesson 5-Topics A B C Content Types (another example) Create 3 files on the desktop RFP Proposal (Word) RFP Estimate (Excel) RFP Presentation (PowerPoint) Create 3 Content Types RFP Estimate – add site column – Task Status (required) RFP Proposal – add site column – Assigned To – (required) RFP Presentation – no columns added Create a Document Library – named RFPs Add Content Types to RFPs Library Change Order of added Content Types Set RFP Proposal as Default (1) Add in a few documents Create associated Views (Proposals / Estimates/ etc.) Save as Template – do not Include Content
SPL2-Lesson 6-Topic A Workflow Contract Upload Workflow When finished with changes Publish Major Version Once all Tasks are completed Done
SPL2-Lesson 6-Topic A Workflows • Create New Document Library • Named Contracts – with Versioning • Library Settings – • Versioning – Major and Minor • Require Content approval • Add a Workflow – All • Approval – SharePoint 2010 • Fill-in accordingly • Upload a file to the library • Notice Status is Draft • Publish a Major Version • Start Workflow • Notice Status is Pending • Notice Approval Process is In Progress • Navigate to Tasks list • Open and Approve the Task • Notice 2nd task is triggered • Open and Approve the 2nd task • Navigate to Contracts library • Notice Status is Approved • Notice Approval Process is Approved • Click on Approval Process “Approved” to see Workflow History
SPL2-Lesson 6-Topic A Workflows
Enable the Crawl • From the Start menu, select SharePoint 2010 Central Administration • Select Application Management • Select Manage Service applications (under the Service Applications heading) • Click once on Search Service Application • Select Content Sources (under the Crawling heading) • Click once on Local SharePoint sites • Scroll down to the Incremental Crawl • Select Create schedule • Check “repeat within the day” – enter 5 minutes • Click Ok • Check “Start Full crawl” • Click Ok