Download
1 / 31
340 likes | 621 Views
Texturing. SET09115 Intro Graphics Programming. Breakdown. Basics What is Texturing? How does Texturing Work? Texturing Pipeline Projection Tiling Using Textures Shaders Blending. Recommended Reading. Course Text Chapter 8 Real-Time Rendering Chapter 6. Basics. What is Texturing?.

E N D
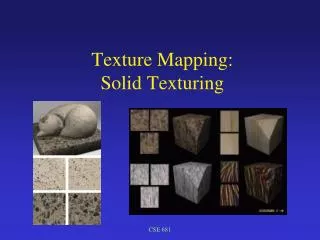
Texturing SET09115 Intro Graphics Programming
Breakdown • Basics • What is Texturing? • How does Texturing Work? • Texturing Pipeline • Projection • Tiling • Using Textures • Shaders • Blending
Recommended Reading • Course Text • Chapter 8 • Real-Time Rendering • Chapter 6
What is Texturing? • Texturing is the process of applying image data to a surface • Wall can be defined using simple geometry • Image of a brick wall can be added to make it a brick wall • Image of wooden wall can be added to make it a wooden wall • Texturing is the third part of what can be considered core 3D rendering • Geometry, Lighting, Texturing
How do we Texture? • Our vertices can have texture coordinate information attached to them • 2D coordinate • These coordinates are used to create triangles that can be attached to the geometry • Fragment shader uses these coordinates to determine pixel colour
Paper Wrapping • Texturing can be thought of as wrapping the texture around the defined geometry • Not quite – more mapping than wrapping • Each defined piece of geometry has a bit of the image stuck to it • GPU can easily take the required piece of the image and place it on the geometry
Projector Function • Determines how the texture should be mapped to the geometry • Takes into 3D position • Four types • Spherical • Cylindrical • Planar • Natural
Corresponder Function • There are a few options here • Sub-image selection, transformation • Wrapping is another option • Repeat • Mirror • Clamp • Border
Texture Values • Once we know how an image is to be mapped to the geometry, we need to determine the texel information • Image data to apply • Typically this is a RGBA value that is to be applied to a pixel • Fragment shader can modify this colour further
Triangle Sections • Basically, when using images to texture objects we are cutting out triangles and applying these to our triangle geometry • We won’t usually have to worry about where texture coordinates come from for basic work • Artists job • We are more likely to work with texture coordinates for advanced techniques • Blending, alpha mapping, bump mapping, post-process, etc.
Magnification • Sometimes textures are too low a resolution for our render • See Oblivion • GPU has to magnify the image to compensate
Minification • More likely that the GPU has to minify the texture due to distance • Aim to have high resolution textures for close items • Four techniques • Point sampling • Mipmapping • Summed area tables • Anisotropic filtering
Mipmaps • Mipmapping is an important concept in texturing • An image has a number of smaller images created • Divide by two • Why many GPUs expect power of 2 texture sizes • Based on the distance to the pixel, a different image is used for texture mapping
Using Texture Coordinates • Using texture coordinates is easy • For each vertex declaration, declare a glTexCoord2f • Same as working with colour • This data can be used directly by OpenGL • Textures using the currently mapped texture • Or can be done with a shader glBegin(GL_QUADS);glTexCoord2f(0.0, 0.0);glVertex3f(0.0, 0.0, 0.0);glTexCoord2f(1.0, 0.0);glVertex3f(10.0, 0.0, 0.0);glTexCoord2f(1.0, 1.0);glVertex3f(10.0, 10.0, 0.0);glTexCoord2f(0.0, 1.0);glVertex3f(0.0, 10.0, 0.0);glEnd();
Using Textures in your Shader • Texture mapping can be performed directly in the fragment shader • We use the texture2D function to get a colour from the texture • sampler2D • Samplers are how we access texture data in GLSL uniform sampler2D tex; void main() { vec4 color = texture2D(tex, gl_TexCoord[0].st); gl_FragColor= color; }
Blending Textures • As texture data eventually just becomes a colour value, we can blend textures together easily • Take in n textures • Apply a blend weight for each vertex for each of the n textures • Add all the colours together to determine the final pixel colour
Example Shader uniform sampler2D tex1; uniform sampler2D tex2; in vec2 texCoord; in float blend1; in float blend2; out vec4 colour; void main() { vec4 col1 = blend1 * texture2D(tex1, texCoord); vec4 col2 = blend2 * texture2D(tex2, texCoord); colour = col1 + col2; }
Alpha Mapping • We can take the blending concept further and apply an alpha map • For the second texture, any point that has no alpha value (black) is transparent in the final render • See Rock Fall
Light Maps • The blending idea can be taken even further and can be used to apply light maps to areas • Instead of determining lighting colour from sources, use a static texture for much of the light • If light direction is fixed, and geometry is fixed, then ambient and diffuse light will be the same • Why calculate per vertex • Provides a more per-pixel look to the final render
To do this week… • Practical this week will be in the Games Lab • JKCC shader support is not consistent • Practical is on OpenSceneGraph • Make sure that you have kept up with the recommended reading • The exam questions will reflect everything in the module, not just what I have on the slides • You could try and figure out texturing yourself if you are impatient • Use DevIL (Developer’s Image Library) to load images in OpenGL • OSG can load images easily
Summary • We have now covered the three core parts of 3D rendering • Geometry • Lighting • Texturing • Texturing is the process of applying images to our geometry • Provides better detail • Texturing can be used to create better effects • Blending, etc. • Bump mapping and post-process (still to come)