Download

1 / 20
200 likes | 284 Views
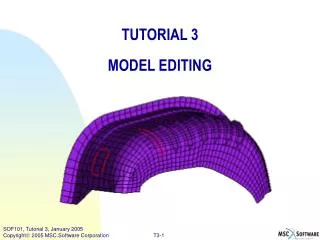
TUTORIAL 3 LOADING, CONSTRAINTS, AND MODEL CLEANUP. Note: As in the other tutorials, all menu items that need to be selected will be preceded

E N D
Note: As in the other tutorials, all menu items that need to be selected will be preceded by a maroon right arrow: >User action. Mouse buttons are indicated as follows: -- 1B = First (left) button -- used for selecting items-- 2B = Second (middle) button -- used for "OK"-- 3B = Third (right) button -- used for View Manipulation & pop-up menusNormally 1B is used, unless otherwise. Table Of Contents • SectionPage • Step1. Open MSC.SOFY Database. 3 • Step2. Create Hole. 4 • Step3. Create RBE2 rigid spiders. 5 • Step4. Create SPC’s. 6 • Step5. Apply Force. 7 • Step6 . Create Pressure Loading. 9 • Step7 . Create Enforced Displacement. 12 • Step8 . Some model checks and cleanup 13 • Step9 . Diagnose and fix weld normality and other rigid element errors. 14 • Step10. Model Cleanup. 15 • Step11. Export Nastran Deck for static analysis . 17 • Step12. Create additional cards. 18
Step1. Open MSC.SOFY Database. e • Launch MSC.SOFY according to your local configuration. • Choose >Nastran from the entry screen. • From >File menu, >Units Mgr> select >Standard Units: >NASTRAN without WTMASS card. • Open the SOFY database of a Decklid model like the one we used in Tutorial N-2: • File >Open. • In the File Open dialog, browse to the file: N-3_decklid_start.sof and >Open.
Step2. Create Hole. a • We'll be putting some constraints at the hinges. But first we • need to properly mesh and attach the bolt holes. • Zoom into the left hinge area. • Turn >Off the >Decklid Outer. • There are holes in the inner panel, but not on the reinforcement. • From >Mesh menu> select >Create Hole with Washer to create on the reinforcement. • You are prompted to select parts, so pick just the >Reinf_Hinge from the canvas. • Confirm with >2B. • Now to pick the hole center: Select > node to define hole center which lines up with existing hole on the inner panel. • Confirm with >2B. • (If node is not present at desired center point, use >Pt on Element pick type.) • Enter the parameters as shown in the dialog box. • Click >OK to create the hole. • Repeat for other hole location and >Exit. i
Step3. Create RBE2 rigid spiders. c • Now put a rigid "spider" at each of the hole locations: • Create a new part called >Bolts. • Select >Element >Create >Rigid >RBE2. • In the Pick block> select >Ind Node at Mid Loc. • Select >Nodes as the pick entity type (default) • Use >Sketch pick style to select all the nodes around the hole for the two parts. • Confirm with >2B and the rigid spider is created. • Repeat for the other hole. • Go to other side of model and >Create Hole with washer & RBE2 rigid spiders at both bolt holes. f
Step4. Create SPC’s. d e • Now to create some SPC's.... • Collection Block>click >All On to bring back all parts to the display. • Change >Type to >BC Set. (Boundary Condition Set) • Right click (>3B) in list area • Click >Create from pop-up menu. • In dialog box, type in the name >hinge_spc for the new BC Set >Create and >Exit the dialog. • Select >BC >Create BC >SPC. • In the pop-up make sure the boxes are checked for all six DOF's. • Click >Store • Click >Exit. • Now select the center >node of each rigid spider created above (two on each side). • Confirm with >2B to create the SPC's. • Click >Exit Pick block. g k
Step5. Apply Force. • Let's apply some forces: • Create another BC Set called >torsion. • Zoom into the lower rear corner of the decklid. • Select >BC >Create BC >Force. • In the pop-up, enter F= 50, DIR1= 0, DIR2= 0, and DIR3= 1. • Click >Store and >Exit. • In Pick block>Coordinates >Global . • Thus each force will be 50N in Z direction. • Pick two nodes near the corner of the decklid inner. • Click >Done. • If you wish to pick only the independent nodes of rigid elements, you can identify them using • 1. Utilities >Identify. • 2. Set >Details On from toolbar. • 3. Pick block> select >Elements • 4. Pick the rigid >element of interest. • 5. Each end will then be labeled as "I" or "D" • as appropriate. d f c a i
Step5. Apply Force. (Cont’d) • Repeat loading on opposite side, except make load in opposite direction. • In Pick Block>Click >(Defaults) button • Change >DIR3 to -1 in dialog box. • Click >Store. • Pick two corner >nodes as was done in Step 5-h. • Click >D (Done). m
Step6. Create Pressure Loading. • We'll be applying a pressure load over an area on the top surface of the decklid. • Create a new BC Set named >Surface. • Use >Organize command to >Keep only the Decklid outer parts (2). • Use >Distance icon to identify an area in the center of the decklid sized at 200mm X 200 mm. • Create a temporary new part called >Temp. • Element menu> select >Move to Curr Part. • Use >Polygon pick style> Select >elements within the 200 X 200 area. • Confirm with >2B • Elements are moved to the new part. • Turn >off all parts except for >Temp. • Click drop >arrow next to Mass icon (on Query Utils toolbar). • Select >Area from drop-down menu, • Check that the area of the new parts is at about 40,000 mm2. • If not, move elements to/from the part "Temp." • From >BC menu> select >Create BC >PLOAD2. • In the dialog> enter pressure of > 0.02 N/mm2. • Select >All elements in the part >Temp • Confirm with >2B. g
Step6. Create Pressure Loading. (Cont’d) • There are problems with the element normals in this model. • Let's fix the normals. • Click >Details On icon • You can see that one half of the part has the pressure loading in the wrong direction. • We must fix the element normals. • Turn BC Sets >All Off in Collection block. • From >Element menu> select >Normals. • In Pick block>Choose >Show Normals from drop-down box. • Select >Disp (Displayed) elements. • Click >Done. • After checking the normals you can change the drop-down to >Fix Normals. • You are prompted to pick a Reference >element. • Choose an element with the correct normal direction as the seed element. • Refresh the display to check that normals are corrected. • (You can also use >Reverse normals option to reverse selected elements.) • The Decklid Outer needs to be corrected also • Before leaving the Normals command, • Select>Hide Normals (from drop arrow)> select >All elements • Click >Done to remove normals from the display. • Now >Exit. f
Step6. Create Pressure Loading. (Cont’d) • Delete and re-create the incorrect pressure loads created above: • Collection block >Type >BC Set> turn on >Surface. • From BC menu >Delete. • Using Polygon or Window pick style> select >all pressure loads. • Confirm with >2B, • Now >Exit the command. • Select >BC >Create BC >PLOAD2 • Follow the same procedure as in step 9, above. • This time the pressure load should be all in the same direction. • Turn on only the parts: • >Decklid outer • >Decklid outer.Copy • >Temp. • Make >Decklid Outer the Current part >click with >2B. • From >Element menu> select >Move to Curr Part. • In Pick block click >All. • Click >Done.
Step7. Create Enforced Displacement. a • Create a new BC Set >Lateral. • Create enforced displacement using >BC >Create BC >SPC. • Uncheck all DOF's except for >D2. • Put a value of 5.0 in the field for >D2. • Now pick a >node or two on the side of the decklid, near the bottom, • Confirm with >2B. b
Step8. Some model checks and cleanup • Let’s check the overall quality of this model. • From >Element menu> select >Quality >Check Quality. • In the Quality Check form > click >Restore Defaults near bottom of window. • Make sure the boxes are checked for >Quality Checks and >Element Checks. • Also, check the box for >Output file. • Click >OK at bottom. • The file "quality.out" should pop up in a text editor window. • Browse the file to see the quality diagnostics. • Note there are several serious errors in this model. • The most serious are precede with 4 stars (****) relate to Rigid loops and Bad Dependency problems. esp weld normality. • Let's try to fix those first. • The failed elements are highlighted in the canvas and are also placed into Sets in MSC.SOFY. • In Collection block > change >Type >Set. • Click >3B over the set >Bad Dependency. • In the pop-up> select >Equal. • This has the effect of displaying only elements in the set, so you can easily find the failed elements. • To fix these elements, • Element >Quality >Remove Dbl. Dep. • Watch message area, and it will indicate if the elements were fixed. (e.g. "4 Rigids Switched ") • Back in Collection block >click >3B over the Set >Duplicate elements . • There are two locations along the centerline of the decklid where duplicate Rigids exist. • Delete one or more rigid element in each location to eliminate the problem. (Element >Delete) • When finished, there may also be coincident nodes at those locations. • Use >Node, >Merge Coin. Node command to resolve.
Step9. Diagnose and fix weld normality and other rigid element errors. • There are many elements which failed the Weld Normality check, mostly along the rear edge. Let's see if we can fix • them.... • Click >3B over the Set >Weld Normality • Click >Equal in pop-up. • Select >Grow Mesh icon a couple of times to bring up surrounding elements. • Turn >Fringes On to see color fringes of quality. • Let's try and fix with automatic quality enhancement: • Element >Quality >Enhance Quality. • Select >All when prompted to pick elements • Click >Done. • In the Quality Enhance pop-up, • enter >100> "Num of Weld Normality Enhancing passes" • enter > 0.5> "Tolerance". • Click >Enhance. • The file "compare.out" pops up in a text editor window showing the statistics on how successful the quality enhancement was. • In this case, we may not be able to fix all the weld normality because the two connected panels are angled from one another and the failed elements are along a boundary. • You can repeat the >Enhance Quality process again to further improve Or consider increasing the max allowable value in the Quality Check form. • Turn parts >All On and >Unmask everything. • Check Quality again, and use >Enhance Quality command again, as needed, to further improve element quality.
Step10. Model Cleanup. c • Let's move on. We'll perform some model cleanup, such as duplicate ID's, unreferenced materials, etc • From >Utilities menu> select >ID Mgmt >Diagnose Model ID's. • A window will pop up with the results, showing one duplicate part (PID #1). • To renumber the parts: • Utilities >ID Mgmt >Model ID Manager. • In the dialog box, you can activate the renumbering of any entity type by checking the boxes to the right. • Let's activate: >Parts, Nodes, Elements, and BC Sets. • Type in the start ID's and Offsets as shown. • Click >OK • For control over numbering of individual elements, nodes, etc., • Select >Utilities >ID Mgmt >Entity ID Manager. • In this case we can demonstrate by renumbering only the four grids at the hinges where we placed SPC's. • In Pick block> select entity type of >Nodes (default). • Now >Zoom in >select the >nodes at the rigid spider center on the part "bolts.“ • Confirm, then in the "Node ID Manager" pop-up, enter >1 as the starting ID for the four nodes. • Click >OK
Step10. Model Cleanup. (Cont’d) • To lock the node numbers so they cannot be renumbered, • Utilities >ID Mgmt >Lock Entity ID's. • The box labeled "Unlock ID's" should be un-checked. • Now pick the same four nodes you just renumbered >Done. • They are now locked until you unlock them in the same fashion. • You may have noticed in the Quality checks that some materials and parts are empty or unreferenced. • To eliminate them, • Utilities menu>select >Model Cleanup>Select >Delete Unref'd. • In the Dialog box> click >Reverse to flip all selections from un-checked to checked. • Then hit >Apply. • Watch message area for indications of empty Parts, unreferenced Materials, unreferenced Nodes, etc. which are automatically deleted. • On Query Utilities toolbar >click >Mass icon. • The reported mass is unrealistically high. Let's investigate. • Clone the Collection Block and enlarge. • Click on >Info button > select >Thickness, >Mass, >Mat Shell, >Mat Solid, ># of Elements, and ># of Nodes. • We can see that the "Gumdrop" parts are responsible for the large mass. • Correct the material density for the gumdrop. • Change >Type in Collection Block to >Material. • Click >3B over material ID 2 (NEWMAT) • Click >Modify. • Change the density to a more realistic value, say 2.0E-6. • Change the name to >Gumdrop. • Click >Modify, and >Exit.
Step11. Export Nastran Deck for static analysis . • We're just about ready to export the Nastran deck. • Add or Modify PARAM cards by changing >Type in Collection block to >Control. • Modify any of the cards listed by clicking with >3B and >Modify. • Finally ready to export the Nastran deck. • Set >Options >I/O Opts >Nastran Opts >Output opts. • Check the all the boxes, except those relating to Precision -- leave those at >Single precision. • Click >Exit (to exit the Options panel.) • Now to export the deck: • 1. File >Export >Nastran Model. • 2. Give the file an appropriate name, such as >decklid_static.nas. • 3. Click >Save. • At this point you can do the final editing of Exec Control and Case Control in any text editor.
Step12. Create additional cards. • If a normal modes analysis is desired, you can createEIGR or EIGRL cards from Collection block: • 1. Change >Type to >Eigen Freq. • 2. Click >Create > choose >EIGR or >EIGRL card for normal modes analysis. • You can also createFREQ, FREQ1, or FREQ2 cards for Frequency Response analysis. • Similarly, from Collection Type >Global BC, you can create cards such as: RLOAD1, RLOAD2, TLOAD1, TLOAD2, LSEQ, and GRAV. • In Collection Type >Nastran Set, the following cards are available: DLOAD, ELIST, LOAD, MPCADD, SEELT, SESET,SET1, SPCADD, and USET1. • Finally, in the Collection Type >Tables, you can create various table cards, such as TABLED1,TABLED2,TABLEM1,DTABLE, etc. • Generally the card images available in Collection block are those that apply to the entire model or are not tied to a specific grid or element. • Loading cards that apply to specific elements or grids are located on the >BC >Create BC menu. (For example :FORCE,MOMENT, TEMP, SUPORT, DAREA.) • Exit MSC.SOFY: >File, >Quit. (Don't save.) • Congratulations!!! • You have just completed Nastran Tutorial 3.