Download

1 / 57
570 likes | 746 Views
Introduction to Further Programming for 3D application. Faculty of Computing, Engineering and Technology Staffordshire University. Further Programming for 3D applications CE00849-2. Bob Hobbs. Outline. Module Details What is 3D programming? Typical Processing Steps

E N D
Introduction to Further Programming for 3D application Faculty of Computing, Engineering and Technology Staffordshire University Further Programming for 3D applications CE00849-2 Bob Hobbs
Outline • Module Details • What is 3D programming? • Typical Processing Steps • Modelling and Rendering • Applications • Summary
Module Details • Teaching Team • Bob Hobbs r.g.hobbs@staffs.ac.uk • Steve Foster s.foster@staffs.ac.uk • Semester 2 15 cats • 3 Hours per week • 1 Hour Lecture Tue 12pm • 2 Hours Practical Mon 1pm, Tue 4pm & Thu 9am
Module Details Course Handbook & Lecture Notes • http://www.soc.staffs.ac.uk/rgh1/FPTGA/fpgta1.htm Assignment Details • 50% assignment work • 50% two hour exam
Program of Study • Week 01 Introduction to Module and DirectX • Week 02 General 3D concepts (Fixed Function Pipeline) • Week 03 Graphics techniques in DirectX • Week 04 Lighting and Shading Techniques - FFP • Week 05 Shading using programmable pipeline (Shaders) • Week 06 Vertex and Pixel Shading • Week 07 Data structures for graphics engines • Week 08 Motion and Collision • Week 09 Picking, Interaction and Motion Cues • Week 10 Textures & Texture Mapping • Week 11 LOD, Mipmapping, SFX • Week 12 Review and Assessment
Hierarchy of Models Behaviour Bio-Mechanics Physics Geometry
How does this work ? • Simulation Loop • read input sensors • update objects • render scene in display • Uses traditional 3D graphics methods to render or ‘draw’ the scene
Read Sensors Check any defined actions Update objects with sensor input Objects perform tasks Step along any defined paths Render World Simulation Loop
Viewer Synthetic image will vary according to: viewing direction, viewer position, illumination, object properties, ... Projection onto 2D surface Object What is 3D rendering? Generally deals with graphical display of 3D objects as seen by viewer
Specification Rendering Graphical display such as What is 3D Computer Graphics? • 3D graphics: generation of graphical display (rendering) of 3D object(s) from specification (model(s)) Modelling
Light source Transformation Hidden surface removal Vertices Shading Viewpoint Facets Typical Processing Steps Wireframe polygonal model Solid object
Illumination model Graphics engine Object model(s) Graphical display Viewing and projection specification Typical Processing Steps Modelling: numerical description of scene objects, illumination, and viewer Rendering: operations that produce view of scene projected onto view surface
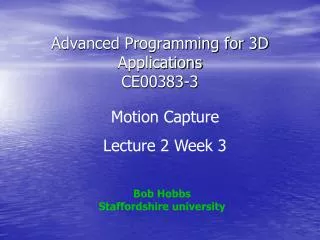
Modelling 1438 facets Human Head Model
Modelling 7258 facets Human Head Model
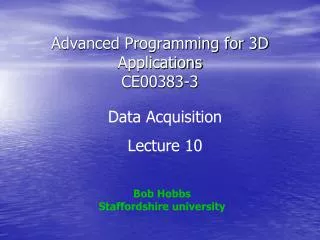
Modelling 2074 facets Teacher and Board Model
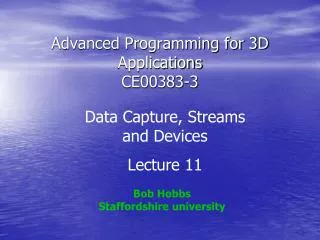
Rendering 1438 facets Shaded Human Head
Rendering Shaded Teacher and Board
Windows Programming • Rendering takes place in a window • Application must generate window in which to render graphics • IP3DA used C and GLUT to handle windows. OpenGL can run in GLUT or other windowing framework including MS windows • DirectX is integrated into windows programming API
code1.cpp • This part of the workshop is basically a big explanation for code1.cpp which creates a window. • You may find it helpful to look at code1.cpp as you go through the slides.
What is a “window?” • The most obvious windows are the application windows on your desktop. • The term “window” also refers to any child window or control (such as a button) within a window. • Windows are organized in a hierarchy.
Event Driven Programming • Windows programming is event driven. • An event driven program sits and waits for an event to process. • Events include moving or sizing a window, clicking the mouse button over a window, or typing keys on the keyboard. • Windows programs are notified of events by messages sent from the OS.
Win32 API • We will use the Win32 Platform API to write a windows program. • Typically more tedious, but we only need to create one window. • Faster and Smaller executable. • Written in C++ • Other options include: • MFC, Qt, wxWindows, SDL, .NET Forms
WinMain • Instead of main, windows programs use WinMain • WinMain has different parameters: • HINSTANCE hInstance – a handle to the program • HINSTANCE hPrevInstance – no longer used. • LPSTR lpCmdLine – unparsed command line. Doesn’t include executable’s filename. • int nCmdShow – Specifies how the window should be initially shown (ie. Minimized, Maximized, Normal) • WinMain must have a WINAPI modifier. • int WINAPI WinMain (…) • WinMain still returns an integer like main.
Headers • To use the Win32 API we need to #include windows.h • If we #define WIN32_LEAN_AND_MEAN before #including windows.h, the compiler will skip compiling the more rarely used windows code.
Windows Program Outline • Create Window Class • Create Window • Show the Window • Enter Message Loop
Window Classes • A window class acts as a template for window creation. • Window classes are not classes in the C++ sense. • We can set such properties as: • Name of the window class – important for identifying it later! • Window style – How it looks and its default behaviors. • Window procedure – a pointer to function that handles messages for a window. • Default cursor, icon, and menu.
Creating a Window Class • Fill out a WNDCLASS or WNDCLASSEX structure. • Use the structure to register the class with a call to RegisterClass or RegisterClassEx, respectively.
Create the Window • Create a Window with a call to CreateWindow or CreateWindowEx. • Some of the parameters you will need to enter include: • The name of a window class. • The name of the window. • A handle to a parent window. (NULL if no parent) • Initial size and position of the window. • CreateWindow and CreateWindowEx will return a window handle (HWND) if successful or NULL if failed.
Showing the Window • When we create a window it starts off hidden. • To show the window you must call ShowWindow (hWnd, nCmdShow) • hWnd – returned from CreateWindow/Ex. • nCmdShow – parameter from WinMain. • This will send a message to the window telling it to show. • Call UpdateWindow (hWnd) to force the window to process the show message immediately.
Message Loops • A message loop is needed to forward messages to their windows. • There are different ways to make a message loop but here is the most common one: MSG msg = {0}; // returns FALSE when message is WM_QUIT while (GetMessage (&msg, NULL, 0, 0)) { TranslateMessage (&msg); // translate keyboard messages. DispatchMessage (&msg); // send message to its window. }
Message Loop (Cont’d) • The loop uses: • A MSG structure – Holds message information. • GetMessage – Retrieves the next message. Waits for a message if the message queue is empty. • TranslateMessage – Translate some keyboard messages. • DispatchMessage – Dispatches the message to the appropriate windows procedure.
Windows Procedure • Every window has an associate procedure for handling messages. • Windows procedures have the following format: • LRESULT CALLBACK ProcName (HWND hwnd, UINT msg, WPARAM wp, LPARAM lp);
Window Procedure Example • Here is an example procedure: LRESULT CALLBACK WndProc (HWND hwnd, UINT msg, WPARAM wp, LPARAM lp) { switch (msg) { case WM_DESTROY: PostQuitMessage (0); return 0; } return DefWindowProc (hwnd, msg, wp, lp); }
Window Procedure Parameters • The procedure has 4 parameters: • HWND hwnd – handle to the window receiving the message. This is useful when multiple windows share the same procedure. You can think of it sort of like a this pointer. • UINT msg – The message. • WPARAM wp and LPARAM lp – These are parameters to the message and may represent different things.
Window Procedure Return • When the procedure completely handles a message, it should return 0. • The procedure should let the OS handle all other messages by calling DefWindowProc and then return its result.
WM_DESTROY and WM_QUIT • For this workshop we only want to handle one message: WM_DESTROY. • This message is called when a window is closed. • Note that just because the window is destroyed, the program will still run. • To end the program we send WM_QUIT by calling PostQuitMessage.
WM_* • Other messages you may want to handle include: • WM_CREATE • WM_SIZE • WM_LBUTTONDOWN • WM_LBUTTONUP • WM_MOUSEMOVE • WM_KEYDOWN • WM_KEYUP • Check MSDN literature for information about these messages: http://msdn.microsoft.com/
DirectX Architecture • Direct3D is just part of the DirectX API. • DirectX also includes: • DirectDraw – for 2D graphics • DirectInput – for input devices. • DirectSound and DirectMusic - for audio. • DirectShow – for different media formats • DirectPlay – for network play
COM • DirectX is built on top of the Component Object Model (COM). • COM defines an standard for writing object oriented code that is portable over different languages. • There is a specific method for creating COM objects, but Direct3D provides helper functions to do the dirty work for us.
Linking the DirectX Libraries • From the menu select Project → Properties. • Properties Pages should appear. • Select “All Configurations” from the Configurations drop down in the top left corner. • On the left side select Linker → Input. • For addition dependencies enter “d3d9.lib d3dx9.lib” • Click “Ok”
Linking the DirectX Libraries Project → Properties
Header • #include <d3d9x.h> after you #include <windows.h>
Setting Up Direct3D Outline • Create a Window (as shown) • Create a Direct3D Object • Create a Direct3D Device
Creating a Direct3D Object • A IDirect3D9 object is used to enumerate and create IDirect3DDevice9 objects. • Creating an IDirect3D9 object is as easy as: • IDirect3D9* pD3D = Direct3DCreate9 (D3D_SDK_VERSION);
Creating a Direct3D Device • A IDirect3DDevice9 object represents a 3D graphics device on the computer. • You create an IDirect3DDevice9 with call to the IDirect3D9 function: HRESULT IDirect3D9::CreateDevice ( UINT Adapter, D3DDEVTYPE DeviceType, HWND hFocusWindow, DWORD BehaviorFlags, D3DPRESENT_PARAMETERS *pPresentationParameters, IDirect3DDevice9 **ppReturnedDeviceInterface );
IDirect3D9::CreateDevice • CreateDevice Parameters: • Adapter – Usually set this to D3DADAPTER_DEFAULT. • DeviceType – Set to D3DDEVTYPE_HAL. This tells Direct3D to use the Hardware Acceleration Layer (HAL) drivers. • BehaviorFlags – Set to D3DCREATE_SOFTWARE_VERTEXPROCESSING. • ppReturnedDeviceInterface – a pointer to your device pointer!
D3DPRESENT_PARAMETERS • You will also need to fill out a D3DPRESENT_PARAMETERS struct, which has the following: • UINT BackBufferWidth, BackBufferHeight – Specifies the width and height of the back buffer. If the device not using the fullscreen, setting to 0 will use the window’s width and height. • D3DFORMAT BackBufferFormat – specifies the back buffer’s color format. Set to D3DFMT_UNKNOWN to use the default. • UINT BackBufferCount – number of back buffers, usually 1.
D3DPRESENT_PARAMETERS (Cont’d) • D3DMULTISAMPLE_TYPE MultiSampleType – This specifies whether to use multisampling effects like anti-aliasing, motion blur, or depth of field. For now use D3DMULTISAMPLE_NODE. • DWORD MultiSampleQuality – For now set to 0. • D3DSWAPEFFECT SwapEffect – Specifies how the back buffer is swapped. Set this to D3DSWAPEFFECT_DISCARD. • HWND hDeviceWindow – handle to the window to draw in. • BOOL Windowed – Specifies whether to draw in a window mode or fullscreen mode.
D3DPRESENT_PARAMETERS (Cont’d) • BOOL EnableAutoDepthStencil – Specifies that Direct3D should manage the Depth and Stencil Buffers. Set to TRUE. • D3DFORMAT AutoDepthStencilFormat – Specifies the format used for the depth and stencil buffer. Set to D3DFMT_D24S8. • DWORD Flags – For now set to 0. • UINT FullScreen_RefreshRateInHz – Specifies the refresh rate of the monitor in fullscreen mode. Use D3DPRESENT_RATE_DEFAULT for the default. Must set to 0 if using window mode. • UINT PresentationInterval – specifies how to wait when the back buffer is ready to swap. Using D3DPRESENT_INTERVAL_DEFAULT usually waits until the monitor is finished drawing one frame. Using D3DPRESENT_INTERVAL_IMMEDIATE swaps immediately which can cause tearing effects.