Download
1 / 15
150 likes | 178 Views
Creating Altering and Deleting a company in Tally is as simple as creating altering and deleting a voucher but still many people are confused or they do not know how to create alter and delete a company in Tally.

E N D
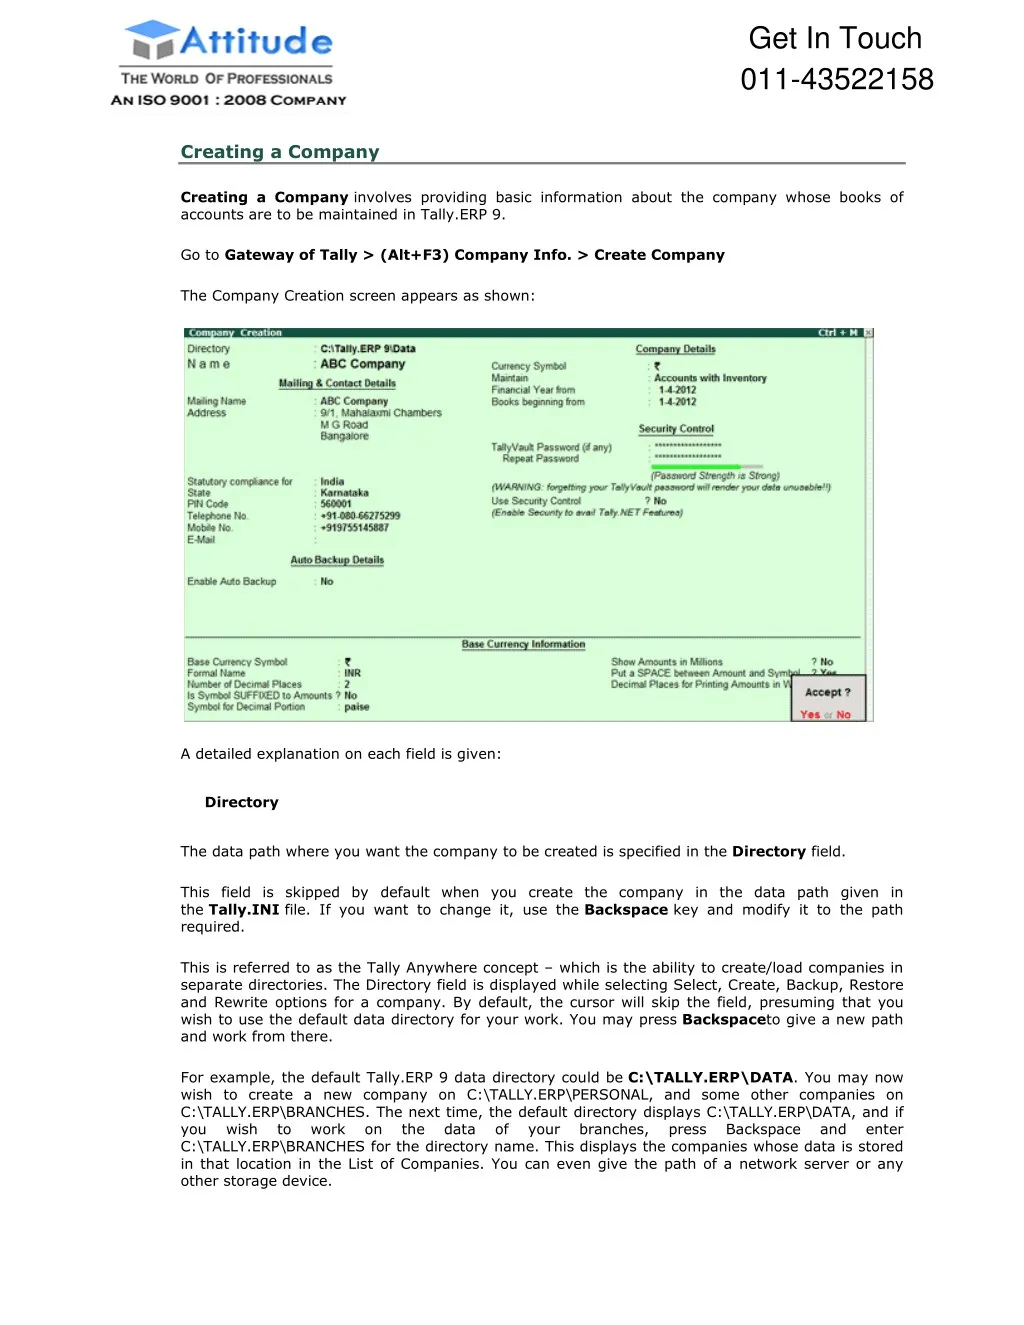
Get In Touch 011-43522158 Creating a Company Creating a Company involves providing basic information about the company whose books of accounts are to be maintained in Tally.ERP 9. Go to Gateway of Tally > (Alt+F3) Company Info. > Create Company The Company Creation screen appears as shown: A detailed explanation on each field is given: Directory The data path where you want the company to be created is specified in the Directory field. This field is skipped by default when you create the company in the data path given in the Tally.INI file. If you want to change it, use the Backspace key and modify it to the path required. This is referred to as the Tally Anywhere concept – which is the ability to create/load companies in separate directories. The Directory field is displayed while selecting Select, Create, Backup, Restore and Rewrite options for a company. By default, the cursor will skip the field, presuming that you wish to use the default data directory for your work. You may press Backspaceto give a new path and work from there. For example, the default Tally.ERP 9 data directory could be C:\TALLY.ERP\DATA. You may now wish to create a new company on C:\TALLY.ERP\PERSONAL, and some other companies on C:\TALLY.ERP\BRANCHES. The next time, the default directory displays C:\TALLY.ERP\DATA, and if you wish to work on the data of your C:\TALLY.ERP\BRANCHES for the directory name. This displays the companies whose data is stored in that location in the List of Companies. You can even give the path of a network server or any other storage device. branches, press Backspace and enter
Get In Touch 011-43522158 If your business uses Tally.Server 9 to maintain data, Click on S: Server List or press Alt+S • Note: If the administrator has enabled Security Access, users need to provide the authorised Tally.NET credentials in order to access the Server List. The List of Tally.Servers is displayed. Select the required location • Press Enter to continue with Company Creation • Name Enter the name of the company whose books are being opened. If you are a professional accountant and are maintaining the books of your clients, give the Client Company's name.
Get In Touch 011-43522158 Mailing Name and Address In addition to the Company Name, Tally.ERP 9 provides the facility to enter the Mailing Name field. It displays the Company Name by default. You may change it as required, if the mailing name is different from the Company Name. The mailing name and address details are picked up for inclusion in any report that needs the company name and address as heading. For example: Balance Sheets, Statement of Accounts, and so on. Tally.ERP's reports print the mailing name and address as given: Tally.ERP 9 does NOT restrict the number of lines for the address details. Tally.ERP 9 accommodates all the entered information and vertically compresses the same. Note: In the space provided for the Address details, observe the vertical compression as compared to the Mailing Name field where there is horizontal compression. You can specify any length for the mailing name and you are permitted to give any number of lines for the address. The information is completely visible. Tally.ERP 9 handles compressed information correctly while printing. It adjusts the reports accordingly. Statutory compliance for Select the Country from the List of Countries. The Statutory Features and Base Currency Symbol are enabled in accordance with the country selected. For example, if the accounts belong to a company in India, the base currency would be Indian Rupees. The Base Currency will appear with respect to the Country selected. Selecting India from the List of Countries brings up a State, Pin Code and Telephone No. field. State You can select the appropriate state from the predefined list.
Get In Touch 011-43522158 PIN Code Specify the PIN Code (Postal Index Number) of the specified address. Telephone Enter the Telephone number. Mobile No Enter the mobile number of the company. E-mail Address Enter the E-mail address that will be used to e-mail documents, reports and data from Tally.ERP 9. Enable Auto Backup Set this to Yes, if you want to enable the automatic backup of Tally.ERP 9 data (per company). Else, set this to No. The data backup is stored in the data folder of the respective company. The auto backup data can be restored by pressing Ctrl+Alt+Kfrom Company Info menu or Gateway of Tally. Note: Ensure that all the systems in a network have the same date and time settings. Currency Currency symbol is the symbol of the base currency, that is, the currency that will be used to maintain the books of account. The symbol ` appears by default in case India for India/SAARC Companies and the field is left blank for International Companies. Note: The currencysymbol changes based on the country selected from the list for Statutory compliance for field. Click here to read about Indian Rupee Symbol Conversion. Maintain Tally.ERP 9 displays a drop down for the Type of Company with two options Accounts only and Accounts with Inventory Select Accounts only if you do not have any inventory transactions (suitable for professionals and corporate offices). However, at a later date (if required) you can choose to alter the information as Accounts-with- Inventory. SelectAccounts-with-Inventory, to maintain both financial accounts and inventory.
Get In Touch 011-43522158 Financial Year From In most countries, the books of accounts of a company are maintained for a stipulated period like, 12 months, 15 months, and so on. This stipulated period is referred to as the Financial Year. The stipulated period of the financial year is 12 months in most countries. Tally.ERP 9 automatically considers 12 months from the date you give here as the Financial Year. For example, if you enter April 1, 2008 as the date, the Financial Year will be from April to March ending with March 31, 2009. If you enter October 1, 2008 as the Financial Year From then the financial year will be from October 2008 to September 2008 ending with 30th of September every year. Tally.ERP 9 allows you to maintain data for multiple years by changing the period (Alt+F2) at the Gateway of Tally. In addition, you can also specify the date of actual establishment of the company (date of incorporation) Books Beginning From Tally.ERP 9 presumes that you wish to maintain books from the beginning of the financial year. Hence, Tally.ERP 9 displays the date given in Financial Year From field automatically. The date for Books beginning from can be changed, in case of companies, which are incorporated in the middle of the year. If your company is new, you can opt to start the books of accounts from the date of actual establishment of the company (date of incorporation) but close books according to the Financial Year as specified by you. Tally.ERP 9 provides the required flexibility in such a case by allowing you to give the date when the books of accounts actually began. Tally.ERP 9 will open books from this date and close as on the last day of the Financial Year. For example, if your company is established on August 19, 2008, the opening balances for all the accounts can be given as on August 19, 2008 even though the Financial Year given is April 1, 2008 (April to March financial year). The company's books will begin on August 19, 2008 and close on March 31, 2009, which ensures smooth transition to the next year. This concept can be applied even when you are migrating to Tally.ERP 9 from any other system or from a manual accounting system on any day during the Financial Year. Close books in that other system on the previous day and start books on Tally.ERP 9 from this day. You are allowed to give opening balances of all Ledger accounts including Revenue accounts. TallyVault Password TallyVault is an enhanced security system, which allows for encryption of the company data. Encryption involves converting normally accessible Tally information into unrecognisable information, which can only be reconverted by authorised persons. Give a password here and repeat the same in the Repeat field. This basically results in the creation of an encrypted company whose information is not accessible to users other than the password holder. Password Strength PasswordStrength indicator is available in Tally.ERP 9 from Release 4.5 onwards. Now, strength is displayed while creating / altering passwords under Security Control, Tally Vault, and Control
Get In Touch 011-43522158 Centre. Also when Password Policy is enabled, Password Strength is indicated in the Change Password screen that appears for first time login. Let us understand the logic used by Tally.ERP 9 to ascertain a password’s strength. This logic consists of two sets of conditions to be applied. A. Password Score B. Password Length and Username match Use Security Control? Set this to Yes, if you want to initiate a password-protected system to control access to Tally.ERP 9 data. Else, set this to No. If you opt for security control, Tally.ERP 9 offers a comprehensive password based access control to different features of Tally.ERP 9 based on authority lists created by the Administrator. For more information refer Data Management in Tally.ERP 9. Name of Administrator, Password, Repeat Assuming the Tally Vault Password and Use Security Control is set to Yes enter the Name of Administrator, Password andRepeat in the respective fields. Use TallyAudit Features Tally Audit allows the administrator or an auditor profile user to track changes in accounting information. If you wish to use this facility, select Yes. Tally Audit will be available only to the administrator/auditor, through Display of Statements of Accounts.For more information refer Data Management in Tally.ERP 9. Disallow opening in Educational mode ? Set this option to Yes, if you don't want the company to be opened in Educational mode of Tally.ERP 9. Else, set this to No. On accepting the company creation screen, if you have specified Tally Vault password, Tally.ERP 9 prompts you to enter the TallyVault password as appears:
Get In Touch 011-43522158 Then Tally.ERP 9 prompts you to enter the Name of User and Password (if any). After verification Tally.ERP 9 imports the latest statutory masters. Wait till the screen shows that 100% of import is complete.
Get In Touch 011-43522158 This completes the Company Creation process in Tally.ERP 9. An explanation on the fields on the bottom of the Company creation screen follows: Base Currency Information The Base Currency Information is found in the bottom frame of the Company creation Screen. Base Currency is the currency in which your accounts would be maintained. Financial statements are prepared in the base currency by default and these are normally required to be submitted to local statutory authorities. The Base Currency information in Tally.ERP 9 varies with the country selected for Statutory Compliance. You can record transactions and raise invoices in foreign currency; and also maintain bank accounts or ledgers in foreign exchange, when required. Base Currency Symbol The currency symbol given earlier in the Company Creation screen is displayed here automatically. Tally.ERP 9 uses this currency symbol in reports, wherever necessary. Click here to read about Indian Rupee Symbol Conversion.
Get In Touch 011-43522158 Formal Name Formal Name is the full name of the currency specified. The Formal Name for the base currency is set to Indian Rupees for Indian Companies. Number of decimal places The number of decimal places for the base currency is set to 2, by default. However, you have the option of specifying up to 4 decimal places. Indian currency has 2 decimal places whereas certain other countries require 3 decimal places and so on. Is Symbol Suffixed to Amounts For countries, which specify the symbol after the amount (value) – this facility is provided. For example, Yen is specified after the amount (5000 Yen) unlike in India where the symbol is specified before the amount (Rs.5000) Symbol for Decimal Portion Enter the symbol for decimal portion. Show Amounts in Millions This is useful for companies, which require reporting the financial statements in millions. This is possible only if Allow Multi-Currency is enabled in F11: Accounting Features. Put a space between Amounts and Symbol This facility is provided to users who require a space between the amount and the symbol. However, putting a space between the amount and symbol could give an opportunity for misuse incase of cheque printing. Hence, the flexibility to turn this option on and off as required is provided. Decimal Places for Printing Amounts in Words You can specify the number of decimal places for printing the amount in words. This number should be equal to or lesser than the number specified in Number of Decimal places field in company creation or currency master screen which will appear in Invoice and Cheque printing screen. For example, if the currency is expressed upto 3 decimal places, the numeric to be printed in words can be restricted to 2 decimal places. Note: The Name of the Company, cannot be translated or transliterated but will appear in the
Get In Touch 011-43522158 Loading a Company In order to load a company using the Select Company option, disable the default loading of a company in Tally.ini file. SetDefault Companies to No OR place a semi-colon before Load = 00001 (company number - placing a semicolon means that the words following it in that line would not be executed. Each line is a separate command). On double-clicking the Tally icon, the screen is displayed as shown: You can use the Select Company option in two ways, from the Company Info. Menu OR by using the button F1: Select Cmp(available on the Gateway of Tally screen). Select Company Select Company option allows you to load another company from the list of companies listed which you may have created earlier. Press Enter on Select Company or use the button F1: Select Cmp. Tally.ERP 9 displays the following screen:
Get In Touch 011-43522158 If your business uses Tally.Server 9 to maintain data, Click on S: Server List or press Alt+S Note: If the administrator has enabled Security Access, users need to provide the authorised Tally.NET credentials in order to access the Server List. The List of Tally.Servers is displayed. Select the required location The Companies available on the selected Tally.Server will be displayed:
Get In Touch 011-43522158 Tally.ERP 9 displays 1.Company Name (All the companies created are displayed in an alphabetical order) 2.System-generated code for each company displayed 3.The Financial Year information relating to the number of years data present in the company Note: The system-generated code for each company is displayed to assist you in identifying which company you wish to work on in case you have multiple companies with the same name (as displayed in the above screen). Select the required company from the list given to go to the Gateway of Tally for that company. In case two or more companies are loaded , click on the company which you need to work on so that the selected company will be highlighted and will appear on top of the list.
Get In Touch 011-43522158 Shut a Company Shut a Company is to unload it. It does not mean that you have deleted it. Simply select it again to load and work on it again. You can shut a company in two ways – either using the button F1: Shut Cmp (Alt + F1) or pressing Enter on Shut Companymenu option on the Company Info. Menu. The screen appears as shown below: Select the company to be shut from the List of Primary Companies. Alter a Company This option allows you to alter information about the existing company, you can modify any information at any time that is set while creating a company. Go to Gateway of Tally 1.Select F3: Cmp Info. (ALT+F3) from the button bar 2.Select Alter and press Enter and the screen appears as shown below: 3.Select the company from the List of Companies and press Enter to view the Company Alteration screen. 4.Make the necessary changes in the required fields and accept the screen. To change the password if Use Security Control is set to Yes: 1.Enter the Nameof Administrator. 2.Enter the new password. 3.Re-enter the password in the Repeat field to confirm. 4.Enter the Old Password and Accept the screen to alter the company.
Get In Touch 011-43522158 Note: To understand the conditions that determine a Password's strength, click Password Strength Indicator. Delete a Company This option allows you to delete an existing company. To delete a company, you have to load the company first. 1.Select F3: Cmp Info. (ALT+F3) from the Gateway of Tally to proceed to the Company Information menu. 2.Select Alter and press Enter. 3.Select the company to be deleted. The Company Alteration screen is displayed. 4.Use Alt + D to delete. Tally.ERP 9 will prompt for a confirmation on deleting the company. 5. Press Enter to delete the company. Note: Deletion of a company is irreversible. The company is permanently deleted from the system.
Get In Touch 011-43522158 Pre-defined Groups in Tally.ERP 9 By default, Tally.ERP 9 provides a list of Groups called pre-defined groups. The user can create any number of Primary Groups and Sub Groups which are again grouped under a Primary Group/Sub Group. There are 28 pre-defined Groups in Tally.ERP 9, out of which 15 are Primary Groups and 13 are Sub-Groups. 15 Primary Groups Branch / Divisions Capital Account Current Assets Current Liabilities Direct Expenses Direct Incomes 13 Sub Groups Bank Accounts Bank OD A/c Cash-in-hand Deposits (Asset) Duties & Taxes Loans & (Asset) Provisions Reserves & Surplus Secured Loans Stock-in-hand Sundry Creditors Sundry Debtors Unsecured Loans Advances Fixed Assets Indirect Expenses Indirect Incomes Investments Loans (Liability) Misc. Expenses (ASSET) Purchase Accounts Sales Accounts Suspense A/c Out of the 15 Primary Groups, 9 Primary Groups appear in the Balance Sheet which are Capital in nature and 6 Primary Groups appear under Profit & Loss Account which are Revenue in nature. 13 Sub Groups are classified under the 15 Primary Groups and they appear in the Balance Sheet. Pre defined Sub Groups Bank Accounts Bank OD A/c Cash-in-hand Deposits (Asset) Duties & Taxes Under Current Assets Loans (Liability) Current Assets Current Assets Current Liabilities Current Assets Loans (Asset) Provisions & Advances Current Liabilities