Download

1 / 111
1.11k likes | 1.27k Views
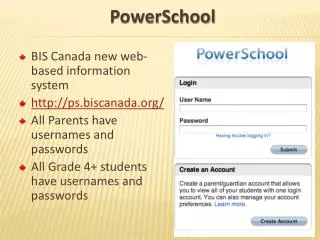
PowerSchool Reports A Hands-On Guide. Creating an “Enrollment Summary”. Go to the Start Page 2. Change the “Term” to the full year it will say 13-14 (2013-2014) 3. Click-Master Schedule.

E N D
PowerSchool Reports A Hands-On Guide
Go to the Start Page2. Change the “Term” to the full year it will say 13-14 (2013-2014)3. Click-Master Schedule
1. This is the Matrix Schedule (it will show the last view you were in)2. Scroll to Bottom of Screen3. Click-Show Preferences.
Select Preferences1. Select appropriate criteria.2. Under “View By” select “List” at the bottom of screen Select “All” Teachers or use the CTRL Key and select multiple teachers. You can also “Sort By” department, room, course, etc.
1. Right Click and Select All 2. Copy and Paste to Excel (right click and select copy) go to Excel and (right click and paste)
1. Delete unnecessary information at the top when you paste to Excel2. If you feel comfortable….use Excel formulas to calculate enrollment by courses/departments and perform different filters & sorts in Excel.
Click on “Current Selection” because it already has the list of all seniors from the previous report.
Click the “drop down box” • Select “Mass Print a Student Screen”
Select “Historical Grades” • Click SUBMIT
Use your mouse and select/highlight all the student names (left side of window)
Go to “File”, Print and click the “Options” tab at the top of the dialog box. • Click the check box for “Print all Linked Documents” • Click Print
Another way to see “Historical Grades”…by “DM Transcripts”
From the “Start Page” select a group of students • Under “Select a function for this group of students” drop down box…select “Print Report”
Under “Value” for “Which report would you like to print?” select “DM Transcript (do not use for Credits – course listings only” • Select appropriate options for other settings if needed • Click “Submit”
Now you see the “Report Queue”. It may take a few minutes…..depending up the # of students you are working with for this report. • Click “Refresh” • Click “View” under “Status”
Use “current selection” of our senior list • Click the drop down box and select Mass Print . . .
In the drop down box select the view for printing schedules (bell schedule view, list or matrix ) • Click Submit • Select your student names on the left side. Go to “file, print, options, print linked table”
Go to the Start Page • Click System Reports on the left side navigation
Scroll down the page to the bottom • Click Class Rosters (PDF) under Student Listings
Select teachers (use CTRL key and click on teacher names to select multiple teachers) • Select periods
Import “fields” for Heading Text and Roster columns • Click Submit
Fields for Heading Text and Roster Column (Fields ) HEADING TEXT High SchoolStatement of Accountability Class Roster Summary Form Course Name: ~(coursename) Course Number: ~(Course_Number) Section Number: ~(Section_Number) Teacher of Record: ~(teachername) Room Number: ~(Room) Period minus 1: ~(Expression) Number of Books: _____ Number Returned: _____ Sequence of Books: ____ to ____ Test Date: ________ Pre: _____ Mid-Term: _____ Post: _____ I have read the guidelines for administration in the CTE Statewide Assessment Administration Manual and have familiarized myself with the Testing Code of Ethics. I understand that security of state assessment materials is my responsibility to keep secure (paper-pencil or online). Test Administrator / Proctor / Building Coordinator Signatures: __________________________ / __________________________ / __________________________ ROSTER COLUMNS Last_Name\First_Name\Middle_Name\Student_Number\Activities.all_case_service_manager\IEPActivities.c_504\504Activities.limited_english_proficient\LEP\Online\Paper\OCS ALT\CREDS\Make-Up
Go to the Start Page • Select “Teacher Schedules” on the left side navigation • Select a teacher and you see the teachers schedule • Click the “Enrollment” number which is a link and it will open the class roster for that class period/section
Click “Make Current Student Selection” …. At the bottom of the page • In your “cookie crumbs” click “Teacher Schedule” • Locate the next course/section and click the “Enrollment number”
Click “Add to Current Selection” • Repeat these steps for the remainder of courses/sections, etc. • Note: this is placing all the students for the selected teacher together. You could just do a course at a time.
Give the report a title • Select “Fields” to locate the “field name” and label the “Column Title” • Sort by “Last Name” or whatever is appropriate for your report • Click “Submit”
Here is your report • Print report or copy & paste to Excel and manipulate the data
Go to the “Start Page” • Under “Setup” click “School”