Download
1 / 4
40 likes | 76 Views
When you are attempting to search your network share, you will get "Toshiba Scan File Storage error, When such a condition happens. But don't you worry about getting rid of this mess.<br>Source URL: https://www.toshibasupport365.com/blog/how-to-resolve-toshiba-scan-file-storage-error/

E N D
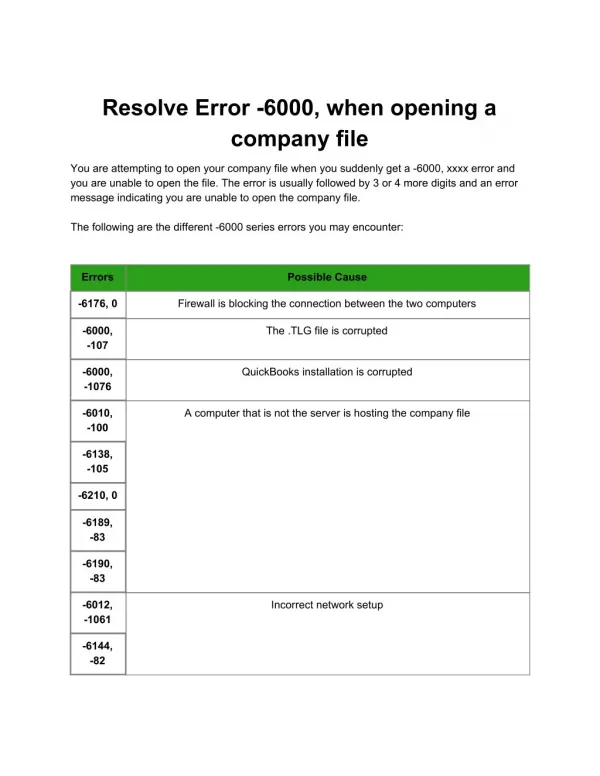
How To Solve Toshiba Scan File Storage Error issue? If you face scan to folder or network scanning issues in Toshiba, this article can help you solve Toshiba scan file storage error online. I face scan to folder issues regularly and I know from experience that a solution is hard to find. A client and good friend of mine were fighting a malfunctioning network scanner for over a year. Furthermore, they were told that replacing the multi-function printer/scanner is the only solution. Unfortunately, replacing the printer would not have magically fixed their scanning woes. Even though the issue was software-based, the printer technician simply did not know how to fix it and in their mind, the hardware must be faulty. After a few days of Googling, phoning and sending smoke signals, I found a solution. Now, I want to share that solution with you. In this article, I will not show you how to setup scan to folder nor how to configure your network scanner. Nevertheless, you will learn the necessary troubleshooting steps to solve this conundrum. What changed to Fix Toshiba scan file storage error? When troubleshooting software issues, the first thing you must do first is – determine what changes were made to the system when the issue started. For example, look for software updates or additions, hardware replacements, or configuration changes. In my client’s case, they upgraded to Windows 10, the same time their network scanning troubles started. You should have a light-bulb moment now. Correct – Windows 10 broke the scan to folder function. But what exactly went wrong? Turn password protected sharing off Sometimes, with a new Windows update, Password protected sharing can be turned on without you knowing. But, no matter how it was turned on, for network scanning or scan to folder to work, it must be turned off. Now, let’s take a look at how to do this. 1.Go to Start, then select Settings. Network and Internet Settings 2.Click on Network & Internet, and then go to Status. Network and Internet Settings
3.Click on Network and Sharing Center, and then in the Network and Sharing Center, click on Change advanced sharing settings in the right pane. Network and Sharing Centre 4.In Advanced sharing settings, expand All Networks, and under Password protected sharing, select Turn off password protected sharing. Advanced sharing settings 5.To finish, press Save changes. Scan account Most scan to folder setups, use a scan user account to connect to a shared scan folder on a network. Therefore, if turning off password protected sharing did not solve your issue, the scan user account could be configured incorrectly. Here’s how to fix it. 1.Right-click on the Start button and select Computer Management. 2.In the Computer Management Console, expand Local Users and Groups, select Users and locate the Scan user account. Please note that the Scan user account can be named anything else. But there should be a description explaining that the account is for scanning. Unfortunately, many people neglect to enter a proper description when creating user accounts. Manage Scan user account 3.Double-click on the Scan user account to open its properties. 4.On the account Properties dialogue, go to the Member Of tab. Look for Administrators in the list. If you can’t find it, press Add… Scan account member of Administrators 5.On the Select Groups dialogue, in the “Enter the object names to select” type Administrators. press Check Names and if you spelt it correctly, it will add your computer name followed by a backslash before Administrators. This lets you know that it found the Administrators group on your computer. 6.Press OK and then Apply on the account Properties dialogue. 7.Still, on the account Properties dialogue, Go to the General tab. Make sure of the following; User must change password at next logon is not selected, User cannot change password is not selected, Password never expires is selected and Account is disabled should also not be selected. Or simply, just copy the configuration from the screenshot below. 8.Press Apply to save the configuration.
9.Back on the Computer Management Console, right-click on the Scan user account, select Set Password… and choose to Proceed on the warning message box. On the Set Password dialogue, type in a new password into the New password textbox, confirm the password in the Confirm password textbox and press OK to save the password. 10.Lastly, configure your printer/scanner with the new password. Because we added the Scan user account to the Administrators group, you need to make sure to use a secure password. Most hackers will target the scan account when trying to break into a computer. So, use uppercase and lowercase letters, numbers and symbols. Furthermore, create a password with a minimum length of 12 characters. And no, Password1 is not a secure password. Sharing and permissions If the steps above solve nothing, maybe there is a faulty share or the permissions on the scan folder is not configured correctly. Check the scan folder share and permissions. 1.Right-click on the scan folder and select Properties. 2.On the folder properties dialogue, go to the Sharing tab and press the Advanced Sharing… button. Select Share this folder and press the Permissions button. 3.On the Permissions dial log, press Add.. if you do not see the scan user in the list. Scan Folder Share Permissions 4.On the Select Users or Groups dial log, type your Scan account user name (Scan in my case) and press the Check Names button. Again, if it finds the user account, it will add your computer name followed with a backslash to the username. For example, on my computer it is DRAGON-PCScan. Scan to folder Select Users or Groups 5.Press the OK button to add the selected user account to the Scan folder Permissions, Group or user names list. Scan to folder Set Permissions 6.To finish, select the scan user account and set its permissions to Full Control. Press the Apply button to save the permissions. Scan to folder should now be working. But, do not worry if it’s not; just keep on reading. To conclude, I hope this article about Toshiba scan file storage error was useful and you managed to solve your scan to folder issue. With so many things that can go wrong with a network, it is hard to mention all the possible fixes in one article. But, feel free to let me know if
you want me to add anything or if I made a mistake somewhere. I am always open to learning from my friends.