Download
1 / 27
290 likes | 1.14k Views
ECG TRAINING MODULE 2. BY BRAD CHAPMAN RCT. OBJECTIVES. PATIENT APPROACH LEAD PLACEMENT ARTIFACT SPECIAL NEEDS PATIENTS. The Approach. Enter to the left hand side of the patient Ensure them that this test doesn't hurt Make sure curtain is pulled across for the women

E N D
ECG TRAINING MODULE 2 BY BRAD CHAPMAN RCT
OBJECTIVES • PATIENT APPROACH • LEAD PLACEMENT • ARTIFACT • SPECIAL NEEDS PATIENTS
The Approach • Enter to the left hand side of the patient • Ensure them that this test doesn't hurt • Make sure curtain is pulled across for the women • Ask the Men if they want the curtain pulled – most won't but occasional one will
Patient Preparation • Tell patient that you are going to place stickers on them and then connect some wires • Start by placing a sticker on either the arms or legs first – this helps to show that this test is non-invasive and helps to relieve anxiety
Placement of Leads • Find the first intercoastal space by moving a finger down the right collar bone towards the sternum. Stop a ½ “ before the sternum • Rock fingers down chest counting the intercostal spaces • Count down to the 4th intercostal space • Place a sticker there • Repeat process on the other side of the sternum
Placement of leads • Draw a vertical line from mid-clavicular to under the breast and place a sticker. This will be V4. • Place sticker in between v2 and v4 • This sticker would be on a diagonal plane between v2 and v4 • Visual drop a horizontal line straight line down from v4 to mid-auxilla and place a sticker (v6) • Place a sticker between v4 and v6 – this will be your v5 lead
Chest Lead Placement • All chest leads are labelled v1, v2, v3,...v6. • All leads are color coded. • Chest leads are • Red • Yellow • Green • Blue • Orange • Purple
Easy to remember • Stop Light • Red, Yellow, Green • BOP • Blue, Orange, Purple
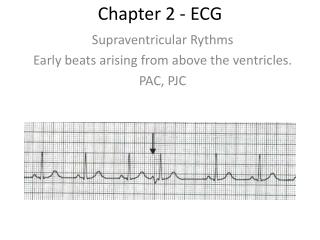
Artifact • There are different types of artifact • Somatic tremors (muscle artifact) – most common • Wandering baseline • AC interference
Somatic Tremors (Muscle artifact) CAUSE • Most common type of artifact • Caused by patient moving limbs, fingers, nervous, restless, or anxious REMEDY • Try to have the patient relax and hold still • Try talking in a calming voice while doing the tracing • Move limb stickers higher up the limb
Wandering Baseline CAUSE • Patient is moving or stickers are not making a good contact • Cables may be dangling or swaying REMEDY • Place a towel on chest leads to weight them down • Apply pressure to lead with a towel
AC Interference • Consistent and regular saw tooth pattern REMEDY • Turn off all cell phones and other electronic devices (possibly lights) • Unplug electric bed • TENS machines must be turned off to do ECG • Place ECG machine further away from ventilators, IV pumps • X-Ray equipment • Radio and TV
Where is that Artifact coming from? If there is artifact in Check this connection these leads • Lead I and II RA • Lead I and III LA • Lead II and III LL • OR • Tap on or shake the limb lead and see where the interference is coming from
Special Needs Patient • Amputees • Burns • Tremors • Paediatrics • Wheelchair • Trauma • SOB • Acute MI • Psychiatric
AMPUTEES • Place lead further up the limb or even on the hip or shoulder • You can put both leg leads on the left leg as long as the left lead is higher up the leg then the right leg lead
BURNS • Place leads on parts of the skin that are not burnt • Do not remove any clothing that is stuck to the skin • Take alligator clip off the end of the lead, clean with alcohol and hold the tip of the lead on the skin lightly
TREMORS • Parkinson’s disease • Place hands underneath the buttocks • Place electrodes on Hips or Shoulders • Add extra pillow under knees
PEDIATRICS • Getting small children to hold still during an ECG may be challenging • Distraction with toys or Music • Young infants, place stickers on then wrap in a blanket
WHEELCHAIR • Assist to transfer to bed • If they can’t move to bed – do ECG in the chair • Record on the ECG that done while sitting up. (Changes the axis of the heart)
TRAUMA • Remain calm – work at putting on stickers while the medical team does their task • Place your stickers on and hook up wires • Communicate to the trauma team when you are ready to acquire the tracing • When ready tell the trauma team not to move them for 10 seconds
RESPIRATORY DISTRESS • The patient in respiratory distress is difficult to obtain an ECG on • You may have to have them in sitting position – just remember to record a comment on the ECG • Place limb leads higher up (Shoulders & Hips)
CHEST TUBES • Place all electrodes you can without moving bandages • You will probably have to leave leads V5 and V6 off • Take extra precautions around the chest tube. Seek help if it appears to be loose.
ACUTE MYOCARDIAL INFARCTION • Remain calm • Leave stickers on if you will be doing serials ECG’s. This will accurately measure changes due to MI and not movement
PSYCHIATRIC • Be very reassuring when it comes to explaining the exam • Explain the test in layman terms • Never use the word “electro” • Always call an ECG a “Cardiogram” or Heart Tracing • ECG sounds like ECT (shock therapy)
REVIEW QUIZ! • Thank you for your time.