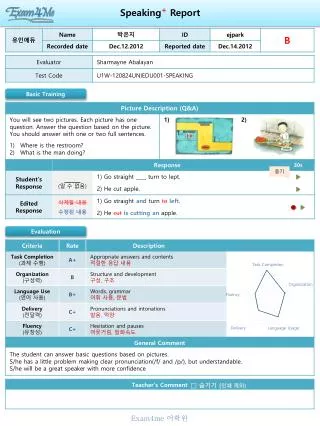
Download
1 / 61
610 likes | 792 Views
SuperSTARS Basic Training. District SES Administrator Refresher August 2011. To get set up on the system, get your login information, or get other questions answered:. SuperSTARS@ITDetails.com. SuperSTARS.

E N D
SuperSTARS Basic Training District SES Administrator Refresher August 2011
To get set up on the system, get your login information, or get other questions answered: SuperSTARS@ITDetails.com
SuperSTARS • Providers do not enroll students in SuperSTARS. The district assigns students to specific providers for specific periods • Providers can see their assigned students on-line at any time (Rosters) • Providers enter ILPs and student attendance on-line
SuperSTARS • SuperSTARS provides “official billing reports” that account for attendance exceptions by the districts and for student PPA use • Providers are able to see these adjustments on-line • Students without approved ILPs will not be included on the official billing reports
Accessing SuperSTARS • Go to https://www.programtracking.com/SuperSTARS • Don’t forget the “s” at the end of http! If you do, you will be trying to log in to STARS, a separate system! • Set a bookmark or favorite after arriving at the site. • Enter your username and password and click “Login”.
Home” Link Clicking “Home” on the blue bar at the top will always bring you to the start page (the Main Menu).
State Functions • There are some actions that State-level users must perform: • Define SES Districts • Set District PPAs • Define SES Providers • Define SES Schools • Set provider rates in each district
Basic District Functions • For each program year Districts MUST: • Enter or update student records • Enable providers in your district • Assign students to providers • Review and approve ILPs • Review and print official billing reports • Districts SHOULD • Verify attendance entered by providers • Districts MAY • Track the status of applications received • Tracking applications does not have any impact on student assignments. These processes are completely independent.
District Functions The “Home” page is where most functions are accessed. You will use buttons on the page and links in the blue bar at the top of the page.
Entering Students for the 2011-2012 Program Year • Student records can only be entered by District users. • New student records must be added or existing student records must be updated before students can be assigned to providers in 2011-2012. • There are three ways to enter/update students for the 2011-2012 program year: • Add new student • Manually update existing student records • Batch update existing student records by uploading data
Information Required for Each Student • Required information for each student is: • District ID number (unique) • SSN • First name • Last name • DOB • Gender • Ethnicity • School • Grade • Lunch Status • Integer district ID numbers should be prefixed with a unique district identifier. We recommend the district name or abbreviation (e.g. EBRNNNN or CADDONNNN) • If no district ID exists, the SSN can be used for this field
District FunctionsAdding New Students Manually To add new students (students that have not been entered in the system before): Click “Students” on the top bar: Click “Add Student” on the form that comes up:
District FunctionsAdding New Students Manually Complete the required fields marked with a red * and click “Add Student”. Note that the District ID number and the SSN must be unique within SuperSTARS.
District FunctionsManually Updating Existing Student Records If a student was entered into SuperSTARS last year, their record must be updated before they can be assigned to providers in the 2011-2012 program year (note that this illustration reflects the 2010-2011 program year). At a minimum, the student’s School and Grade must be re-entered. Other fields should be updated if more current information is available. To update student information entered in a prior year for use in 2011-2012, click “Students” on the top bar and then click the “Update Students for the 2011-2012 Program Year” button on the form that comes up:
District FunctionsManually Updating Existing Student Records Select the program year that the student record will come from, enter all or part of the last name of the student to update, then click the “Search” button: UPDATED
District FunctionsManually Updating Existing Student Records Matching student records will be displayed. Click “Edit” next to the student that you want to update: UPDATED
District FunctionsManually Updating Existing Student Records That will open the information fields for editing. Note that the student’s School and Grade must be re-entered. When done, click “Update”. When the update is done, the student will disappear from this list and will now be available in 2010-2011. UPDATED TIP: If you have a lot of students to update manually you might consider searching on just the first letter of the last name to return a list of students. Once they are displayed on the update screen you can edit each one and each one will disappear from the list when the update is done. This can be faster than looking up each student individually.
Batch update student records by uploading data You can update the records of a large number of existing students and/or add new students by uploading student records from a spreadsheet. The format of the spreadsheet is the same as it was in 2010-2011 and can be provided to you on request. Batch updates are only practical for large number of students and may require support from your IT department to accomplish. • When a spreadsheet of student records is uploaded: • Students that are not in the system (no matching SSN is found) are added to the system. • Students that are in the system from a previous year have information records for 2011-2012 created, making them available • for assignment in 2011-2012.
Enabling Providers • The district enables data entry for each provider that is providing services in their district • This is done one time each year for each provider • Note that provider rates in districts are maintained by the State
District FunctionsEnabling Providers • Click “Providers” on the top bar:
District FunctionsEnabling Providers • Click on the “Search Providers” button
District FunctionsEnabling Providers • Click the name of the provider that you want to enable • We will choose Education Station
District FunctionsEnabling Providers • At the bottom of the page that is displayed, select the program year and click the “Enable Provider” button. UPDATED
Managing Student Assignments • Districts must assign students to providers in order for the providers to enter ILPs and attendance • Each assignment has a specific start date and end date • Providers cannot enter attendance data for dates before the start date, or after the end date
Managing Student Assignments • Students can be assigned to more than one provider during the program year • Students cannot be assigned to more than one provider on any given day • Assignment start and end dates can be adjusted, but only if the adjustment does not conflict with another assignment
Managing Student Assignments • Quick Assignment Process • Designed to allow districts to rapidly assign students to providers during high-activity times, such as program startup each year • A student can only be “quick assigned” if no other assignments for the student exist during the program year • Any adjustments to a quick assignment must be made using the normal assignment tools
Managing Student Assignments • Normal Assignment Process • Operates on a selected student • Create new assignment • Adjust an existing assignment • Delete an assignment • Shows the student’s assignment history, if more than one assignment has been made
Managing Student Assignments Assigning Students to Providers - “Normal” Method Click “Students” then use the form to find the student that you want to assign. Click the student’s name.
Managing Student Assignments Assigning Students to Providers - Normal” Method When the student’s record is displayed, click “Assignments” at the bottom of the page.
Managing Student Assignments Assigning Students to Providers - “Normal” Method Select the provider and the start and end dates of the assignment. The program year should default to the current program year. Click “Add Assignment” when these are set. Assignments are shown at the bottom. No list means no assignments. Multiple assignments may exist. You can edit the assignment as needed.
Managing Student Assignments Assigning Students to Providers - “Normal” Method When a student is assigned to a provider on a given day they will then show up on the provider’s roster for that day.
Managing Student Assignments Deleting Assignments • A student assignment should only be deleted if the assignment was a mistake. • Deleting an assignment makes it look like the assignment never occurred. It takes all associated data with it! • Normally an assignment should be adjusted As a general rule, do not delete assignments. If you are unsure what action to take, send an email to superstars@itdetails.com to ask a question.
Managing Student Assignments Adjusting Assignments Clicking the “Edit” link next to an assignment will open the edit boxes. Click “Update” to save your changes.
Adjusting Assignments Here we are making an assignment to T-Provider 2 from 12/15/2007 through 2/29/2008. Note that the student already has an assignment to T-Provider 1. We clicked the “Add Assignment” button and we got the error message shown in red. Why did this assignment not work? The start date of the assignment to T-Provider 2 overlaps the end date of the existing assignment to T-Provider 1! If 12/15/2007 is the desired start date for provider 2 then …
Managing Student Assignments Adjusting Assignments Adjust Provider 1’s end date
Managing Student Assignments Adjusting Assignments Complete the second assignment
Managing Student Assignments Quick Assignments Quick assignments let you make student assignments to a selected provider for a selected period very quickly. Quick assignments only work for students with no existing assignments, regardless of who the provider is or when the assignment is for. Quick Assignments work “at the click of a button.” As such you should use it carefully because … There is no Quick UN-Assign!
Managing Student Assignments Quick Assignments After clicking the Quick Assignments button on the home page you select the provider and start and end dates of the assignments that you want to make. The program year should default to the current program year. When you are done, accept the settings.
Managing Student Assignments Quick Assignments Filter the student list by entering all or part of the last name. Leaving the field blank and pressing Enter will return *all* eligible students. Click “Select” next to a student to quick assign that student. When the assignment is made, the student disappears from this list.
Approving ILPs Clicking the “ILP” button on the home page takes you to the Student ILPs page. Once providers mark ILPS as complete they will show up on the district’s ILP status screen. Select the program year and provider, click the “Completed Awaiting Approval” selection, and then click “Search ILPs” to get a listing of ILPs. To review and approve an ILP, click the student’s name.
Approving ILPs The ILP will display with Approve and Disapprove buttons at the top. If you disapprove an ILP remember to enter a reason so the provider will know what they need to fix.
Attendance Verification Districts can verify recorded attendance against sign-in sheets. Click “Attendance” on the home page.
Attendance Verification On the page that comes up you specify the provider and month of attendance, and all or part of the student’s last name. A list of students assigned in that month is displayed and you select one to display their attendance along with “verified” and “exception” checkboxes.
Attendance Verification Consider the following billing report for provider T-Provider 1 in Tensas for September 1 through September 30, 2007. Angelic Oliger has 8 hours recorded.
Attendance Verification Note that two of Angelic’s hours are now marked as exceptions by the district. Also note that a reason is recorded.
Attendance Verification Consider the same billing report now. Exception hours are automatically excluded from the billing. Angelic only shows 6 hours now.
Attendance Verification An exception report is available.
Attendance VerificationLocking Attendance • Districts can lock a provider’s attendance records for a specified period. • This is a way to ensure that providers do not make changes to attendance while it is being verified. • After the verification is complete, the attendance can be unlocked – at the district’s discretion - to allow the provider to make corrections or additions. • All attendance in the period can be unlocked, or only the unverified attendance, or only the unverified, non-zero attendance. • If a provider makes corrections that are acceptable, the district can remove exceptions by un-checking the appropriate exceptions box. • Once all changes to a period’s attendance are made locking the attendance is recommended.
Locking Attendance • Click “Lock/Unlock Attendance” on the home page
Locking Attendance • Select the program year, the provider, and the start and end dates of the period to lock • Then click the “Lock Attendance” button