Download
1 / 3
30 likes | 113 Views
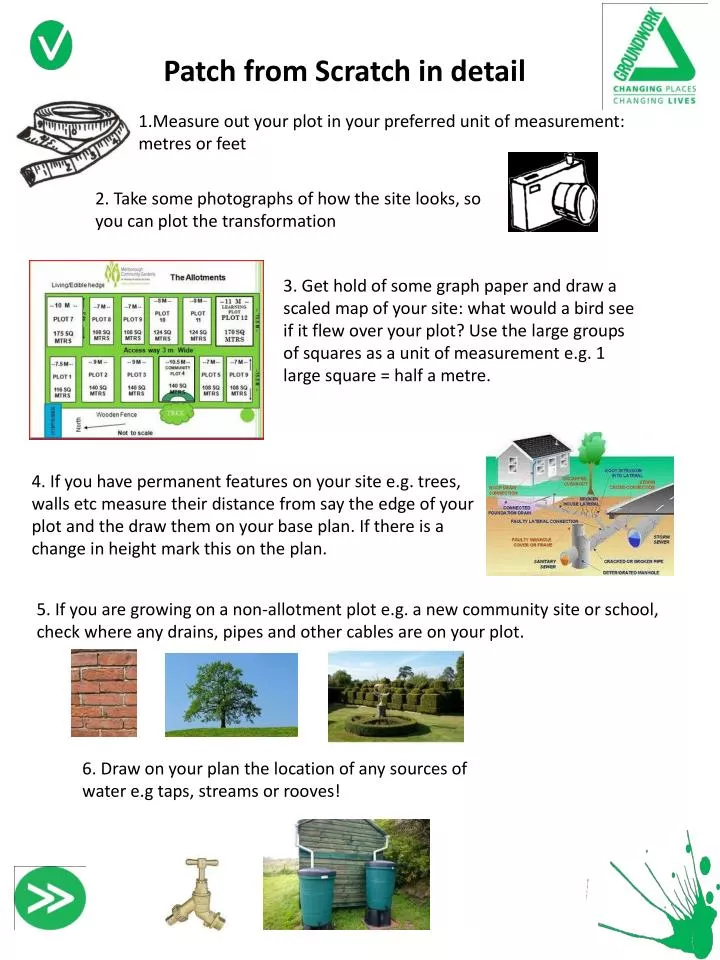
Patch from Scratch in detail. 1.Measure out your plot in your preferred unit of measurement: metres or feet. 2. Take some photographs of how the site looks, so you can plot the transformation.

E N D
Patch from Scratch in detail 1.Measure out your plot in your preferred unit of measurement: metres or feet 2. Take some photographs of how the site looks, so you can plot the transformation 3. Get hold of some graph paper and draw a scaled map of your site: what would a bird see if it flew over your plot? Use the large groups of squares as a unit of measurement e.g. 1 large square = half a metre. 4. If you have permanent features on your site e.g. trees, walls etc measure their distance from say the edge of your plot and the draw them on your base plan. If there is a change in height mark this on the plan. 5. If you are growing on a non-allotment plot e.g. a new community site or school, check where any drains, pipes and other cables are on your plot. 6. Draw on your plan the location of any sources of water e.g taps, streams or rooves!
Patch from Scratch in detail 7. Using a compass work out which way your garden is facing and draw this on your map, this will give you a good idea about what you will be able to grow later on 8. Check the direction of the wind, is there a noticeable prevailing wind? Is your plot sheltered from the wind or exposed? Draw this on your map. 9. If a communal site, ask other people who might use it to state how they might like to use it, what would they like to grow, would they like seating etc and if they are willing to do some work towards the site 10. To get everyone’s ideas really clear, copy your base plan a few times and overlay with tracing paper and encourage others to draw in colour what they would like to see on the site: their dream garden Don’t forget key elements of a garden: footpaths, seating, types of planting (not named plants at this stage), types of growing area: raised beds, shelter, tool storage, waste disposal: compost heaps/leaf mould bins. If you see images on the internet or in magazines/papers you like cut them out and put them next to the base plan to collect all your ideas together. Display everyone’s ideas on a notice board and have a meeting to vote for everyone’s favourite things on site. In a smaller group decide where all the agreed items will go in your garden, consider zoning your garden according to use and conditions e.g. Productive zone: raised beds, waste zone: compost heaps, relaxation zone: seating and aromatic planting
Patch from Scratch in detail Next stages: practical Test the soil for: PH, Texture and Structure Remove any large areas of unwanted weeds and shrubs Mark out plans agreed in sand or compost lines When you are certain all has been agreed prioritise areas of the garden you want to work on and start these tasks first, consider doing a planning exercise beforehand: task; materials needed, practical work to be done, how many people etc