Download

1 / 29
290 likes | 396 Views
Web Page Creation Part I. ST: Introduction to Web Interface Design Prof. Angela Guercio Spring 2007. Objective. In this lecture, you will learn: What HTML is How to create an HTML file The HTML syntax more syntax in next lecture

E N D
Web Page Creation Part I ST: Introduction to Web Interface Design Prof. Angela Guercio Spring 2007
Objective In this lecture, you will learn: • What HTML is • How to create an HTML file • The HTML syntax • more syntax in next lecture • You will experiment HTML and apply the concepts hands on.
Web Page Creation • Create a document by using a mark-up language • HTML • Web Browsers show ASCII text files • *.txt = text file • *.html or *.htm = HTML files • Software is available to facilitate the Web page creation.
Web Browser • Web browser display Web pages • make any effort to display on the best way • for laptop with smaller screen text is rearranged • formatting from text files is not preserved (e.g. break lines are gone!). • Web browsers dynamically rework the files to fill the display window as best as it can • Web browsers rework each page for each visitor
Web Page: Basic • Since Web browsers read text files we can get a text file and display it the Web browser. • A Web server is not needed during page design • you can be offline • It is needed only at publication time
Web Page: TO DO Practice: Rename a .txt file with the .htm or .html extension and open it with a browser. • Open Notepad (Start Program Accessory…) • Now close the dialog box, go to File, Edit with Notepad and continue editing • In the file write your name and postal address in the same way you would do on an envelope. • In File Name save as “Myaddress.html” in any folder you like • Go to the folder where you saved your file and double click on the icon of your file. It will be open with your default browser. • Go back to your file and change the address with the school address. Save (CTRL S) • Go back to the browser: do you see any change in the page? Reload the page. Do you see the changes now?
HTML • HyperText Markup Language is a language that gives the author control over the web browser • set of HTML elements or tags • insert a HTML element to add to a content or a style to a Web page • Instructions are issued through a series of TAGS - which are shown in <brackets> • Basic HTML Elements • HTML, HEAD, TITLE, BODY
Editing HTML files • Use Notepad (Windows) or SimpleText (Mac) for now. • do not use Word • Word file saved as HTML invoke a HTML Converter which is not what you want when you are writing HTML files! • or save it “Text Only with Line Breaks” • Later I will let you use other editors (ex. Frontpage, Netscape Ed, ect)
TAGS • <HTML>……..</HTML> • They can be nested inside other tag pairs • <HTML> contains everything the browser need to know about the Web Page • <HEAD> contains information that is not displayed in the browser’s Web page display • <TITLE> contains the title element that appears in the browser window’s title bar • <BODY> text and graphics inside the body element are displayed in the browser’s Web page display
TAGS Syntax • General TAG format: <tagname> … </tagname> The tag begins formatting. Content to be formatted. The closing tag ends formatting. Observe: Closing tags are preceded by the / symbol
Tags details • Tags are NOT case sensitive: <TITLE> and <title> are the same • MOST tags start with the command and end with a slash(/) • ie. <TITLE> ……. </TITLE> • However there are a few tags that do not require to be terminated • <br> • Break – new line • <HR> • Horizontal Row – next line/page • Spacing the content inside a TAG is important, spacing outside of the TAG’s is NOT important
Practice TO DO: • Create a file with Notepad • Insert the tags in the following way <HTML> <HEAD> <TITLE> </TITLE> </HEAD> <BODY> </BODY> </HTML> • Fill the TITLE and the BODY • See the result with a Web browser • Where does the text in the Title appear? • Where does the text in the Body appear?
Web Page Development Cycle • Save your file with the Save command • Reload the new file • Review the new Web page with you Web browser • Revise you page as needed Repeat 1-4
Formatting: Heading • Heading element (do not confuse with HEAD!) give you a title inside the body of the Web page • 6-sizes • <H1> very large </H1> • <H6> very small </H6> • The alternative to heading is the tag <big> and <small> • More convenient • You can add more than one <big> or <small> in line. • You will be limited by the display ability of the browser.
Formatting: Align • Attributes can be added to elements • Attributes go INSIDE the angle brackets! • Align is used to justify • <H1 ALIGN=CENTER> very large </H1> • <H6 ALIGN=RIGHT> very small </H6>
More tags: Paragraph • <P>…</P> • breaks the text into blocks of text set off by blank lines • no indentation • the </P> is optional • Title and paragraphs add clarity to the Web page and make it easier to read.
Tags: Lists • Bulleted lists • <UL> ..</UL> unordered list • Enumerated list • <OL> .. </OL> ordered list • Each item in the list is marked with tags <LI>..</LI> • </UL>, </LI>, and </OL> are optional but use it anyway Ordered lists of books <ol><li> book 1<li> book 2</ol> 1. book 12. book 2 • Unordered lists of books • <ul><li> book 1<li> book 2</ul> • book 1 • book 2
Fonts and Styles • Different computers have different fonts. • What font will the Web browser will choose if your font is not available? • Tag: <FONT> • Attribute FACE • Sans serif fonts: Arial, Geneva, Helvetica • Serif fonts: Times New Romans, Times • Monospaced fonts: Courier New, Courier Pick a selection: <FONT FACE = “Arial, Geneva, Helvetica”> • The browser will choose the first available.
Fontsand Styles Tags: • <B>..</B> • for Bold • <STRONG>..</STRONG> • like Bold but more general • <I>..</I> • for Italic • <EM>..</EM> • like Italic but more general • <U> underlined
Fontsand Styles Attributes: • COLOR=“the color” for Color setting • SIZE=+2 for the change of the current size • <font size = 6> insert your texthere </font> will set the size to 6 Size chart Size 1 = 8pts Size 2 = 10pts Size 3 = 12pts Size 4 = 14pts Size 5 = 18pts Size 6 = 24pts Size 7 = 36pts
Blanks, Comments, etc. • Try to insert blanks lines or extra white space characters • What happens? • To insert whitespaces? •   inserts a white space • <!--, --> for comments • <BR> inserts line breaks • <HR> draws one horizontal separpation line
Image Files • GIF (Graphic Interchange Format) • extension .gif • JPEG (Joint Photographic Expert Group) • extension .jpg • Scanner create TIFF (Tagged Image File Format) file • conversion in GIF or JPEG is done in software • image in GIF is smaller but still good
IMG tag <img src="../../Desktop/aubree.jpg" alt="" width="125" height="149"> • IMG creates an inline image • i.e. treated like a single alphanumeric character which has a larger size than a regular character • SRC specifies the image file and the physical location • ALT specifies the size of the image • Use it all the time because: • Lynx user (an old text-based browser) will recognize what they are missing if ALT is specified • Text-to-voice browser for visually impaired, get a great amount of information from it.
Aligning and resizing images • Include ALIGN attribute inside the IMG tag • Center • Top • Bottom • Middle • WIDTH and HEIGHT are used to resize • resize but preserve original scale • resizing does not reduce memory or bandwidth requirements • BORDER is used to put a frame around a picture • 0 no border
Graphics • Insert a background color • 16,777,216 colors • or 216 Web-safe colors • colors are in hexadecimal notation (base 16) • insert the attribute BGCOLOR=“#FFFFFF” in the BODY tag for white background • pattern background uses the attribute BACKGROUND followed by the file you want to use.
Patterned background <BODY BACKGROUND=“image.jpg”> • do not use a pattern that distracts the reader from the page • use bold headings and oversized fonts
Design Issues • Do not overload your page • avoid to put images on top of a patterned background • images, background and special effects should not fight each other. • if you use many pictures use a solid color for the background
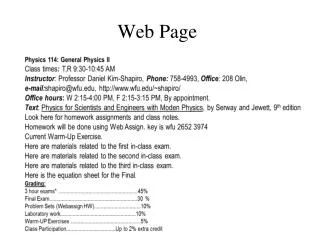
HW: to start in class • Write a html file that produces this page (see next slide) as output. • The instructions about the Format, the Style, the Font, and the Color are in the page. • When completed, e-mail the file to your teacher (aguercio@kent.edu ) • Deadline: Before next class.


![Nucleotide Sequence Analysis Part I [ web page ] Osvaldo Graña CNIO Bioinformatics Unit](https://cdn3.slideserve.com/6720096/slide1-dt.jpg)