Download
1 / 64
720 likes | 1.18k Views
Expanded “Cookbook” Instructions for the Teradyne Integra J750 Test System. Faculty Advisor Dr. Weber Team Members Murwan Abdelbasir, EE. Jonathan Brown, EE. Brent Hewitt-Borde, EE. Robert Stolpman, EE. Team May 07-12 Client ECpE Department. November 28, 2006. Presentation Outline.

E N D
Expanded “Cookbook” Instructions for the Teradyne Integra J750 Test System Faculty Advisor Dr. Weber Team Members Murwan Abdelbasir, EE. Jonathan Brown, EE. Brent Hewitt-Borde, EE. Robert Stolpman, EE. Team May 07-12 Client ECpE Department November 28, 2006
Definitions • ADC – Analog to digital converter • ASIO – Analog signal I/O board • DAC – Digital to analog converter • DIB – Device Interface Board • DSIO – Digital signal I/O board • DUT – Device under test • ESD wristband– Electrostatic discharge protective device • FET – Field effect transistor • IG-XL – Custom software for Teradyne Integra J750 • KSPS – Kilo-samples per second • MSPS – Mega-samples per second • MHz – Mega-hertz • MSO – Mixed signal option • PDIP - Plastic dual inline package • PLCC – Plastic leadless chip carrier • PCB – Printed circuit board • LAN – Local area network • Teradyne Integra J750 – High speed digital tester • TSSOP – Thin shrink small outline package • ZIF – Zero insertion force
Project Overview • Problem Statement • Iowa State recently upgraded the Teradyne J750 to test analog circuits and wireless LAN testing. • The existing digital cookbook must be upgraded to include mixed-signal testing. • Problem Solution • The team will review the existing training materials related to mixed-signal testing. • Test scenario and document support must be created for: • Two different 10 – 12 bit ADC’s • Two different 10 – 12 bit DAC’s • Two different 10 MHz or greater Op amps Figure 1 – Teradyne J750
Operating Environment 27°C - 33°C Humidity around 50% ESD wristbands IG-XL for Windows Intended Users ECpE Faculty and Students Knowledge of Teradyne Integra J750 Knowledge of mixed-signal testing Intended Uses Functional tests on mixed-signal devices using cookbook or template test scenarios Project Overview
Project Overview • Assumptions • System • Equipment is operational and properly calibrated • Present IG-XL code can be modified for the required objective • User • Basic training in the operation and care of the Teradyne J750 • Knowledge of mixed-signal operation • Knowledge of operation of devices to be tested • Understands operation of DUT
Project Overview • Limitations • 27°C - 33°C and 50% humidity required • IG-XL is the only software option • Computer function ability is limited • Devices and socket converters limit testable frequencies • Teradyne cannot be moved • End Product and Other Deliverables • Five different IC interfaces created • A complete Teradyne J750 cookbook with mixed-signal documentation • Demonstration tests for each of the required devices
Project Activities • Present accomplishments • Selection of DIB mating method • Selection and purchase of devices • Knowledge of IG-XL fundamentals • Understanding of mixed-signal operations • Identification of major technical challenges: • Pattern files • Test instances
Project Activities • Future Goals • Design and testing of circuit interfaces for each of the 6 DUT • Test scenarios for each of the DUT • Documentation of process and creation of the cookbook
Project Activities • Design functionality progress • ADC testing • DAC testing • Op-amp testing • Cookbook interpretation & ease of use • Cookbook integration with previous • MSO testing • IG-XL code implementation
Project Activities • DIB mating • The daughter boards are used to mate the device under test to the DIB. • It would be preferable if the team could find devices that mate with either of the sockets already installed. • Multiple options available for mating
Figure 2 – Sample DIB Project Activities • DIB mating • Using the current setups? • The chips will be more expensive. This could become costly if a good amount of them are burnt out during tests. • A great deal of time will be saved since the team won’t need to design a new daughter board or interface. • One of the ZIF sockets is a 24-pin DIP. Because of this the team will be limited to chips with around a maximum sampling rate of 700 Mbps which might make testing a slower process. • The 28-pin PLCC socket enables much faster sampling rates, but most of the devices in this package are obsolete, hard to obtain, and functionally limited. • If a chip burns out it would be very easy to replace, thus saving time.
Project Activities • DIB mating • New daughter board? • Making a new daughter board would allow us much more flexibility in device selection. • This would require a decent amount of time to assemble and would cost significantly more than any of the other options. • It is by far the cleanest and most durable choice.
Project Activities • DIB mating • Socket converter? • A socket converter would be a fast and easy solution. The expense is still within the team’s budget and is cheaper than creating a new daughter board and less time consuming than creating a new interface. • It might be hard to find all of our parts in the same package which would necessitate buying multiple converters. • Will not work with the PLCC sockets.
Project Activities • DIB mating • Printed circuit board? • Depending on the design of the PCB it could be very time consuming, but would be cheaper than using a socket converter. • De-soldering and re-soldering burnt chips would be a slow and potentially destructive process. • If a socket is used on the PCB switching chips is easy. • This option would not work with high speed devices. • There is almost absolute freedom in the choice of devices. • Will not work with the PLCC sockets.
Figure 3 – Socket Converter Project Activities • DIB mating • Final decision: socket converter
Project Activities • Device Selection • A total of six devices need to be selected for testing. These devices will help to supplement the old cookbook by giving it mixed signal testing capabilities. The types of mixed signal devices the team chose are: • Two different 10 to 12 bit ADC’s • Two different 10 to 12 bit DAC’s • Two different 10 MHz or greater op-amps
AD7892 A 12-bit ADC with an output that can be chosen to be parallel or serial was chosen because of its wide versatility. Runs off of a single 5 volt supply The AD7892-1 and AD7892-2 have sampling rates of 500 KSPS and the AD7892-3 has a sampling rate of 600 KSPS Has a conversion time of 1.47us A signal to noise ratio of 70 dB Is available in a 24 lead PDIP package at the cost of $15.45 per device AD7470 This chip has a 10-bit parallel output and was chosen to complement the AD7892 and by doing this the team will be able to have a more comprehensive ADC section in the cookbook. A sampling rate of 1.75 MSPS, which introduces a high speed component to the cookbook Uses a single 2.7 volt to 5.25 volt power supply Comes in the 24 lead TSSOP package at the cost of $3.53 per device Has a wide input bandwidth and no pipeline delay Figure 4 – Sample ADC chip layout Project Activities • Device Selection – ADC’s
Project Activities • Device Selection – DAC’s • AD5440 • This package has dual 10-bit high bandwidth multiplying DAC’s with a parallel interface. It was chosen because it is the only 10-bit DAC available from the chosen parts vendor that comes in a 24 lead TSSOP package. • It has an update rate of 21.3 MSPS and a settling time of 35ns. • Has a 10 MHz multiplying bandwidth. • AD5447 • This device is almost identical to the AD5440 with the only major difference being that it is a 12-bit DAC.
AD823 It possesses a very good AC and DC characteristics and the ability to drive a very wide variety of loads make this device an excellent all around amplifier. A dual package, meaning it houses two amplifiers. It is a 16 MHz rail-to-rail FET amplifier. The device comes in an 8 lead PDIP package. The cost per package is $2.63 and free samples are available. It also can operate from a single or dual power supply. Direct loads drive capability of 500 pf. Project Activities • Device Selection – Op. amps
OP37 An op-amp that operates at higher speeds and has very low noise characteristics should add an extra degree of challenge to testing. Combined with the AD823 amp it will allow users of the cookbook to be able to test an even larger variety of devices. Optimized for circuits gains higher than 5. A 2.7 Hz noise corner frequency. Has a 63 MHz gain bandwidth. A very high open loop gain of 1.8 million. Comes in 8-pin mini DIP packages. Project Activities • Device Selection – Op. amps
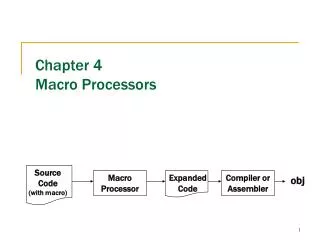
Digital Waveform Analog Waveform DSIOSource ASIO Capture Analog Waveform Digital Waveform DAC ASIOSource DSIOSource ADC “1010” “1010” Project Activities • IG-XL Design / Test and Implementation Figure 4 – Simple MSO figure Test Procedure Development EnvironmentSlide 24-46 are taken from the training manuals provided by Teradyne which is the primary source for the IG-XL development for the test devices.
Project Activities Click on the button that shows up next to it.
Project Activities This opens up the PDE Environment
Project Activities Element Editor Flow Chart Editor Variables Table
Project Activities Insert additional test elementsas follows: • LevelsTiming element. • DSIOSineGenerator element. • DSIOsrcWaveEnable element. • LMFcapWaveSetup element. • LMFcapSetup element. • LMFcapWaveEnable element. • Pattern Start element. • DSP Procedure element. • two Limits elements.
Project Activities Start with the first element LevelsTiming. Select “Connect All Pins”, “Load Levels”, and “ Load Timing”. This sets up a pre-defined levels and timing segment in the Instance Editor.
Project Activities The DSIOSineGenerator element creates the mathematical model of your test waveform. Note that you can navigate to help files showing information about each parameter.
Project Activities The DSIOsrcWaveEnable element sets up the hardware for the source waveform.
Project Activities The LMFcapWaveSetup element sets up the math for the captured waveform.
Project Activities The LMFcapSetup and LMFcapWaveEnable elements set up the hardware for the captured waveform.
Project Activities The LMFcapWaveEnable element is used to finish setting up the ASIO hardware.
Project Activities The PatternStart element runs the digital pattern containing the mixed signal microcode to activate the DSIO and ASIO.
Project Activities The DspProcedure element runs a VBA function to make calculations on your captured waveform.
Project Activities The Limits element takes values read back and processed from the hardware, compares them to user specified lower and upper limits, and data logs them.
Project Activities Instance Editor The Limits element takes values read back and processed from the hardware, compares them to user specified lower and upper limits, and data logs them.
Select Procedure for Type from the dropdown menu Select the correct Procedure name Note how the tabs are named Levels & Timing, Parameters 1-3 Project Activities
Figure 5 –Personnel effort requirements Resources and Schedule Estimated Resources
Resources and Schedule Table 1 - Resource requirements
Figure 6 – Project Costs Without Labor Resources and Schedule