Download

1 / 47
470 likes | 631 Views
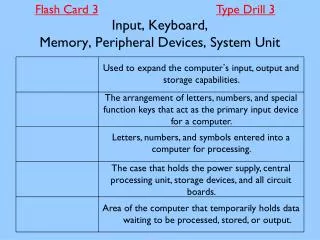
Project name :. Peripheral Devices For ML310 Board. Winter Semester 2004 / 2005 Final Presentation. Presenting :. Erez Cohen & Shay Yosef. Supervisor :. Inna Rivkin. Contents. Project Goals ML310 Board – Overview Checked/Operated Peripherals Ali South Bridge & the Parallel Port

E N D
Project name : Peripheral Devices For ML310 Board Winter Semester 2004 / 2005 Final Presentation Presenting : Erez Cohen & Shay Yosef Supervisor : Inna Rivkin Part A Final Presentation
Contents • Project Goals • ML310 Board – Overview • Checked/Operated Peripherals • Ali South Bridge & the Parallel Port • Project status • Introduction to part B Part A Final Presentation
Project Goals The ML310 evaluation board is one of the major hardware platform for projects in the High Speed Digital System Lab, therefore our main project goal is : • Creating comfortable Platform for future projects on the ML310 Board In order to allow students to focus on their specific project modules and not to waste valuable time understanding how to operate the board and its peripherals. Part A Final Presentation
Project Sub Goals • Collect information about the peripherals of the ML310 Board. • Operate the peripherals of the ML310 Board. • Implement the protocol of the Parallel Port. • Arrange all collected information about the ML310’s peripherals and the way to operate them, into a simple & comfortable html format. Part A Final Presentation
Contents • Project Goals • ML310 Board – Overview • Checked/Operated Peripherals • Ali South Bridge & the Parallel Port • Project status • Introduction to part B Part A Final Presentation
ML310 Board ALi SB PCISlots VirtexIIPro Parallel, Serial, USB & Ethernet ports DDR DIMM Part A Final Presentation
ML310 High Level Block Diagram Part A Final Presentation
The Peripherals connected DIRECTLY to the VirtexIIPro FPGA : CF,JTAG System Ace SysAce OPB Bus DDR PLB2OPB Uart RS232 PLB Bus OPB2PLB GPIO PM1 2xPPC 405 SPI OCM BRAM PM2 SMBus Virtex II Pro XC2VP30 FF896 Part A Final Presentation
The Peripherals connected DIRECTLY to the VirtexIIPro FPGA (through the OPB Bus) : • System ACE CF Controller • The System ACE CF controller is the primary means of configuring the XC2VP30 on the ML310 board through the JTAG interface. • System ACE CF controller can be used to facilitate general-use, non-volatile storage. The System ACE CF controller provides an MPU interface for allowing a microprocessor to access the CompactFlash memory, enabling the use of the CompactFlash card as a file system. • Serial port FPGA UART (RS232)The serial port connects directly to the XC2VP30 FPGA by way of a 10-pin header. It can be accessed by simply implementing a UART in the FPGA fabric. Part A Final Presentation
The Peripherals connected DIRECTLY to the VirtexIIPro FPGA : CF,JTAG System Ace SysAce OPB Bus DDR PLB2OPB Uart RS232 PLB Bus OPB2PLB GPIO PM1 2xPPC 405 SPI OCM BRAM PM2 SMBus SMBus Virtex II Pro XC2VP30 FF896 Part A Final Presentation
The Peripherals connected DIRECTLY to the VirtexIIPro FPGA (through the OPB Bus) : • IIC/SMBus InterfaceIntroduction :The Inter Integrated Circuit (IIC) bus provides the connection from the CPU to peripherals. It is a serial bus with a data signal, SDA, and a clock signal, SCL, both of which are bidirectional. The IIC/SMBus interface serves as an interface to one master device and multiple slave devices.The SMBus also provides connectivity from the CPU to peripherals, it is also a two wire serial bus through which simple power related devices can communicate with the rest of the system.IIC/SMBus on ML310 Board :The devices connected to the IIC/SMBus are : EEPROM, temperature sensors, power monitors, and a Real Time Clock. Part A Final Presentation
The Peripherals connected DIRECTLY to the VirtexIIPro FPGA : CF,JTAG System Ace SysAce OPB Bus DDR PLB2OPB Uart RS232 PLB Bus OPB2PLB GPIO PM1 LEDS/LCD 2xPPC 405 SPI SPI OCM BRAM PM2 SMBus SMBus Virtex II Pro XC2VP30 FF896 Part A Final Presentation
The Peripherals connected DIRECTLY to the VirtexIIPro FPGA (through the OPB Bus) : • GPIO LEDs and LCD • direct GPIO access to eight LEDs is provided for general purpose use • Also, provides indirect access to a 16-pin connector that interfaces the ML310 to a 2-line by 16-character LCD display.A simple register interface handles access to the XC2VP30 FPGA’s GPIO signals. • SPISerial Peripheral Interface™ is a serial interface much like the IIC bus interface. There are three primary differences: the SPI operates at a higher speed, there are separate transmit and receive data lines, and the device access is chip-select based instead of address based.The ML310 employs a single SPI device, 64 kb EEPROM Part A Final Presentation
The Peripherals connected DIRECTLY to the VirtexIIPro FPGA : CF,JTAG System Ace SysAce OPB Bus DDR 256MBDDR DIMM PLB2OPB Uart RS232 PLB Bus OPB2PLB GPIO PM1 LEDS/LCD 2xPPC 405 SPI SPI OCM BRAM PM2 SMBus SMBus Virtex II Pro XC2VP30 FF896 Part A Final Presentation
The Peripherals connected DIRECTLY to the VirtexIIPro FPGA (through the PLB Bus) : • DDR MemoryThe ML310 includes a registered 256 MB PC3200 double data rate (DDR) Dual Inline Memory Module (DIMM) with an industry-standard 184-pin count.Technical specifications : 32Mx8 DDR SDRAM devices with 13-row address lines, 10-column address lines, and 4 banks.Access to memory is through software application by pointers. Part A Final Presentation
The Peripherals connected DIRECTLY to the VirtexIIPro FPGA : CF,JTAG System Ace SysAce OPB Bus DDR 256MBDDR DIMM PLB2OPB Uart RS232 PLB Bus OPB2PLB GPIO PM1 High Speed PM1 LEDS/LCD 2xPPC 405 SPI SPI OCM BRAM PM2 High Speed PM2 SMBus SMBus Virtex II Pro XC2VP30 FF896 Part A Final Presentation
The Peripherals connected DIRECTLY to the VirtexIIPro FPGA (through the PLB Bus) : High Speed PM1 & PM2 Connectors The high-speed I/O signals on the FPGA are accessible through two personality module (PM) connectors, PM1 and PM2, on the ML310 board. Each connector has 40 differential pairs and several power and ground pins. The PM connectors on the ML310 board provide a means for extending the functionality of the board through high-speed I/O pins. The PM1 and PM2 signals are as follows: • 8 RocketIO MGT pairs (32 pins total) • 42 LVDS pairs • 1 LVDS clock pair • 38 single-ended I/O ♦ 12 at 2.5V ♦ 26 at 3.3V • 2 single-ended 2.5V clocks • 2 pins not connected Part A Final Presentation
The PCI Bus and the Peripherals connected to it Virtex II Pro XC2VP30 FF896 PCI Bus The ML310 board design provides the XC2VP30 access to two 33 MHz/32-bit PCI buses, a primary 3.3V PCI bus and a secondary 5.0V PCI bus. There are several PCI devices available on the PCI buses Part A Final Presentation
The PCI Bus and the Peripherals connected to it Virtex II Pro XC2VP30 FF896 PCI Bus Intel GD82559 10/100 Ethernet Intel 10/100 Ethernet Controller Fast Ethernet controller with an integrated 10/100 Mb/s physical layer device for PCI board LAN designs. Part A Final Presentation
The PCI Bus and the Peripherals connected to it Virtex II Pro XC2VP30 FF896 PCI Bus The FPGA is directly connected to the primary 3.3V PCI bus while the 5.0V PCI bus is connected to the primary PCI bus via a PCI-to-PCI bridge. Intel GD82559 10/100 Ethernet TI PCI 2250 3.3V PCI Slots 5V PCI Slots Part A Final Presentation
The PCI Bus and the Peripherals connected to it Virtex II Pro XC2VP30 FF896 PCI Bus Ali M1535D+ South Bridge Intel GD82559 10/100 Ethernet TI PCI 2250 3.3V PCI Slots 5V PCI Slots Part A Final Presentation
The Peripherals connected to the Ali South Bridge : Ali M1535D+ South Bridge The ALi M1535D+ South Bridge Super I/O controller augments the ML310 with many of the basic features found on legacy PCs. These basic PC features are only accessible over the PCI bus as this is the only way to access the ALI M1535D+. Part A Final Presentation
The Peripherals connected to the Ali South Bridge : GPIO Ali M1535D+ South Bridge IDE (2) USB (2) The cores of the peripherals above are fully implemented in the Ali M1535D+ Part A Final Presentation
The Peripherals connected to the Ali South Bridge : GPIO There are 15 GPIO pins connecting the ALi M1535D+ to the 24-pin GPIO header ON THE ML310 board. These can be accessed through the ALi M1535D+ by way of the PCI bus. IDE Supports a 2-channel UltraDMA-133 IDE master controller independently connected to a primary 40-pin IDE and a secondary connector 40-pin IDE connector. USB The M1535D+ USB is an implementation of the Universal Serial Bus Specification Version 1.0a that contains two PCI Host Controllers and an integrated Root Hub. Part A Final Presentation
The Peripherals connected to the Ali South Bridge : GPIO RS232 (2) Ali M1535D+ South Bridge IDE (2) PS/2 K/M USB (2) Audio- AC97 The cores of the peripherals above are fully implemented in the Ali M1535D+ Part A Final Presentation
The Peripherals connected to the Ali South Bridge : UART – RS232 In addition to the serial port accessible through the XC2VP30 FPGA, the ALi M1535D+ provides access over the PCI bus to two serial ports, UART compatible. The two serial ports are connected to the ALi M1535D+ device with two male connectors. PS/2 The ALi M1535D+ has a built-in PS2/AT keyboard and PS/2 mouse controller. The PS/2 keyboard and mouse ports are connected to the ALi M1535D+ through standard DIN connectors. Audio The ALi South Bridge Super I/O controller has a built-in audio interface that is combined with a standard audio codec (AC’97). Part A Final Presentation
The Peripherals connected to the Ali South Bridge : GPIO RS232 (2) Ali M1535D+ South Bridge IDE (2) PS/2 K/M USB (2) Audio- AC97 Flash SMBus Parallel Port The cores of the peripherals above are fully implemented in the Ali M1535D+ Part A Final Presentation
The Peripherals connected to the Ali South Bridge : SMBusThe SMBus host controller in the M1535D+ supports the ability to communicate with power related devices using the SMBus protocol. Flash Rom The ALi South Bridge supports 4 Mb Flash memory interface. The ML310 provides connectivity to an AM29F040B 4 MB (512 K x 8 bit) flash memory via the Ali M1535D+ ROM interface. Parallel Port The parallel port interface of the ALi South Bridge is connected to a 25-pin connector, female DB25, On the ML310 Board. The ALi M1535D+ supports various parallel port modes such as standard parallel port (SPP), enhanced parallel port (EPP), and IEEE 1284 compatible ECP. Part A Final Presentation
Contents • Project Goals • ML310 Board – Overview • Checked/Operated Peripherals • Ali South Bridge & the Parallel Port • Project status • Introduction to part B Part A Final Presentation
Checked/Operated Peripherals • LEDS • Connected directly to the FPGA • Can be operated using both the PowerPC (C/C++) or the FPGA alone (VHDL/VERILOG) • Useful Commands in EDK : • XGpio_mSetDataDirection(BaseAddress,1,0x00000000);Set the I/O device with BaseAddress as output (0). • XGpio_mSetDataReg(BaseAddress, 1, data);Write data to the I/O device with BaseAddress. • It was operated using the PowerPC in all of our projects (will be added to the Project CDs). Part A Final Presentation
Checked/Operated Peripherals • LCD • Connected directly to the FPGA • Can be operated using the PowerPC (C/C++) only. • Useful functions : • LCDInit : Initialize the LCD before it can be operated. • LCDWrite : Write data to the LCD. • LCDCls : Clear the LCD Screen. Note : all relevant functions and libraries will be given in the project CDs. • It was operated using the PowerPC in one of our projects (will be added to the Project CDs). Part A Final Presentation
Checked/Operated Peripherals • UART • The UART we operated is Connected directly to the FPGA. • Can be operated using the PowerPC (C/C++) only. • We connected a PC computer to the ML310 board through the UART connection to send and receive data. • Useful functions : • XUartNs550_SetBaud: set the UART baud rate. • XUartNs550_mSetLineControlReg : set # of bits. • XUartNs550_SendByte: Write byte to the UART. • XUartNs550_RecvByte: Read byte from the UART. Note : all relevant functions and libraries will be given in the project CDs. • It was operated using the PowerPC in most of our projects (will be added to the Project CDs). Part A Final Presentation
Checked/Operated Peripherals • DDR Memory • Connected to the PowerPC through the PLB bus. • Can be written/read using pointers (to/from the memory space of the DDR). • The data width of DDR devices must be half of the PLB data widththerefore, as the PLB is 64-bits, the DDR data width must be 32-bit. • It was operated and fully tested using the PowerPC in one of our projects (will be added to the Project CDs). Part A Final Presentation
Checked/Operated Peripherals • PCI Bus, Ali South Bridge, Parallel Port • All of the above was checked and tested • Will be intensively discussed further on. Part A Final Presentation
Contents • Project Goals • ML310 Board – Overview • Checked/Operated Peripherals • The Ali South Bridge & the Parallel Port • Project status • Introduction to part B Part A Final Presentation
The Ali South Bridge & the Parallel Port Implement the protocol of the Parallel Port Virtex II pro XC2VP30 Program PCI Bus Ali M1535D South Bridge Parallel Port Part A Final Presentation
The Ali South Bridge & the Parallel Port Block Diagram & Connectivity The Ali SB Is connected to the FPGA through the PCI Bus The Parallel Port Controller is a Function in the S. Bridge PCI Device. Part A Final Presentation
The Ali South Bridge & the Parallel Port Accessing the AliSB and the Parallel Port • The Communication with the Ali SB and its devices is through writing/reading to/from hardware registers inside the Ali SB. • These registers have a unique address in the PCI I/O address space. • The devices can be configured by writing to specific registers in the I/O configuration space. Part A Final Presentation
The Ali South Bridge & the Parallel Port Main registers - Ali SB • 0x3F0 – CONFIG/INDEX port • 0x3F1 – DATA port • 0x02 – Its LSB is used for soft reset the configuration registers. • 0x07 – Select the current logic device. This allows the access to each logical device’s registers. • 0x22 – Controls the direct power down of several devices. • 0x23 – Controls the automatic power down of several devices. Part A Final Presentation
The Ali South Bridge & the Parallel Port Main registers – Parallel Port • Configuration Registers : • 0x30 – Its LSB is used to enable/disable the device. • 0x60 – The higher address of the Parallel Port’s I/O base address (default 0x03) • 0x61 – The lower address of the Parallel Port’s I/O base address (default 0x78) • 0xF0 – Parallel port protocol mode. • Standard Registers : • Address 0x378 – Data Port. • Address 0x379 – Status Port. • Address 0x37A – Control Port. Part A Final Presentation
The Ali South Bridge & the Parallel Port Configuration & Access of the Parallel Port Main Stages • Enter Configuration mode – assign the keys 0x51, 0x23 to the CONFIG PORT (0x3F0). • Choose the parallel port device – assign 0x07 to the INDEX PORT (0x3F0) and assign 0x03 to the DATA PORT (0x3F1). • Enable the parallel port device – assign 0x01 to register # 30 • Setting the parallel protocol (for example ECP+EPP 1.7) – assign 0xF0 to the INDEX PORT (0x3F0) and assign 0x8F to the DATA PORT (0x3F1). • Exit Configuration mode - assign the key 0xbb to the CONFIG PORT (0x3F0). Part A Final Presentation
The Ali South Bridge & the Parallel Port Configuration & Access of the Parallel Port Main Stages - continued • Change the control signals of the parallel port – assign 8-bit control word to the Control Port (0x37A). • Write Data to the parallel port – assign the 8-bit data to the Data Port (0x378). • Optional : Reading the status of the parallel port – read the 8-bit Status Port (0x379). Part A Final Presentation
Contents • Project Goals • ML310 Board – Overview • Checked/Operated Peripherals • Ali South Bridge & the Parallel Port • Project status • Introduction to part B Part A Final Presentation
Project Status • Collect information about the peripherals of the ML310 Board - • Operate the peripherals of the ML310 Board:LEDs - LCD - DDR Memory - UART - Parallel Port - • Implement the protocol of the Parallel Port - • Left goal : Arrange the collected information into a simple & comfortable html format. Part A Final Presentation
Contents • Project Goals • ML310 Board – Overview • Checked/Operated Peripherals • Ali South Bridge & the Parallel Port • Project status • Introduction to part B Part A Final Presentation
Introduction to Part B The main goal of part B is to broaden the platform we created in Part A so it can be used while working with O.S. on the ML310 Board. In order to fulfill this goal we need to do the following : • Learn the relevant Montavista’s tools. • Study the Montavista’s Linux Kernel. • Access and operate the peripherals of the ML310 board using Montavista’s Linux Kernel. Part A Final Presentation
Thank You ! Part A Final Presentation