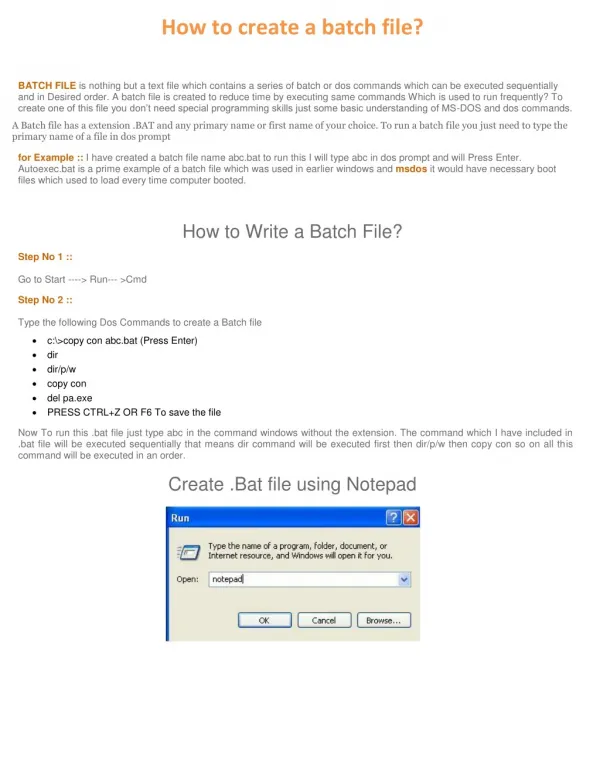
Download
1 / 24
240 likes | 395 Views
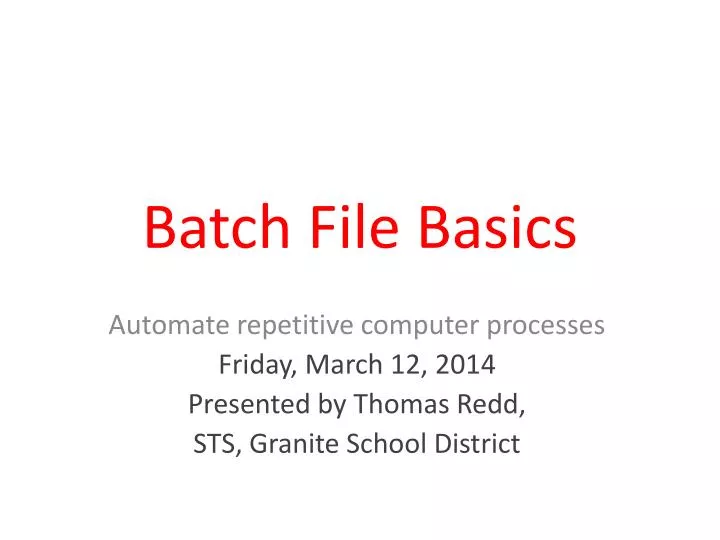
Batch File Basics. Automate repetitive computer processes Friday, March 12, 2014 Presented by Thomas Redd, STS, Granite School District. Why Create a Batch File?. Multiple commands Executed in order Several tasks accomplished in a batch Launch multiple operations quickly and easily

E N D
Batch File Basics Automate repetitive computer processes Friday, March 12, 2014 Presented by Thomas Redd, STS, Granite School District
Why Create a Batch File? • Multiple commands • Executed in order • Several tasks accomplished in a batch • Launch multiple operations quickly and easily Why not?
Creating the Batch File • Programs you will need • NotePad • Command Window • Understanding of basic computer commands • Most DOS commands are available • Help with syntax is available in the Command Window
Getting organized • Know what you need to accomplish • Decide in which order to do your tasks • Create a folder of needed installers and icons • Locate this folder in an easily accessible location • Should it be on the shared drive? • Should it be in your personal documents? • Should it be on a portable drive?
Getting StartedOpening the Command Window • Click the Start button • Type “CMD” • Press Enter • The Command Box appears
Getting StartedOpening NotePad • Click the Start button • Click All Programs • Click Accessories • Click NotePad • NotePad will open.
Getting Started • Position both boxes conveniently on your screen
Getting Started • Test commands in the Command box
Getting Started • Compile a list of instructions in NotePad • One command per line
Getting Help with Commands • At the prompt, type “Help” and Enter for a list of commands
Specific Command Help • For more information on a specific command, type HELP (command-name)
Specific Command Help • Or you could type the command and “ /?” • Example: xcopy /?
Command Syntax Command Locations for command operation Required or optional control switches that Control the command operation
Required or optional control switches that Control the command operation Locations for operation Command Additional Control Switch Instructions
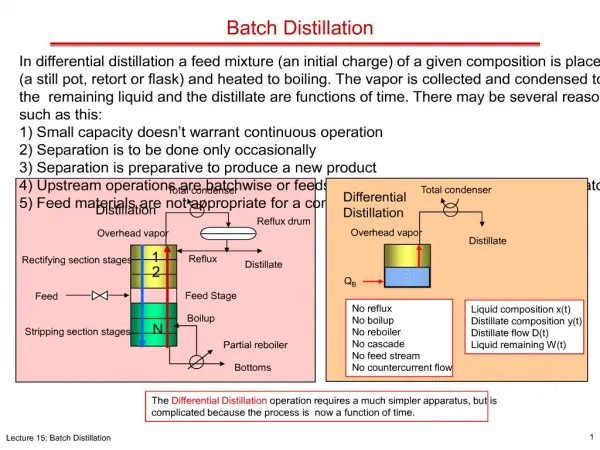
Sample Batch File S: Cd\ Cd Valley_Crest Cd tjredd Dir Dir > listfiles.txt Xcopy *.* f:\home /e/s/d/y Changes to the S Drive Changes to the root directory Changes to Valley Crest Directory Changes to the tjredd sub-directory Copies all files in the directory to a folder of an external drive (f:) in a folder called home—Over writing previous files, and including all new Changes. Lists a directory of files on the screen Writes a list of files in this folder to a file called listfiles in this folder
Saving Your Batch File • Save your NotePad file with a “.bat” ending • Save it to the folder you want it in
Using your Batch File • Navigate to your file location • Double click the batch file • When the black box goes away, the tasks have been completed
My Student Icon install batch Create the Imagine Learning English Icon on the desktop Many Icons placed of the desktop of all users Go to the S Drive • s: • Cd\Valley_Crest\toms-icons-windows-7\icons-windows-7 • ValleyCrestILE.msi • copy Windows*Live*Movie*Maker.* c:\Users\Public\Desktop /d/y • copy Valley*Crest*Elementary.* c:\Users\Public\Desktop /d/y • copy Student*Help*Files.* c:\Users\Public\Desktop /d/y • copy Road*to*Success.* c:\Users\Public\Desktop /d/y • copy Microsoft*Excel*2010.* c:\Users\Public\Desktop /d/y • copy Microsoft*PowerPoint*2010.* c:\Users\Public\Desktop /d/y • copy Microsoft*Publisher*2010.* c:\Users\Public\Desktop /d/y • copy Microsoft*Word*2010.* c:\Users\Public\Desktop /d/y • copy Go*Math*7.* c:\Users\Public\Desktop /d/y • copy SongsmithSetupAcademic.msi c:\*.* • cd MuseScore*Program Note that the “*” is a wild card . In this file, it represents a space as well as the “Lnk” file ending Change to the correct folder Change to directory containing install files Copy the Songsmith Program to the C drive
My Student Icon install batch (continued) • MuseScore-1.3.exe • copy FluidR3_FM.sf2 C:\Program*Files*(x86)\MuseScore\sound • Cd S:\Valley_Crest\Maintenance\toms-Icons-Windows-7\ilesetup • Pstory.msi • MicrosoftAutoCollageAcademicSetup.msi • Cd\s:\NE-STS_Shared\LanSchool_v7.7.4.18\Windows • Student.msi • pause • cd\Valley_Crest\toms-icons-windows-7\icons-windows-7 • pause • atubecatcher.exe Change to another directory containing Install files Change to S Drive NE-STS Shared folder, the LanSchool install directory Install MuseScore, a Music Notation program Install Photo Story 3 for Windows Install Microsoft AutoCollage A Pause is required to make LanSchool install correctly. The message “Press any key to continue” appears in the command box when the install is complete Install Student LanSchool Program Change to another folder of install files Installs aTube Catcher. This is the last command to run. After installing, the Command Box will close showing that the install process is complete Copy improved sound files to MuseScore sound directory Another pause before installing is required to make aTube Catcher install correctly
Where are my Files? My files are stored in a hidden folder on the school shared drive
Store files where? • Create a folder that will have proper access • Hidden file? • Student access? • Teacher access? • In your personal document folder? • Copy install files to that folder • Create wanted desktop icons • Copy icons to that folder • Copy any wanted files (text or other) to that folder
Preparing a Computer • Re-image a machine • Log in • Navigate to your batch file • Double click the batch file • Watch the work be done for you quickly and completely with no human error or omissions • Batch files can be activated with LanSchool • All machines are identical • Smile and log off
This is what my completed computer desktop will look like after running the batch file
Getting Instructions • Download document file of complete instructions here. http://41eq.qr.ai or • QR code: Link Valid until April 1, 2014 Also Posted on Tomshelppages.weebly.com