Download
1 / 17
170 likes | 287 Views
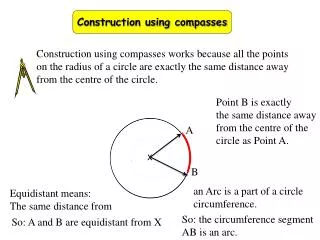
Navigation Part II Compasses. http://www.su.nottingham.ac.uk/~dofe and click downloads. Understanding Bearings. Bearings come in two main formats a) 5°55’43’’ and b) 045. Is the proper way to write a bearing and can be very accurate.

E N D
Navigation Part II Compasses http://www.su.nottingham.ac.uk/~dofe and click downloads
Understanding Bearings • Bearings come in two main formats a) 5°55’43’’ and b) 045. • Is the proper way to write a bearing and can be very accurate. • Is how you write a bearing normally, you always use three digits and omit the degree symbol. This is to prevent confusion with poor handwriting; 30° could look like 30° or 300. • So: • 40° 040 • 300° 300 • 0° 000 • 060° is incorrect Background Information - Not important A circle is divided into 360 degrees, each degree is split into 60 minutes and each minute is split into 60 seconds. So 5°55’43’’ is a bearing of 5 degrees, 55 minutes and 43 seconds.
How to Break a Compass Always useful for a bit of background knowledge. • Drop it/tread on it, etc • Spin it around on its cord • Put it near other magnets or iron based materials • Expose it to extremes of heat
Compass Variants Silva Expedition 4 ~£25 Silva Field 7 ~£10 Magnifying Lens Base plate Direction of Travel Arrow Compass Housing Orienting Arrow Compass Needle Red End North Romers Rulers Glow in the Dark Bits
Compass Basics Direction of Travel Arrow You follow the Direction of Travel Arrow. Orienting Arrow and Compass Needle Line the red end of the needle and the Orienting Arrow up and they both point north, you DO NOT follow them. Compass Housing Rotate this to sort out that .
North? Everyone agrees compasses point north, but where is north? True North Grid North Magnetic North True North: This is the point about which the Earth spins, ignore it, it’s useless. Grid North: This is where the vertical gridlines on an OS map point. Magnetic North: Your compass points this way, helpfully it is continuously moving.
Magnetic Variation In the map key you will find the following statement. “At the centre of the N and S sheets true north is 0°42’ east of grid north. Magnetic north is estimated at 3°00’ and 2°58’west of grid north respectively for Jul 2007. Annual change is approximately 11’ east.” The stuff in red is what’s important: The magnetic variation is ~3° and applies for July 2007. For the purposes of DofE you can ignore annual change as your compasses are only accurate to 2°, just make sure your map isn’t too old. MAG to GRID RID GRID to MAG ADD
Taking a Bearing Rotate the compass housing to align the orienting lines with the north-south grid lines on the map. Remove the compass from the map, rotate the compass so that the north end of the needle and the orienting arrow are aligned and then proceed following the direction of travel arrow. Align the compass along the required route on the map. Rotate the compass housing to compensate for magnetic variation.
Following a Bearing - Transits Following a bearing is much easier when using transit points. Transit points allow you to walk without looking at the compass and provide a quick visual check that you are still following your original bearing. When you take your bearing, look up, find one or preferably two objects that are in line with your bearing and head towards those. If your transit point is no longer in front of you, or your two objects are out of line, you know you have gone wrong and can quickly rectify it. There are two types of transit… Spot Transit Line Transit
Following a Bearing - Dog Legs Heading towards a transit also allows you to avoid obstacles such as bogs or crags without loosing your direction.
Following a Bearing - Back Bearings Taking a bearing back along the route you travelled is another useful way of confirming your direction of travel. You can use the start point if it is visible, if not, such as in fog, then you can take a bearing along the members of your party. The easiest way to take a back bearing is to rotate the compass so that the south end of the needle is in line with the orienting arrow.
Attack Points When trying to navigate using a compass to a poorly defined feature, or in low visibility an attack point is best used. Say you want to end up at a sheep fold for shelter in a storm, they quite often can be hard to find. Set your compass to a very clear feature a couple of hundred metres away from the target such as the edge of a wood, or a junction in a wall and take a bearing and head for that. Now that you’re closer an accurate bearing can be made to the target with little chance to wandering off course.
Aiming Off Aiming for a small target such as a gate or footbridge can be very hard over long distances. If you get to the river and you can’t see the bridge it could be to your left or right. If you deliberately aim a few degrees to one side of the target, when you get there and you can’t see it you know for definite which direction it is in.
Relocation If you are unsure of your position continuing blindly is foolish. A compass is easily used to pinpoint you exact location. Relocation Using a Linear Feature If you are following a footpath, stream or wall, take a bearing to a distinctive spot feature and draw a line on the map so that it crosses the feature you are following. Relocation Using Two Spot Features Use the compass to take a bearing on a spot feature, draw a line on the map as before. Take a second bearing on a different spot feature and draw a second line, where the two lines cross is your approximate location. The further apart the two features are, the more accurate the method becomes.
Pacing Pacing is a simple method for judging distance, when combined with a compass bearing and a bit of practice excellent accuracy can be attained. Simple measure 100m on the ground and walk up it counting how many paces it takes you, make sure you are using a normal stride, you can easily mess it up if you think too much. Repeat a few times and take the average. You will need to adjust the number of strides to suit the terrain; uphill, downhill, boggy, rocky etc; to suit the walk; hiking, backpacking, fast group, slow group, knackered etc; and to suit any other criteria you deem important. Being able to accurately adjust your paces will only come with practice. Pointlessly practicing across fields, even when you can see the stile, can quickly build up your experience.
References Hill Walking by Steve Long ISBN 0-9541511-0-0 The official handbook of the Mountain Leader and Walking Group Leader schemes. Mountaincraft and Leadership by Eric Langmuir ISBN 1850602956 Compiled and approved by Mountain Leader Training UK. www.ordnancesurvey.gov.uk Some sections are useful and some are aimed at small children.